


Veterans of the armed forces are often asked about hypothetical survival situations. Should society collapse, how would you survive?
There are many different answers to survival questions, but having a bag packed and ready if staying home isn’t an option is an excellent place to start. This bag is called a go-bag, or bug-out-bag. I’ll give an idea of what every go-bag should have at a minimum.
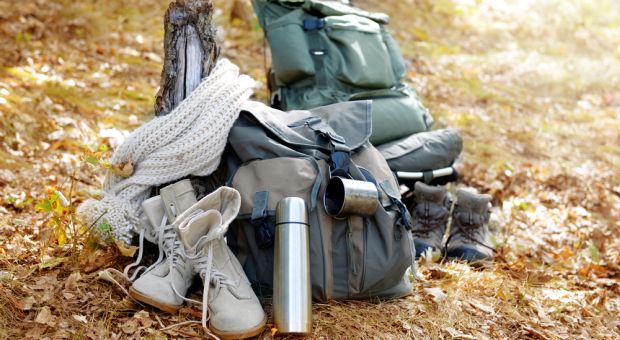
What is a Go-Bag?
A go-bag is a medium-sized backpack that always remains packed. If society collapses, you can grab it and your weapon and be on the go in less than 10 minutes. It must be designed for three to seven days of survival. If you’re going to be out there long-term, you should be looking to utilize nature for your needs.

It’s always good to have a few things on your person at all times. A pocket knife is always good to have, a lighter or firestarter kit, and a handgun. You can survive with just these items but it will be much more difficult.
The items below are precisely what the U.S. Army Infantry packs for the same amount of time in training and wartime scenarios. Not once, in my ten years in the Infantry, did I ever pack a tent. We used a poncho with some bungee cords and well-chosen trees.
I will detail how to build one of these to save yourself space for more essential items, like food, water, ammo, and socks.
What To Pack in Your Go-Bag?
So when packing a go-bag, you need to be focused on the idea that each item will protect you from something. A weapon and ammo will safeguard you from people wanting to take what’s yours and defend you against animals looking for an easy meal.
Cold weather clothes, sleeping bags, and fire kits will shield you from cold weather and cold nights. Many people I speak to never have any socks in their go-bag. Folks, keeping your feet healthy is paramount to survival. Lose a foot to a preventable disease, and you’re in deep trouble.
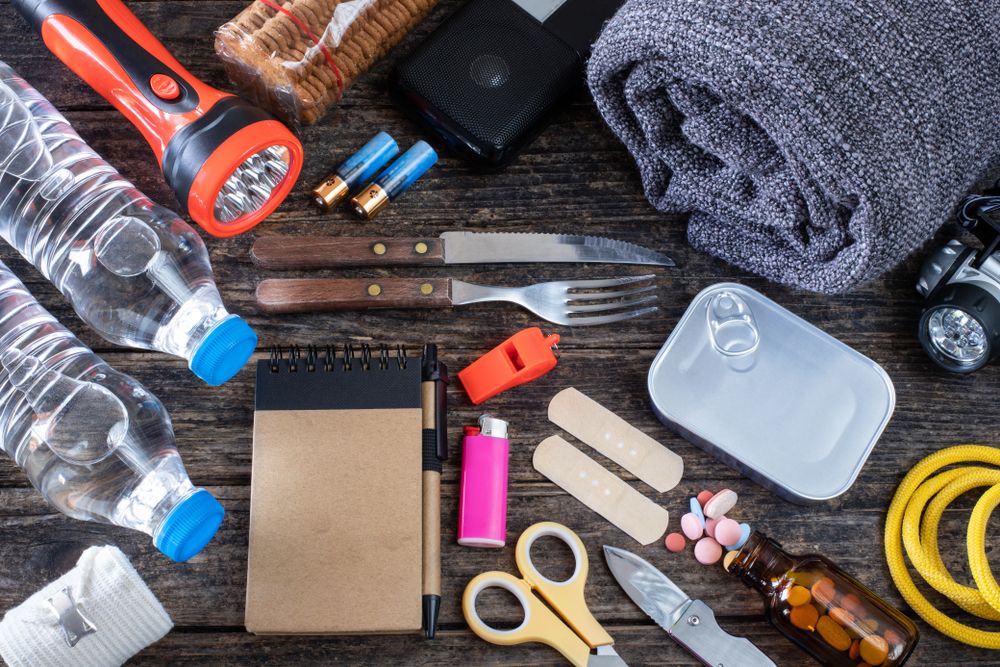
Here’s what you need.
- Medium-sized backpack
- Wet weather Bag
- 7-9 pairs of socks
- 3-4 T-shirts
- 2 pairs of pants. It should be loose-fitting and you need one for warm weather, one for colder weather.
- 2 long sleeve over shirts, preferably of different material and weight. One for cooler weather, one for warm.
- 1 pair of thermal underwear
- 1 extra pair of shoes
- 1 good cold weather waterproof jacket.
- A good sleep system (sleeping bag set) with a stuff sack and a Bivy cover
- 1-2 ponchos
- 50′ of parachute cord
- 5 bungee cords
- A compass
- Map of the area
- Matches and/or fire starting kit.
- A water storage container like a CamelBak
- Food. Pack protein-dense foods. Jerky is great for hiking. Meals Ready to Eat should be purchased.
- First Aid Kit
- A good fixed blade Knife. For field dressing animals.
- Entrenching Tool
- Ammo, if carrying a weapon. Ammo gets heavy quickly, so pack enough but not too much. Seven mags of 5.56 ammo should be more than sufficient, and 2-3 mags of pistol ammo if you’re carrying both. Preferably these are carried on Load-bearing equipment of some kind, but can be stored in the pack somewhere quick and easy to access.
- Hooks and fishing line
- Weapons cleaning kit if carrying a weapon
- Toilet paper (optional) – leaves work
- Underwear (optional)
This list is the minimum of what your go-bag should have. You can add to it if there’s still room, but focus on essentials. Pack your heavy items high in your backpack, so most of the weight rides high between your shoulders.
Having a decent walking stick is also good. Walking sticks come in handy when crossing high current streams or traversing steep inclines. Try to keep your pack under 40lbs. Fifty pounds should be your max. The heaviest items should be water, food, and ammo.
How to Build a Tent with a Poncho
A go-bag should be designed like one for a long-distance hiking trip. Weight is a factor measured in ounces, not pounds. After the weight, storage space in the pack is second. These design specifications are things I became too familiar with within the United States Army Infantry.
While serving with the 10th Mountain Division in Fort Drum, New York, I learned cold-weather survival through the annual extreme cold weather training we did each year. While with the 101st Airborne Division, I spent much of my time hiking, or “rucking” as we called it, from one point to another, then putting up base camps so we could conduct operations.
Whether it was six miles or thirty, cutting down on pounds while unlocking more space was an ongoing battle when creating packing lists. One approach that can create space and shed a few ounces is ditching the tent and replacing it with a poncho. I never packed a conventional tent in my entire military career.
Here’s what’s required:
- One poncho
- Five bungee cords or five lengths of parachute cord about five feet long.
First, survey the area and try to find the highest point. The next task is choosing the right spot amongst a set of young trees. The trees should be about eight feet apart and approximately an inch and a half to two inches in diameter at their base.
Don’t try to be too precise when scouting an area. I’ve never had to look longer than a few minutes to find a set of trees that will do nicely. If there’s some fallen debris, such as leaves and limbs, clear an area roughly the size of your poncho using your foot or a fallen branch until you get down to the dirt.
Once this is achieved, cover the cleared space with a thick bed of fresh dry leaves. That will give extra padding for comfort and insulation.
If you know it will be an especially cold night, I learned a trick during cold-weather training. If you have an entrenching tool, dig a suitable and deep hole for a fire pit before replacing the leaves. The fire pit should be deep enough so that the flames don’t break the top of the hole.
Setting your fire pit this way will help mask it from anyone passing by. In the edge of the pit, dig a tunnel with a slight rise all the way to the sleeping pad, but off to one side having a hole coming up into the pad. That will pump heat from the fire into the sleeping section.
With the pad set, take the poncho and pull the drawstring tight to close the hood. Wrap the drawstring around the hood flap to ensure it’s secure and leave a bit of excess hanging.
Lay the poncho flat over the pad with the corners lined up with the designated trees. Use a bungee or a length of parachute cord to attach to the poncho’s eyelet and secure the other end to the adjacent tree. Go to the opposite corner of the poncho and repeat the process; when securing it to the tree, pull the line taught till the poncho is stretched tight. Finish by doing the same to the remaining two corners.
Now comes setting the height of the attachments. The side closest to the fire will be the high side to catch any heat radiating from the fire. I like the high side to be about knee-high, and the low side all the way to the ground. This method keeps your campsite’s profile low and will make it harder to see by unwanted visitors.
The last step will be to secure the poncho’s hood, now the tent’s center, to a low hanging limb. Attach the last bungee cord or length of parachute cord to the excess drawstring you left hanging from before. Secure the other end to a low hanging limb.
Lastly, you should dig a trench around your poncho tent. Look at the ground your tent is covering and determine the lowest end.
Starting at the highest end, begin your trench at least 6 inches deep. Dig the trench deeper as you proceed around your tent, moving toward the lowest point. Your trench should be about 10 inches deep by this point. Now dig another one leading away from your camp about 6 feet, getting deeper as you go.
The dirt your dig out should be placed between the trench and your tent to produce an embankment. Should rain move in, this design will help keep your sleeping area relatively dry.
It also helps to determine how long you plan on staying in this spot. The general rule is to keep moving, only staying in one place for a night. But, if on the third-day supplies are getting low and you find an area with a good water source like a river, it might be good to stay two or three days in that spot to catch some fish and re-evaluate the situation. It’s recommended not to stay in one place for more than three days.
There it is, a tent that requires virtually zero space in a pack, and the hiker can wear it as protection in wet weather. After doing this a couple of times, a person will find it’s surprisingly quick and easy to accomplish. Also, as you build more of these, you’ll begin to create a design that works best for you.
Desert Applications
If you’re in a desert environment, a few adjustments will have to be made. There may not be very many trees to choose from. So, you’ll want to dig yourself deep enough into the ground to get to the cooler sand. The hole should be smaller in length and width than the poncho, then cover the hole with it.
Find some rocks about the size of your fist or bigger. Tie some parachute cord to each of the rocks, then fasten the other end of the parachute cord to the corner eyelet of the poncho. Repeat with all four corners. Next, pick a corner and pull the rock till there isn’t any slack in the cord. Dig a hole about 8 inches deep for the rock and bury it.
Now go to the opposite diagonal corner, grab the rock attached to the poncho, and pull it tight and bury the rock. Repeat this process with the remaining corners. Then using an entrenching tool, bury the edges of the poncho. Whichever side you designate as the front, dig an access tunnel into your humble abode.
Conclusion: Build on the basics
The problem with many who try to pack for an Armageddon scenario is the “what-if” scenario to death. They try to plan for every possible thing that might happen, and it distracts them from the basics.
When I was building my go-bag, my last thought was having to survive a battle with other humans. My main focus was on surviving everything I know Mother Nature is going to throw at me to test my worthiness. Prove yourself worthy, and she will provide a nice life, fail, and you’ll die.
As you place each item in your go-bag, ask yourself if it’s a need or a want. You should bring a couple of wants, like a book, to help with sanity, but 95 percent should be necessities.
Once you have your go-bag set with everything you think you need, take it out and try it. Go on a camping trip with only your go-bag. Set up a poncho tent. That will reveal the items you don’t need and the objects you don’t have.


I find this list to be unrealistic for the average person. Too heavy, over-packed.
It’s a list for longer term travel on foot but if people dont know how to survive “Bushcraft” style, they need to stay closer to the outskirts of town or just inside of national forests. And in such case, the list would include some unnecessary items and not include other necessary items.
There are really only two scenarios on foot.
Short-term survival outside of city limits until civil unrest ends or longer term survival farther away.
When your food runs out deep in the woods, mountains or desert, you need to live off the land and animals. If you don’t know how, then the six pairs of Sox don’t keep you fed.
When it comes to temporary bugging out, short term just outside of Suburban areas, stick to basics and keep your pack weight 30 pounds or less. Stick to the basics.
Fire starting
Lighter, waterproof matches
Steel canteen
Steel cook pot
Backpack stove
Stove fuel
Water filtering
Emergency blanket
Rain poncho
Rain jacket, pants
Extra wool socks, 1 pr.
1 extra non cotton shirt
1 extra pair non cotton pants
Thermal underwear
Extra underwear
Belt
Wool hat, fishing hat
Sunglasses
Scarf or bandana
Fleece jacket
Wool shirt
Parka
Full tang survival knife
Small pocket knife
Small hatchet
50-100 ft paracord or sargent knots line
Tarp
First aid kit
Trauma kit
Emergency food bars
Energy bars
Sardines, kippered snacks
Steel water bottle
Leather hiking boots.
Medicine
Leather man
Flashlight
Solar pocket charger
Cell phone
Rechargeable batteries and charger w/usb cord
I add a telescope, monocular or set of binoculars to the list, always handy to see trouble before trouble sees you. A decent 10x monocular will set you back $50 or so, and weighs a few ounces.
As far as food goes, I prefer fruitcake or peanut butter. Non-perishable, no cooking, high in nutrition and cheap (fruitcakes often are ‘donated’ to me by family that hate them).
The heavier the bag, the less the Mobility. It may seem not too heavy, and a few hours/days later…