


With the economy tanking and so many bad things happening all around us (the latest one being that pretty tense situation in Ukraine), a lot of people are starting to wonder if it’s time to take steps to protect themselves and their families. Should you be preparing for that “doomsday scenario” preached about by lots of survival gurus? It certainly can’t hurt.
I must admit that reading the daily news, sometimes it feels just like it was in the fifties when we were engaged in a cold war (about to turn hot and nuclear) with the Russians and people were digging fallout shelters and hoarding supplies like there was no tomorrow.
Fortunately, the day of reckoning never came, but I bet that many of those fallout shelters are still in place, waiting for their moment of fame and glory.
Obviously, the worst case scenario would be an “all bets are off” nuclear war with Putin’s Russia, but there are other (and more plausible) SHTF scenarios that we should be worried about.
A terrorist attack or a natural/man-made disaster are both scenarios that we may realistically have to be worried about. I’m an optimist but I always take into account the worst case scenario; I’m that kind of “hoping for the best while prepping for the worst” guy.
This preamble is aimed at convincing you about the utility, if not necessity, of digging an underground shelter, an increasingly popular DIY project in the prepping community.
If you’ve wrapped your mind around this concept, you must know that a DIY project like this may be the ultimate idea when it comes to providing security for you and your family, assuming you have the space and the means to do it.
What you need to know about digging an underground shelter is that, even if it may sound complicated and expensive, it really isn’t. As a matter of fact, it’s quite the opposite. I’m not talking about a huge investment or endless back-breaking days of shoveling and moving piles of rubble!
What You Need for the Project
A decent underground shelter can easily be built at a reasonable price, especially if you’re ready to invest some elbow grease into the process.
The basic construction materials are cheap (even free of charge, depending on what you choose to use for the project) and the blue-print for a DIY underground shelter is pretty straight forward.
The good news is that you can build yourself a cheap underground shelter almost anywhere, because these types of structures aren’t usually subject to any building codes whatsoever. The only thing to keep in mind is that the structure must be relatively small, usually less than 200 square feet, but the regulations depend on your actual location so you need to check that out with your local authorities just to be sure.
When it comes to budget prepping, one of the cheapest ways to build underground structures is with earth bags. You can build for as low as $10/square foot, especially if you’re using found/recycled materials; these will significantly drop the price of construction. Earth bags are usually big polypropylene sacks filled with dirt and used like bricks, stacked together and tamped solidly.
Even if it does sound weird, keep in mind that constructions using earth bags were used for hundreds of years and are incredibly strong. They’re perfectly able to withstand disasters like earthquakes, hurricanes and tornados. They even pass California’s strict earthquake testing laws – how about that! They’re also bulletproof! I mean, they’re perfect!
Another cool benefit of building stuff using earth bags is that if properly insulated, the structures will keep you warm during the winter and cool in the summer.
The Method
There are basically three ways of building this type of shelter: fully underground, earth bermed (partially underground) or fully earth-bermed. Keep in mind that the lower you dig, the more space you’ll have and also the more protection from blasts, and radiation.
But before proceeding with building an underground shelter, you must determine exactly what type of soil conditions you’ll be confronted with. If the soil is soft and shifty, you must build your shelter above ground and cover it with earth afterwards (the fully earth-bermed type).
A fully-underground shelter is the hardest to build, because it requires the most work (excavation is pretty hard to do yourself if you don’t have machinery) and can only be dug in dry or well-draining soils. So if you opt to go underground, you must go for a concrete reinforced type of structure with supportive ground masonry of some sort, but this will considerably increase the costs and it requires advanced construction skills.
If you’re on a really tight budget, and the soil fits the idea, you should go for a partially underground shelter. You must dig down a few feet, build the actual structure using earth bags (as seen in the video bellow) and then cover it with earth.
Video first seen on Casey Youngblood
This is the easiest/cheapest way to DIY an underground shelter and it will save you lots of money in excavation costs, not to mention that you can build this kind of shelter absolutely anywhere, in any type of soil. Also, the earth that you dug out in the first place can be used for covering the shelter afterwards, again saving money in the process (for the additional fill in materials required).
A fully earth-bermed shelter is suitable for clay-rich, rocky soils where flooding is an issue and it involves building the actual shelter at the surface and covering it with earth on top afterwards.
The bags most commonly used in these types of constructions are 18×30 inches in size, as they offer excellent stability and when filled with dirt, they will not break your back! The best soil to use for filling the bags contains 30% clay and 70% sand and it should be slightly moistened before being shoveled inside the bags.
One thing to keep in mind about earth bag building is that you don’t need mad skills or complicated tools or even training. A relatively basic earth bag structure can be easily built with common tools like a level, a hammer and a shovel. Well, plus the work, which can be exhausting, hence it would be a good idea to conjure your friends and family for this task.
Video first seen on Ka Sundance
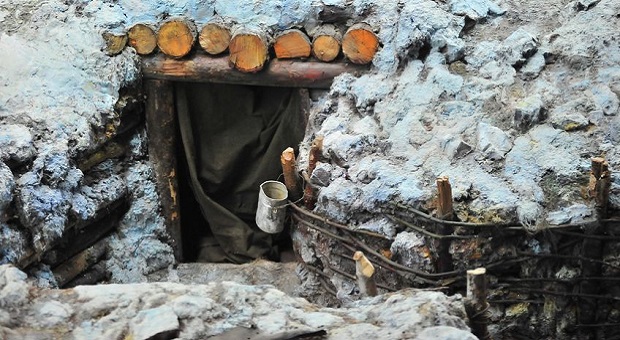
Aside from earth bags, you can build an underground shelter using poles which is a variation of the partially underground type of structure. The idea behind this project is to dig a trench in the ground that’s large and deep enough to suit your needs, and to use logs or telephone poles for covering it, as a roof of some sort.
You will finish the shelter by adding the dug earth on the top of the structure; that will work as an insulating material and also as camouflage. This is a very decent type of underground shelter, again, very easy to build in terms of planning and materials but labor intensive, especially the digging part.
Video first seen on Southern Prepper1
After you’ve finished digging the trench, you must put the poles or logs on the top and keep in mind that the poles must be cut wider than the trench; at least one foot wider to keep them from falling through.
The cracks between the logs must be filled using leaves or cloth and after you’ve done that, you must place the soil that you’ve already dug on top of the “roof” made of poles or logs until the layer is at least 18 inches high. The higher the earth layer, the more protection and insulation you’ll have.
One extremely important thing to remember when building an underground shelter: regardless of the method or type, always build it with two different exits. In case of a fire or who knows what, you don’t want to be trapped inside now, do you?
Video first seen on Camp Liberty 1989
When the construction job is done, don’t forget the supplies and, most importantly, OPSEC!
If you have any suggestions or comments, feel free to share your thoughts in the comment section below.

This article has been written by Chris Black for Survivopedia.


I have been putting off building a small under-ground shelter for a while now. Not because of time, but money. I like the Ideal of the earth-bag shelter, but I do not believe I would trust it with my families lives in an F4-5 tornado. I live in N.W. Arkansas and the tornados are getting more frequent (as with many places).
Suggestions welcomed.
EVERYONE who lives in “Tornado Alley” is “concerned” about the safety of their family. Don’t take this wrong – cause you’re in the majority – 80% of the people living in cities in “tornado Alley” DO NOT HAVE proper shelters. When a tornado hits a city (google Joplin, Missouri 2011) The people who survived it’s path of destruction HAD shelters. Do whatever it takes NOW to install a shelter.
You live in SOME county. Go to your county building department. They have approved plans for EVERY budget. The minimum requirements: at or below grade and approved metal doors. Hope this helps.
seams to me it would almost be mandatory to have a shelter, (IE; concrete ? like septic tanks are made, next to or near any home in tornado alley..
keeb.
I am from Mississippi now living in Brunswick, Ga! If i am not mistaken, the soil in Arkansas is like our’s in Mississippi, a lot of red clay!
Actually, that is the perfect soil to build a shelter in, and, i believe, would withstand most any tornado; especially if it is built, at least, partially underground! Of course, totally underground would be the best; then have a small, above ground, entrance, and exit!
You can rent earth digging machinery most anywhere at a reasonable price!
My intent, is to find a “shipping container” and bury it on my land in Mississippi! It actually isn’t that costly as you don’t need reinforcement materials!
The rest is up to you!
Best Regards,
Ross Allen
Shipping containers are NOT meant to be buried. If you decide to bury one, the sides will collapse inwards. They are meant to hold weight on the corners, not the sides.
Not if they are fortified!
A little steel reinforcement goes a long way.
What about water leakage.?I had a bermed house with only the roof exposed and despite waterproofing and French drains, it still leaked on a regular basis. Finally only some extensive drainage work got it dry. I can’t imagine those earth sacks not letting water through at some point.
Where do you obtain the earth bags and where would you get the combination dirt to fill them?
You should be able to find them at Lowe’s, Home Depot, etc.! Essentially they are a nylon type bag!
As well, you could contact your Emergency Management Agency!
Hope this helps!
Ross Allen
http://www.oism.org/nwss/s73p904.htm
The link I am going to give shows how to build an extremely strong, very secure underground shelter even for only $100. Cost about $2,000 after all the concrete, steel beams, steel doors etc. were added. But this link is to a very long very info, pic and even video filled thread that tells possibly everything there is to know about underground structures: http://www.survivalistboards.com/showthread.php?t=107463
Check out FM 5-34 The Army Engineer Field Data Book. There are many different type of bunker designs in there as well as a bunch of other useful information such as various methods of perimeter protection.
Oh man!!!!! My body aches all over just from watching the earth bag video.
Southern Prepper1 is the only video that actually adheres to the title of this article.
Plus I’ve watched most of his videos and have actually incorporated some of his suggestions into my plans.
In my younger days I actually did build and underground bunker. Mainly because of the terrain of the place I lived in. The backyard went up at a 45 degree angle. It seemed so simple to just dig in horizontal. It was all fun til the roof caved in. (Why is the correct terminology “caved in”? LOL) Back then we called it a “root cellar”.
If you own your property you should have a root cellar if only to keep the wine cool.
Whatever you decide to do be sure to look into moisture control and protection from water/flooding.
If you live in winter states where the frost level (e.g., frozen ground) reaches several feet, you can control moisture in two ways. One is to create swales to altar the flow of rain or snow melt away from your shelter. This means the top of your shelter would be somewhat higher than the surrounding ground (but you don’t need a mound [and in plumbing drains the drop is about 1/4 inch per foot…all I am saying here is that this works for plumbing to drain water and sewage in pipes. Adequate ground surface drainage is often considered to be a 1 foot drop over 6-10 feet of distance from a foundation ]. The second thing you can do is create what are called “ground gutters” (Yes, they work similar to roof gutters). You dig up the ground around your shelter, maybe a foot deep and lay down plastic (6 mil or higher) then bury it under the dirt you dug up [hopefully there won’t be a bunch of tree or shrub roots in the area you pick for your shelter, because roots can easily break through plastic]. Moisture will sink in the soil, hit your plastic and move along the swale slopes you have created.
Another thing you can do is bury closed-cell rigid foam insulation boards around your bunker, and 4-6 feet out from your bunker. This will reduce the depth of ground freeze (frost level), which will keep the soil around your bunker warmer. This is recommended for thin concrete slabs (e.g., old detached garages) subject to frost heave, when the ground expands and contracts due to freezing and thawing. A home I bought in South WI had buried plastic around the home. After 5 years of no water in my basement I found ground plastic while gardening around my house. I pulled it out, not understanding what it was. Then after a big rain I had a wet basement, so I re-buried plastic (1 foot deep and sloped outward) all around my house (about a 2 hr job). Now, no more wet basements! The housing industry approves the use of “ground gutters” (buried plastic) because the area (about 3 foot) from the foundation is back-filled with lots of large stones, concrete, etc. from original construction. Even better than plastic (in winter states) would be 4 foot long closed-cell rigid foam insulation dug 1′ underground and laid sloping away from the house. It would also force rain/snow melt away from the foundation, and would provide an insulation effect to the ground reducing the lateral (e.g., horizontal) pressures of freezing/thawing ground against the center of basement walls (wet frozen ground can push with 1,000s of pounds of force against basement walls, weakest at the center of the wall [and imagine what it could do to the unreinforced walls of a dug-out dirt bunker]). In basements freeze/thaw causes basement wall cracks and the bowing of walls indoors, when extreme. The plastic is cheap, maybe $12 for your whole house, and much less for a bunker. The rigid foam boards are more expensive to bury; but for bunkers the ground will be warmer at depths, and you get moisture control. Nobody wants to spend any time in a bunker that is leaking in moisture and that is terribly cold in states where the frost level can go 3-6 feet in depth; and any moisture leaking into a bunker risks a wall collapse, which kills construction workers to this day, such as when a 5′ trench wall in dirt collapses in such a way that your head is in air, but pressures against your lungs are depressed so you can’t breath. And BTW, in terrible winter cold (long term -20F), when there is little snow cover (to insulate the ground), frost levels in areas with an average 31 inches of depth can reach up to 5 and 6 feet in depth [and this happens regularly to cement porches, and deck supports]. This should make sense considering no ground (snow) insulation, shorter sunlight days, the angle of the sun is less direct. So, I am summarizing why you winter state porch shifts, and why your deck may be out of alignment, and the excrutiating cold you may feel in a wet and frozen dirt bunker in a winter state, when you failed to add swales and buried, rigid-foam insulation over and around to 6 feet out from your bunker. In warmer states, ground-gutter buried plastic with a slope away from your bunker will keep your bunker dry.
Just the perfect hiigh altitude rsal estate!
As and added thought. Safety as far as cave-ins and such. I remember reading about a fellow who had the wall of a pit where he was digging his shelter collapse and burry his granddaughter and her friend. Good information in your article.
You can get bags from any place that bags deer corn or any livestock feed, and may even find them for sale on the web. However, please understand these bags will not last forever; they rot, slowly but surely and it is a heck of a lot of work placing all those bags in place, and it can be downright dangerous as you go up the tier. When we dug hours we just dug the hole lowering treated six by sixes as we went so as to prevent any cave in on us. We also used six by sixes on top with three feet of dirt covering them. It’s working fine and is even a nice place to sleep winter or summer. The temp seems to stay constant between 68-72 year round. This is a basic bare bones bunker to protect us from a tornado and nuclear fallout if necessary. Total cost on mine was less than 1200 dollars. The six by sixes are around $35.00 each or at least they were last year. Good luck, and ‘git r dug’.
culvert pipe that goes under roads 6 ft or so Diameter in a hill side would work too. installed as the Highway Dept.does.. Plastic septic tanks- 3,000 + gallon size are safe too.
keeb.
The idea of burying a container is great , except the sides and top are NOT INTENDED TO TAKE THE WEIGHT and will crush !!! you must reinforce them a lot !!
turn container upside down . then the floor is now the roof itll handle more load. put container in ground maybe run light poles parrell to the sides all the way to the top. perforated sewer pipe for water drains everywhere and often.
I had a storm cellar dug and lined it with cement bleocks from a building somebody was tearing down, blocks for free if I picked em up. BUT I didn’t get any sealer on the inside OR the outside before the dirt went in around 3 1/2 sides of it.( Had BRIDGE TIMBERS for a roof,, timbers were 4 to 5 in thick and 9 foot long and about 10 to 12 in wide. dirt piled on top of those and shingles and tar paper kept all dry from top.) So what happened eventually was BLACK MOLD.. Too much moisture and no way to get rid of it. Just seaped thru the walls. The shelter is totally useless and dangerous. As money comes available will have a back hoe take it apart.
Spay the entire interior with bleach, then seal the inside of the blocks and spray a varnish all over them! If you want you can put an air purifier in it, just be sure it has ultraviolet function!
Before you decide that a shelter, really a bunker, is the way to go you need to ask yourself two questions: What is my criteria for entering the shelter? and What is my criteria for leaving the shelter? If you don’t think about this before hand you most likely will never enter it or enter too soon. Once in the shelter, not knowing when to come up (Is it safe?) could end up being a deadly mistake. Shelters are great for natural disasters (tornado) but for an economic disaster it is much less desirable. If you think me wrong then “shelter in place” in one room for more than three days and see what you think. Whether by yourself, with family or with neighbors this scenario has a tough time getting you to the finish line (surviving the crisis). It is a challenge but setting up a “secure” location that you can still go work (earn money) and determine what is going on around you is a worthwhile pursuit.
I think it was in the Field Manual – “Nuclear Survival” I saw a design for a shelter that used a very light wooden framework covered with a glorified nylon tarp. It was then buried with at least 18 inches of soil. It was considered the best shelter when it came to the overpressure generated by a thermonuclear burst. The idea was it would “flex”. You could built it with PVC or even bamboo. I’m sure this came out of the Nevada above ground tests in the 1950’s and 1960’s. If someone has these plans it would be interesting to see them reprinted here.
Tom, (I can’t find a way to stop the all caps)
The book is called “Nuclear War Survival Skills, by Cresson H Kearny, originally published by the Oak Ridge National Laboratory; and was updated in 1980, 1982. ISBN: 0-939002-02-7.
Kearny worked with survival equipment during WWII in jungle environments, for soldiers. After the war he worked in Civil Defense, then Oak Ridge. I got 3 of his books (all the same book) on Amazon last year for about $7 – $10 apiece. I wanted to get a copy for me and my kids.. He has all the plans as well as how to build manual (*non-electric) fans) to keep air flow in the trench type of underground shelter he recommends. The air flow is important to reduce heat in summer (as well as the humidity in the trench from evaporation of moisture in the soil. He really did suggest that people could barely tolerate the lack of air flow in these structures, if they did not have a way to move air through them in hot environments. His mechanical fan device is fascinating. Also his dig plans involved a 2 day build by two strong adults (such as in one’s backyard) in the event that it may take 2 days for radiation to blow into your area from a blast 500 miles away (or something like that).
love this,,I have some crapy land with some old ravines. ill divert the water flow,buy block ,Paint black or tar them for walls, rebar for stability, heavy Roof type sheet metal.tar it. cover with cedar limbs & leaves, nice hideout sort of.
Keebler.
First, like so many armchair experts : soil composition then water table beause you dont get a shelter but al swimming pool.
Don’t talk about elbow grease: its hard labour.
Chris, I live central Ia and am fully aware of the events of the next up coming months. I’m 58 mom of adult children and grandkids. I going forward with safe place and thinking moving higher ground with very little time left and limited resources. I’m going to prepare for myself and my family in hopes they join me. Needing advice on location Minnesota and Wisconsin plus shelter advise ASAP you understand why. With best regards, Sincerely Pam Constable
Email address : [email protected]
If you have a hillside you could dig into it and place one of those 12×12 metal buildings in it, cover the top with some 6×6 beams and 3/4″ plywood then put some dirt on top should make a good shelter.
I was thinking of renting a backhoe and dig a 12×24 hole about 8 foot deep and build a structure in there using 6×6 beams and 3/4″ plywood then put about 3 foot of dirt on top.
Before Y2k I buried a 1500 gallon water tank-Top access,modified the cap to also be opened from inside,if needed for a shelter, It’s all filled with “OLD” water, in my hillside, it’s meant for gravity flow water to my 1/2 bath. if we had lost power back then.well, it’s still holdng water thru many freezes, one was 14 below & never cracked. Im glad i did it & would love to do another one in case of a tornado,in southern Va,Had one just south of Appomattox last yr, millions in damage. one died. no one has a shelter,
keebler.