


With only two ingredients and a little time you can stockpile a survival food that’s been used for centuries. Let’s take a lesson out of the history books and learn from various soldiers, sailors, and explorers throughout time.
It’s time to look at hardtack.
Hardtack is a simple survival food. It’s really inexpensive to create, and lasts for years. In fact, there’s still some on display from the Civil War that’s still good.
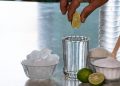
The most basic of recipes call for only two ingredients: all-purpose flour and water. Other recipes call for additional ingredients, but the basic recipe has stood the test of time. We’ll start with that one.
Hardtack provided nutrition for hard times throughout history. It’s a good source of carbohydrates. If you keep it and protein-rich pemmican in your bug out bag, you’ll have sustenance to keep you alive for a while.
It’s also a good addition to your supply of emergency food. You just have to ensure you keep it away from pests and moisture. If the bugs get it, you’ll find weevils living in your stored food. If the hardtack gets wet, it’s prone to mold.
Making Hardtack
 Hardtack is simple to prepare. Before you begin, turn your oven on to 350 degrees.
It won’t take long to mix your hardtack up and you want your oven ready when you are.
Now, get yourself a big bowl. Measure out two cups of all-purpose flour and dump in.
Next, slowly add a half-cup of water and stir.
Keep adding water, a tablespoon or two at a time.
Your goal is to achieve a thick dough that’s just slightly sticky. A thick playdough type consistency.
While many recipes tell you exactly how much water to add, it really varies quite a bit. Your humidity, the dryness of your flour, and the type of flour you’re using all play an important role.
A rough estimate is ½ the amount of flour. So for two cups of flour, you’d need about one cup of water.
If you accidentally add too much water and your dough is pasty, just add some more flour. Once it’s the right consistency, mix it for a couple of minutes. This will ensure your moisture is evenly distributed throughout the whole batch.
Now it’s time to roll out your dough. A rolling pin works best, but in a pinch you can just pat it out with your hands. You’ll want to roll the dough until it’s somewhere between ½ an inch and a ¼ of an inch thick. Any thicker, and it’ll be even harder to eat when it’s dried.
Once it’s thin enough, you can cut the dough. A pizza cutter works really well, but so does a sharp knife. If you want your hardtack to look uniform, you can pull out a ruler and cut it into 3X3 pieces. Or use a biscuit cutter and have round pieces. Otherwise, just cut it into rectangles that are roughly the same size.
Grab a chopstick or a clean nail, and dock each piece. Docking means you poke holes in it, but don’t go all the way through. You’ll want to poke about sixteen holes in each piece, with four rows of four. It’ll resemble a modern day saltine cracker.
Then flip over each piece and dock the other side. Docking your hardtack will keep it from puffing up in the oven. It’ll also help ensure the moisture gets out by allowing the steam to escape.
Place your docked hardtack pieces on a cookie sheet. You’ll want to bake them for 30 minutes. When the time is up, remove and flip over each piece.
Bake them for another 30 minutes before removing them from the oven. They should be fairly hard at this point.
You’ll want to set your hardtack pieces on a rack to continue drying. Let them sit out at room temperature for a couple of days. They’ll be hard as bricks when they’re fully dry.
Storing Hardtack
Proper storage is essential for optimal shelf-life. You can pack the hard tack into glass Mason jars, or metal tins. These will keep the moisture out better than regular Ziploc style bags.
You can also store them in vacuum-sealed bags. No matter how you keep them, you want to prevent moisture and bugs from getting in.
Video first seen on SNO Multimedia.
Eating Hardtack
Now that you know how to make and store hardtack, let’s talk about storage. While hardtack will help your belly feel full in an emergency situation, it can be difficult to eat. That’s because it’s so hard.
Back in the day, this survival food was commonly called “tooth-breakers.” Make sure you don’t bite into it directly with your front teeth. They can break.
Of course if you’re a parent to a baby, you’ll find a benefit from the hardness. A chunk of hardtack makes a good teething biscuit. Just be sure to provide supervision with it to ensure a small chunk doesn’t break off and become a choking hazard.
If you don’t desire to simply gnaw on a chunk of hardtack all day, there are other ways to eat it. Here are a few common methods:
Soaking
As hardtack sits in moisture, it absorbs it and becomes softer. You can soak your piece in just about anything. Coffee, soup, and water have all been used historically.
Another benefit of soaking the hardtack is bug removal. During early wars, proper storage wasn’t always possible. Weevils became prevalent in this grain-based ration.
Once placed in liquid, the bugs began to float to the top. Diners could easily scoop them off the top and discard them before eating.
Frying
After cooking up salt pork, soaked hardtack can be fried in the grease. This adds flavor and fat, helping to make it more palatable.
As a Thickener
You can crumble your hardtack with a pestle and mortar. If you don’t have one accessible, you can take a lesson from soldiers and hit it with the barrel of your rifle until it breaks. Once it’s powdery, you can stir it into a stew. It’ll act as a thickener and add some caloric bulk to your recipe.
As a Holder for Spreads
Many people have used hardtack as a bread of sorts. When you add a moisture-rich spread like soft cheese, honey, or peanut butter and jelly, the moisture will slowly soften your hardtack.
Using Hardtack Creatively
You don’t have to be limited to the above recipes when eating hardtack. With a little creativity, you can turn these hard squares of dried flour into many dishes. Here are two more ideas for you to try.
Slather it with pizza sauce and toppings and make yourself a mini-pizza. Just be sure to cut it before consuming so you don’t break a tooth.
Soak your hardtack overnight in buttermilk. In the morning, fry it up in butter or bacon grease. Serve with maple syrup and call it a pancake.
Recipe Variations
Since basic hardtack tastes a lot like flour, many variations of the original recipe have crept up. While the addition of salt, seasoning, oil, or protein powder may improve the taste, they do have an impact on long-term storage ability.
If you decide to make a batch of one of these recipes, inspect your hardtack closely before consuming. Make sure it’s still hard and hasn’t started to go soft. Be on the lookout for any mold growth. You might even decide to make a new batch every year or so, just to ensure your supply is good when you need it.
Adding Salt
To your original recipe, just add 2 teaspoons of salt. Then, continue as directed above. It’ll help improve the flavor.
Adding Seasoning
Hardtack is pretty bland. You can add some other seasonings like garlic or onion powder to the original recipe to enhance the flavor. Feel free to add your favorite seasoning blends as well.
You can even experiment a bit within a single batch. Before you roll it out, break your dough into smaller chunks. Add different seasonings to each, and then continue with the recipe. This will allow you to take notes on what you like or don’t like before committing to making an entire batch.
Adding Fats
Several recipes online call for the addition of about a tablespoon of shortening, butter, or oil. While the added fat would help improve the texture, it is prone to becoming rancid. This addition is better served for short-term storage.
Substituting the Flour
All-purpose flour is not the most nutritious flour out there. But, it stores well since most of the oil from the bran has been removed. By simply experimenting with the flour you use, you can change up your hardtack.
Give whole-wheat flour a try to increase the nutrients. Try substituting a cup of flour for a cup of cornmeal. Or a cup of protein powder to add protein to your emergency ration.
Hardtack is an excellent DIY addition to your survival food stores. When properly stored, it can be added to this list of foods that’ll last longer than you do!
Have you made hardtack? With the endless variations, I know I didn’t cover them all. What are your favorite additions or ways to use your hardtack?
Leave a comment below and share your tips with all the readers. And click on the banner below to get more tips on how our ancestors survived!

This article has been written by Lisa Tanner for Survivopedia.


Thanks for this simple, but obviously great food idea.
Buddy
I made hardtack out of Ezekiel bread. I cut it into 1/2 to 3/4 inch squares and made sure it was totally hard and dry in an oven temp of 300 degrees F. It is still good after several years. I stored it in big jars.
How long would an ignorant person probably want to leave this cut up bread in the oven for? What I mean is, I know this guy and….
This is something to Get Behind: NOTHING Should Go Before Congress except on its own! Nothing should Be ABLE to Be ATTACHED to Another Bill ( Each ITEM on it’s Own ) Anyone or Group doing so to Push Something Through This Way Will GO TO JAIL FOR 3 YEARS WITH NO EXCEPTIONS ) And I do not mean some Playhouse Prison!
What does this have to do with hardtack
I need wheat free products. Anyone have any experience with wheat free flour mixes, like Bob’s Red Mill gluten free all purpose flour?
This is one of the most informative and well-written survival articles I’ve read in a long time. Keep up the good work Lisa!
Good article, and thanks for your insight. I have two questions. First, if you add ingredients like butter or shortening, how significantly do they impact the shelf life of hardtack? In other words, is the shelf life still measured in years if kept in sealed containers, or is it reduced to a shorter length of time?
Second, do these ingredients reduce the “hardness” to any degree?
It depends on the type of fat you add. If the fat has a short shelf life before going rancid, it will significantly affect the shelf life. A fat with a longer shelf life will impact the shelf life less. It used to be that certain types of fat were used for their preserving properties by pouring them, liquid, on top of things like precooked meat, and this worked by excluding air from the item being preserved. Maybe something like ghee would work for hardtack.
Second, I can attest as a person who makes crackers often, the only difference being the addition of fat and seasonings, to this recipe: Yes. It also helps if you handle the dough as little as possible once fluid/water is added, Including the rolling. Something about developing the gluten/wheat protein makes flour more tough. This is why when making any pastry, one is suggested to cut in the grease to the flour, before adding any fluids.
Dear Lisa,
My comments are not always useful, but sometimes they are interesting. Back in 1846, a group of pioneers headed by wagon train for California and made a bad decision on their chosen route over the Sierras. The result was the “Donner Party Tragedy” that left them trapped in the mountains during a harsh winter. Some starved to death and some ate their friends and neighbors. A highway goes there now and there is a marker at Donner Pass.
But, meanwhile, down in Texas, a professional heel-fly, newspaper editor and inventor named Gail Borden had an idea. He wanted to invent a food that would keep forever, be nutritious and become a staple for folks during hard times He built a combination slaughter house and bakery where he extracted the “essence” of beef and baked it into a “marvelous meat biscuit”, pretty much like one of today’s dog treats. Despite support from some of the shakers and movers here, it just didn’t catch on. So,he decided to try it on the world market and took it to a grand exposition in London where it won a grand prize. But, no one wanted it. It must have been pretty vile because arctic explorers, who had been cozened into taking a supply, reported that starving sled dogs wouldn’t touch it.
Somewhat depressed by all of this, Borden took passage to sail back to Texas, and experienced another disappointment. He liked fresh cream in his coffee. Many passenger ships at the time carried one or more cows for that purpose. But, in rough weather, cows become seasick and the result was unfortunate. Since he couldn’t sell meat biscuits, Borden turned his mind to the new problem, and Borden’s Condensed Milk was born. Borden moved to New York and “canned cow” became a staple that is stil on the shelves today.
Good job Lisa.
Two comments:
1. Instructions for off-grid preparation without an oven to set to 359 deg F would be useful.
2. Maybe you meant rifle butt as opposed to barrel or it could be that since most military barrels from that era were much heavier than their modern counterparts, it had little noticeable effect on accuracy which would have been true before the mini ball, but I wouldn’t recommend using many modern rifles barrel as a hammer outside of a muzzle thump in CQB. The hammer poll of a tomahawk or hatchet, a couple of rocks or grinding stone might be a better solution.
Thanks again and welcome : )
Since hardtack does not require baking/browning so much as drying out, any heat source that can produce thise results should, I imagine, work fine. Maybe on the side of a campfire spread on some flat rocks, in the event you’re out camping and have no stove but do have a five pound sack of flour, a bit of salt, and some extra potable water in your backpack.
From experience, breaking hardtack with rocks results in gritty particles of rock getting in with the broken up crackers, which is a gross tooth sensation. Though… the older hardtack gets, the easier it seems to break apart into smaller pieces. Not that the smaller pieces are much less hard to eat.
I heard about hardtack before, read about it, even considered buying some; now I think I’ll make my own – change that, I KNOW I will.
Such a great article, so well-written, so user-friendly. As I was reading along a question would come to mind and the answer to that very question would be ready and waiting for me in the next sentence or the next paragraph.
Lisa Tanner, you are a brilliant, meticulous, smooth and much appreciated writer.
I’m gonna research you (!).
(I came to this site via IWB and reckon I’ll stick around for a while…. Damn fine article.)
I’ve made it many times, and found that the best use is as a big and thick cracker to put on the bottom of a bowl of soup. Make the hardtack no more than 3/8 inch thick – 1/4 inch is ideal for this use. Unlike saltines that dissolve into the soup, the hardtack will just soften but keep some crunch.
The idea of adding protein powder to create a more complete food is very intetesting. I have also pondered adding beef tallow, which is known to have an excellent shelf life. However, your article is a little vague concerning the shelf life of fortified hard tack. Any chance you could provide more specific information about my quandry?
Hello,
The shelf life of fortified hard tack is up to 4 to 5 years.
Sutvivopedia team 🙂