


Do you need a quick bread that’s easy to cook over a campfire? Your very own instant baking mix of sorts that just needs water added?
Then you need some bannock!
Like hardtack, bannock has a long history. It’s believed to have been brought to North America by Scottish explorers. In Scotland, bannock was cooked over an open fire on a bannock stone.
Once in North America, the love of bannock spread quickly. Indigenous tribes from coast to coast adapted the method and created their own versions of this survival food.
Today, many outdoor enthusiasts rely on bannock to accompany their meals. It’s easy to prepare before heading out, and simple to cook over a campfire. This portability makes bannock a wonderful addition to your survival stores.
The ingredients of bannock are very similar to those of hardtack. Like hardtack, you can make a simple bannock out of just flour and water. However, to get the best tasting bannock, you’ll want to add a few additional ingredients.
A Variety of Bannock Recipes
There are bannock recipes with just two ingredients, and others with a lot more. At the heart of every bannock batch is flour.
The Scotts traditionally used oat flour. As the recipe grew in popularity in North America, corn meal and wheat flour were used. Obliviously, bannock works with a variety of flours. So use what your body can tolerate, and what you can easily store.
Besides water and flour, you can add some additional items to improve the taste of your bannock. Here are a few common additions, and how much to use of each.
To keep your bannock light instead of dense, add baking powder to your flour. A teaspoon for every cup of flour is an appropriate amount. Adding salt improves the flavor of the final product. Use ½ teaspoon of salt for every cup of flour.
Cutting a tablespoon of fat for every cup of flour into the dry ingredients helps improve the taste and texture of your bannock. If you use a shelf-stable fat like lard or shortening, you’ll still be able to store your dry mix for several months at a time.
You can adapt the recipe to use what you have on hand, which makes this bread an ideal survival food. Here’s how I tweaked the recipe. It created a flavorful bread when baked, pan-fried, or cooked over an open fire.
For each batch, you’ll need:
- 1 cup of white wheat flour
- 1 tsp. baking powder
- ¼ tsp. salt
- 1 TSB. unrefined coconut oil
You’ll also need some water when you’re ready to cook the bannock.
Begin by preparing the dry ingredients. I mixed them in a small bowl, and used a fork to incorporate the oil. My end mixture looked a lot like commercial Bisquick or other baking mixes.
Once you’ve prepared your bannock mix, you can store each batch in a sealable bag. Throw a couple of these bags into your bug out bag, along with a bottle of water, so you can always be ready to make bread.
Here’s a picture of a bag of bannock mix I made, along with a bottle of water and a green stick. All I need is a fire and I can have freshly made bread! Since each batch doesn’t take much water, that single water bottle is enough to make a couple of bags.

How to Cook Bannock
The ingredients aren’t the only thing you can vary when making bannock. This bread can be cooked in several ways.
No matter how you cook it, you’ll need to add water to your mix. Just pour in a little water into the bag, and start gently squeezing the bag. You’ll distribute the water throughout the mix.
The dough will begin to form a soft ball. If your mix is too dry, add a tiny bit more water. It’s much better to add the water slowly than to add too much. Once your dough is a soft sticky ball, stop working it. You’ll make the bannock tough if you handle it too much.
Here’s a picture of what my dough looked like when it was ready to go.

There’s many ways to cook your bannock. Here are three popular methods:
Pan Fry
Heat a little bit of oil in a cast iron skillet. Once water droplets dance, it’s time to add your bannock. You can just squeeze it directly from the bag to the pan. Or you can break it into smaller pieces to speed up the cooking. That’s what I did.
Let it cook a couple of minutes, shaking the pan gently. Once the bannock comes loose from the bottom of your pan, it’s time to flip.
You can either grab a spatula like I did, or grab the frying pan tightly and toss your bannock in the air. It’ll flip over and you can catch it. Then cook the other side.
Bake in an Oven
In a survival situation, you probably won’t have a traditional oven. But if you have a solar oven set up, or are just making bannock for supper, you can bake it.
Before putting it in the oven, dump your prepared bag out onto a greased pan. Then flatten it out a bit with your hands.
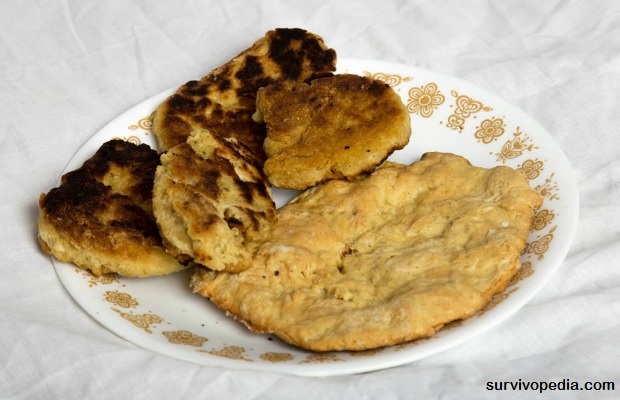
I baked my bannock at 400 degrees for about 12 minutes. It came out nicely browned, and cooked all the way through. Here’s a picture showing pan fried bannock (the small ones) and baked bannock.
Over an Open Fire
If you’re in the wilderness, find yourself a green stick from a tree. You’ll want to strip the bark from the end you’ll cook the bannock on.
You’ll also need a fire. Similarly to roasting marshmallows, you’ll want a fire that has plenty of hot coals. That way the bannock cooks all the way without burning on the outside.
To prep your stick, hold the peeled end of the stick over the coals for a couple of minutes. This will heat the stick and help the dough to cook on the inside.
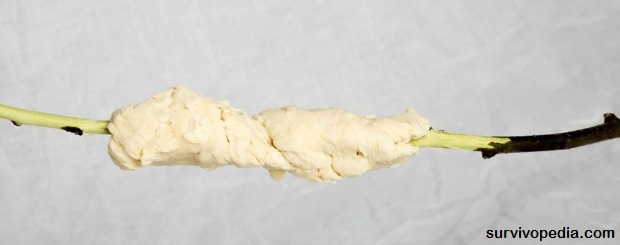
When you’re stick is hot, it’s time to wrap your dough around it. Just pretend the dough is playdough and make it into a long snake. Then, wrap the snake around the peeled portion of the stick. Remember it’s hot, so be careful! You want the dough to be thin on your stick so it can cook.
Here’s what my wrapped stick looked like. It doesn’t have to be perfect, just as long as it’s on tight enough not to fall off while over the fire.
It took me a couple of tries to get my bannock cooked correctly, and not burn it. Then I discovered it was very similar to roasting a marshmallow, and adjusted the distance from the coals accordingly.
It should take a couple minutes to cook. When I thought it was done, I pulled my bannock away from the fire and broke off a little piece to test the center. After the center was no longer doughy, it was ready to eat.
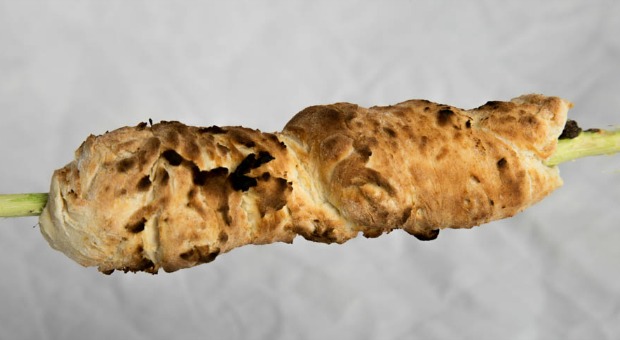
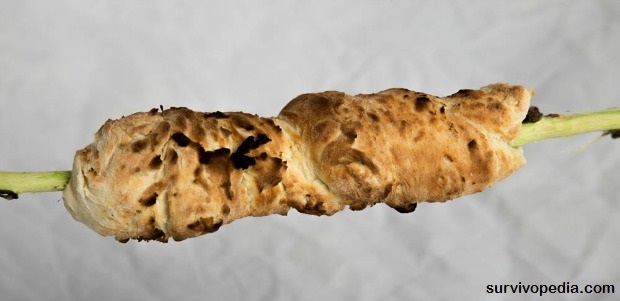
Here’s my finished fire roasted bannock on a stick. The kids thought it’d make a fun hot dog bun substitute the next time we have a cookout. I agree.
Add-In Ideas
We just tore this bannock into pieces to eat. But, you don’t have to eat your bannock plain. You can doctor up the final product with butter, jam, cheese, or some meat.
You can also stir many different ingredients into your dough to mix it up a bit. If you’d like a sweeter bannock, consider adding a teaspoon of sugar into your dry ingredient mix. Honey would also be a good sweetener, added at the same time as the water.
You can also add some shelf-stable ingredients to your dry mix that’ll add some texture and flavor to your bread. Here are some ideas to try. You can either use a single add-in, or make up your own favorite combination.
- Chopped, dried fruit
- Chopped nuts
- Spices (such as cinnamon or nutmeg)
- Seeds
- Mini chocolate chips
Storing Your Bannock
The shelf life of your bannock mix will depend on what ingredients you include, and how you store it. A basic mix with flour, baking powder, salt, and oil will last at least a couple of months when stored in a sealed plastic baggie. If you remove the oil, the mix would have a longer shelf-life.
Mixing up a batch of bannock mix takes just a couple of minutes. You won’t have a large time-commitment ensuring you always have a fresh batch on hand.
If you’re storing plastic baggies in your bug out bag, or even just for a camping trip, be sure that they aren’t going to get punctured. You might consider keeping the smaller bags inside a stronger, larger freezer bag to offer more protection.
Once your bannock is cooked, you can keep it for several days. That means you can cook up a big batch and use it to help give you strength if you’re on the move to another bug out location. You’ll notice the texture will change a bit as the bannock dries out, but it’ll still taste fine.
Want to learn how our Grandparents survived through the Great Depression? Click the banner below and download your own collection of real American survival wisdom!

This article has been written by Lisa Tanner for Survivopedia.


Very informative article! First off, I never knew the shelf life of coconut oil was so long! Just that fact alone made your article an A+. Thank You. Iv’e seen too many posts on this website dealing with politics. Thank you for not including this article among them. These types of articles are the reason(s) why I subscribed to this website. We all have different reasons I guess as to why we feel the “need” to be such educated by these sites, I believe deep down we all have “good” and want the same for our children and loved ones, that being; living in peace and having love and security. Anyway, I digress. Thank You for your informative article. Stephen Milata
One of my reasons for joining this website, is because I have a fascination for the way things were done before the industrial revolution. The cleverness of people’s doing of things before electricity and oil simply amazes me. It is my fond hope that these “ways” never be entirely lost. I mean imagine if the Egyptian Library at Alexandria had not been burned to the ground! The plethora of knowledge lost plunged us into the dark ages for a millenia! I hope that never happens again. Which is why I believe the knowledge of the “old ways” of doing things never gets lost. Articles like yours keeps such knowledge alive, and for that, I thank you!