


Is with all things survival-related, knowing how to extract clay from soil has multiple uses. The first thing that most people think about when they hear the word clay is pottery or cobs and making roof tiles, but clay has been used for centuries in other ways, including medicinally and for pigments.
Extracting clay from soil takes a bit of time but it’s possible just about anywhere.
There are, of course, regions that are rich in nearly pure clay, but other regions have soils that are mostly sand or rock. Still, there are ways to get clay from your soil.
A good sign that soil is rich in clay is that it gets slick when it’s wet and becomes sticky as it dries. You may also see the soil cracking as it dries after a rain. When clay is dry, it’s almost as hard as a rock. If the clay is close to pure, it will be sort of like Play Doh – you’ll be able to roll it into a coil if it’s dry (or wet) enough. Pure clay is the exception, not the rule though.
What is Clay?
Clay is a particular type of soft rock made up of minerals. It’s the leftover particles of rocks that have decomposed. Some clay stays where the original rock, such as feldspar, was. This is called primary clay.
Secondary clay has traveled from its original home and likely picked up other minerals and rocks such as quartz, iron, or limestone. Limestone is an absolute no-no in clay used for pottery because it will make your pot crack when you fire it.
There are two types of clay – earthenware and stoneware. The difference is that stoneware and earthenware vitrify at different temperatures, which means that the two have different uses. It’s critical that you know what type of clay you extract from your soil.
Earthenware has a firing temperature of 1300-2120 degrees F. This means that this is the temperature that it takes for the clay to “cure”, or harden. Bonfires heat to about 2120 degrees F, so earthenware can be fired in open bonfires. However, if you fire it beyond this point, it will melt and create a puddled mess in your kiln.
It’s also rare to find an earthenware-type clay that will vitrify enough so that it doesn’t leak. That doesn’t mean that it’s useless – it just means that you can’t use it for food purposes such as fermentation. It’s great for bricks, tiles, planters, and steamers. The vitrifying (firing) temperature is the temperature at which a piece reaches its maximum hardening and tightening. It’s comparative to glass, which is completely waterproof.
Stoneware clay, which is a much harder clay to find, vitrifies at temperatures of 2100-2372 degrees F. Stoneware is great for creating vessels such as vases and fermentation containers. It’s tough and will be much harder to break or chip than earthenware products.
I highly recommend firing your local clay before you decide what you’re going to use it for. It’s common for people to mix clays for either aesthetic or functional purposes.
Extracting Clay
Video first seen on buildnaturally.
Good places to find soil to extract clay are places like creek banks and beds, sea shores (yes, even though you think of that as mostly sand, there’s likely clay there), construction sites, excavations, and other places where the topsoil has been removed. This is because the top 8 inches or so of earth is made up of decomposing organic matter such as leaves and grass.
If you don’t have access to any of these, you’ll have to do a bit of digging of your own in order to extract clay from your particular soil. You can use a shovel or a set of posthole diggers – as long as you get deeper than 8 inches or so. You may want to do a sample first to see what your yield of clay per pound of soil is.
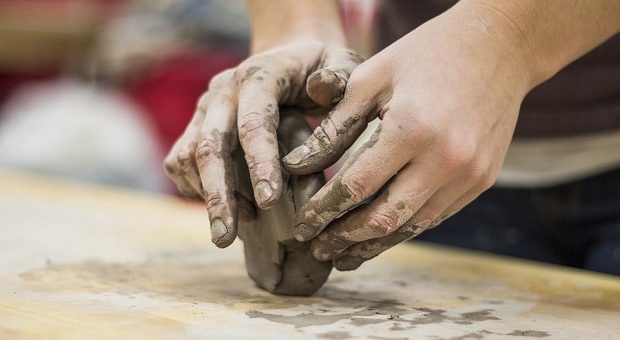
I’d recommend the posthole digger method – dip out the first scoop or two to get through the topsoil and set that aside. Collect the next couple of scoops in a bucket. Now, there are a couple of different ways that you can proceed from here: the water method or the smash and soak method. I personally prefer the water method because it’s easier and I live in an area that’s rich in sand instead of rock.
The Smash and Soak Method
This method is exactly what it sounds like – you dig the clay in the form of rocks, smash them up into dust, then soak them in water until they turn into slurry, which basically means liquid clay. This is a process that requires a couple of steps because you have to collect the clay, dry it, bust it up, and soak it. Then when it’s broken down into a clay, you have to screen it and soak it some more.
Simply soaking the clay won’t be as effective because it would take longer to absorb excess water than if you dried it first. This is a good method to use if you’re working with clays that are obviously plastic enough that you can work with it without straining out a ton of impurities.
You can usually pick up a sample of this clay from a creek bed (for example) and it will roll into a ball.
- Collect the clay
- Lay it out in a thin layer on a tarp or something and let it dry
- Smash it up and remove any foreign matter such as leaves or pinecones.
- Pound it with a rock or hammer (use a mask) into a pulverized clay and put it in a bucket. Add an equal amount of water to the bucket.
- Let it stand at least overnight to absorb the water.
- Screen the clay using a screened box with 1/4 inch screening to filter out the larger chunks and debris. Just pour the water/clay mixture through the screen into a bucket. You’ll probably have to smash it through with a flat tool such as a spatula.
- Let it settle for a couple of days, then pour off the extra water. Repeat this process until you have a smooth, mud-like product.
- Place it in a cloth such as cheesecloth or a pillowcase and hang it up until enough moisture drains and the clay is moldable. Alternatively, you can spread it out on a plaster slab until it dries to clay consistency. Fold it as it dries so that it dries evenly, then work it and store it as you store other clays.
Video first seen on Jerad Spencer.
The Water Method of Extracting Clay from Soil
This method is good for extracting clays out of just about any type of soil, but particularly if the soil is relatively free of debris and sandy or fine.
- Fill a container about 1/3 full of soil. I highly recommend starting with a small amount, 10 pounds or so, to see what the quality and firing temperature of your local clay is.
- Smash up the dirt and clay with your hands until it’s as fine as you can get it, removing as much debris (sticks, etc.) as you can during this process.
- Add enough water to fill the container.
- Stir the mixture and let it settle for several minutes. The working premise here is that clay is lighter than the heavier sediment such as sand, etc.
- You’ll start to see a color change where the clay and sediment separate. The “clay water” is what you want to keep.
- Pour off the clay water into a separate container until you start to see bottom sediment, then stop pouring.
- Repeat this process until all sediment is removed.
Now it’s time to let the clay settle. Let it sit undisturbed for at least several hours, or overnight so that the clay particles will settle to the bottom of the container. You’ll see an obvious delineation of the water and clay.
- Pour off the water, then let it sit for a few more hours and pour off the water again. Repeat until you can’t pour any more water off.
- Pour the remaining wet clay slurry through a pillowcase, bed sheet, or other fine cloth.
- Tie the top of the cloth together with twine and hang it from a tree limb or some other structure so that the water can drain from the clay.
- After 24 hours, check the dryness of your clay. If you can shape it into a ball, it’s ready to add to your clay collection. If it’s still a bit wet, let it dry for another 12-24 hours. When it’s moldable, it’s ready.
As I’ve suggested, do a test batch; first process it, then do a few small sample pieces and fire them at different temperatures, or cones, to determine what the vitrification temperature is. Then you’ll have a better idea of what type of clay you have and what you can do with it.
Now that you have a couple of methods of extracting clay from soil, give them a try. Remember that after you know what type of clay you’re working with (earthenware or stoneware), you’ll have a better idea of what your limits are. You can also add your local clay to purchased clay to add special appearance or specific effects.
If you’ve dug and processed your own clay, please share your experience with us in the comments section below. And click on the banner below to find out more secrets that helped our ancestors survive!

This article has been written by Theresa Crouse for Survivopedia.


There is always a “but”.
Good article, well written
BUT
While videos are very good, they do not translate well into captioned pictures for articles that are printed and bound for future reference/use.
Videos also don’t work well for people like me with slow internet connections.
On the video, they say you can use faeces with the water method. As long as they’re your own, I don’t see why not. I got enough from the text to decide to try for some clay tomorrow.
Very good article. Thank you!
This is the best article in the world I hope you know this and hopefully you aren’t gullible.
You mentioned in one of your articles that Europe was more progressive than the USA, and that we should get there too.
Well, one of the major differences that flies in the face of your opinions of some things that may protect us is the fact that guns are prohibited for the masses unless guns are prerequisite for gun-clubs, hunting clubs etc. But general sales of guns in Europe? No.
The Europeans get along just fine without the gun-addiction we have in America. It is our society that suffers ever-shorter periods of peace between some mass-killing somewhere. Gun-proliferation may be the answer, don’t you think?
This article is about finding clay in local soil, you’re in the wrong place.
Those who sacrifice a little freedom for a little security are worthy of neither – Ben Franklin
Sweeping dismissals of someone’s right to freedom or security are a clear indicator of the speaker’s intention to justify harming that “someone.”
And while I’m a huge fan of Ben Franklin, I’m afraid that this quote is too easily abused by those seeking to take from others. This sentiment would mean that all of the people lost into the TrumpCult are gone forever and that they should be left to rot in the stench of their belligerence but I truly believe that it is our duty to give them a path out of their madness.
Our brothers and sisters stuck in the MAGA lies deserve freedom and security, even if they are still entranced by YamTits or the turtle caucus.