


Now that you’ve made your pottery wheel, it’s time to try it out. I can tell you right off the bat that you’re not going to make anything but a mess the first few times that you try this because it takes a little bit of trial and error.
Don’t worry though; it won’t take you long.
You can have a rough piece made after probably 10 or 15 attempts as long as you start small. Note that I said a “rough piece” and that’s exactly what I mean. Unless you’re either really lucky or really adept, the first few pieces that you make are going to be pretty crude and ugly.
That’s OK though – you have to start somewhere. It won’t be long before you’re making pottery that you’re not embarrassed to claim as your own.
Choosing the Clay
The first choice that you need to make is what type of clay to use. In another article, I’ve told you how to make your own clay regardless of where you live, so now, we’re going to go with the store-bought variety that you can get from local pottery shops or craft stores. You can also order online, which is handy if you don’t have a local shop.
There are two basic types of clay – stoneware and earthenware. You want to go with stoneware if you can because it’s much more durable than earthenware. Stoneware clay is also often finer, which makes it a better medium to learn with, at least in my opinion.
Glossary of Pottery Terms
And here are some basic terms in case you still need them.
- Slip is clay that’s been watered down to a thin, glue-like consistency. You make it by letting clay soak in water until it breaks down. You use slip just like you use glue, or to cover cracks or smooth the surface of a piece.
- Throwing is the actual process of making a piece of pottery on the wheel.
- Firing is the process of drying and hardening your pot. This is usually done using a kiln but you can do it in a fire, too. I talk about that in another article. Pottery can be single-fired or double-fired for a variety of reasons.
- Greenware is unfired pottery.
- Bone dry is when your unfired pottery is dry and ready to fire. At this point, it’s extremely fragile but it’s non-pliant. This is a good time to clean off any errors or rough spots.
- Glaze is used to seal the pottery so that it’s non-porous. Some glazes are for decoration and some are to make a container safe to hold food. Glaze starts as a liquid that’s applied to either the greenware or the pottery and requires firing.
- Bisque is pottery that’s been fired but not glazed. It’s not uncommon for the artist to choose to paint the bisque rather than glaze it – the pottery is functional at this point as long as you don’t want to use it for food purposes or as outdoor ornamentation.
- Grog is basically ground ceramic material. It can be super fine, or grainier than sand. It’s often added to clay to add “tooth” or a rustic texture. It also helps maintain the structure of the clay while it’s being thrown. Grog aids in even drying which helps prevent cracking.
- Bat is the wheel that you put the clay on.
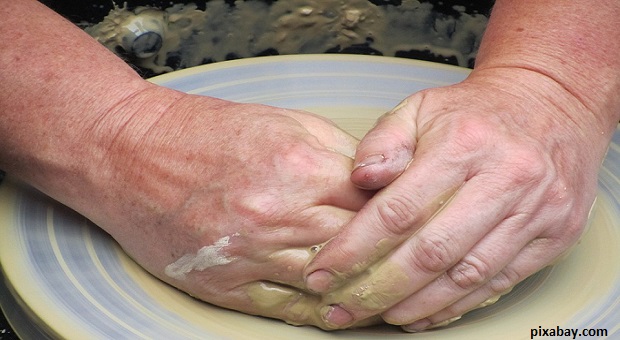
Make your Pot
OK, that should be enough to get us started. Let me give you some forewarning – throwing pottery is physical work, especially if you’re using a manual potter’s wheel.
Tips: Keep a sponge and a bucket of water handy because you’ll need them both. Also, be gentle until you get the hang of this – a little pressure goes a long way!
- Start with a smaller ball of clay – 1 pound, or 2 pounds at the most. Shape it into a cone and use the tip as a guide to place the clay in the center of the bat.
- With dry hands, center the clay as well as you can and shape it into more of a ball while turning the wheel slowly.
- Wet your hands and place your palms together, then place your palms against the ball of clay. Turn the wheel a bit faster while holding your hands steady against the clay, helping to center it perfectly.
- Brace your elbows tightly against your body and wrap your hands a bit more around the clay while it’s spinning faster now.
- Once the clay feels stable, start to apply some pressure evenly to the sides so that it starts to build into a cone shape.
- Keep your hands wet. Use your thumbs to flatten the top of the cone. Now your clay should be just a bit wider at the bottom than it is at the top, and it should be flat on top.
- Put one hand back on the side as you’ve been doing, and place your other hand flat on top of the clay.
- Keep spinning, and apply steady pressure with both your bracing hand and your top hand. Allow your bracing hand to move out as the clay flattens. This is to push the clay down and get it perfectly centered. When it’s at roughly the same height as it was when you started, repeat the process so that you’re sure that the clay is perfectly centered.
- Once the clay is spinning perfectly between your palms, bring it back up as you did at first, but this time, make the walls vertical instead of conical. You want the clay to be about as big around as it is tall.
- Now it’s time to open the clay. You do this by running your finger across the top of the clay to find the exact center. If you don’t start the hole in the exact center, your pot will collapse and you’ll have to start over. Chances are good that this will happen at least once, so don’t get discouraged!
- Some people use a forefinger to open the hole and some people use their thumb. Personally, I prefer my thumb, but do what seems comfortable to you. Start applying gentle pressure in the center. A hole will begin to form.
- Slowly push your finger down to make the hole bigger until you’re an inch or so from the bottom, using your other hand on the outside to act as a stabilizer. Once you have the hole made, slowly remove your finger with the wheel still turning.
- To enlarge the hole, put your finger back in the hole while the wheel is quickly spinning and start pulling gently towards you. Again, use your other hand on the outside as a brace. It’s important during this step to keep the walls fairly vertical.
- When you’ve reached the diameter that you want your pot to be, stop pulling.
- If the bottom seems a bit thick or uneven, you need to thin and even it out. Do this by placing your thumbs at the bottom at the edge of the wall. With the wheel spinning, gradually and gently push down while bringing your thumbs in toward the center. You’ll end up with a cup-like figure once you reach the center. Keep going until the “cup” detaches in the center and remove the clay. Put it aside – this is still perfectly usable clay.
- At this point, the wall should be a bit thick, because you’ve got to stretch the clay taller to make it the height that you want it to be.
- Again, make sure that you pull your hands away slowly as the wheel slows if you’re going to stop for a minute. As I’ve said, this can be tough on your back, shoulders, hands and fingers.
- The pot should still be perfectly centered with no wobbles. Now it’s time to compress and shape the bottom, refining what you just did. If you ski this step, you can end up with cracks. Using your wet sponge, start in the center of the bottom of the pot and as the wheel spins, apply gentle downward pressure, working your way out.
- Now it’s time to raise the walls. This is actually a few steps because you want to do it slowly. Place your index finger and middle finger of one hand against the inside of the pot at the bottom, and the middle and index fingers of the other hand on the outside of the wall in the same spot, placing the wet sponge against the outside wall.
- Start the wheel turning and GENTLY apply pressure with your inside fingers, using your outside fingers and wet sponge to help the process along. This helps to thin the sides and stabilize the pot. Your clay should be fairly wet at this point.
- If you want the pot to be vertical, then pull it straight up. If you want the top to be wider, pull a bit more towards the outside as you work your way up. In the beginning, you may want to make a cylinder to begin, then shape it after you have a solid, stable base to work with.
- Repeat this step a few times until you have the pot the height and thickness that you want. Always work your way all the way to the top, smoothing the rim, or else your clay will collapse or sling right off the wheel.
- Once you get the hang of this, you’ll be able to do this all in one step, but to learn, it’s easier to do it a bit at a time.
- If you choose to build it straight up, this is considered a base cylinder and can be your finished product or can be taken further and shaped into whatever shape you’d like to make it.
- If you didn’t shape it as you went up, you can now go back and pull the cylinder out from the bottom. A simple flower pot shape with straight walls angling out is a good project to start with rather than trying to make a piece that’s rounded in the middle. Do this by starting at the base like you did when you were making the cone and pulling gently and gradually out as you move toward the top.
- If you’d like to make the top a bit wider than the body so that it has the wider lip like a flower pot does, apply less pressure to the outside as you reach within an inch and a half or so of the top.
- Using a damp sponge, smooth out the top by touching the sponge to the top of the piece, and putting your palm against the outside so that it’s cupping the pot and touching the sponge. Spin gently to smooth.
- Now it’s time to trim the bottom. You’ll surely have a bit of flat clay around the bottom and it needs to be separated from the pot. Using a sharp, pointed wooden tool. Start the wheel going again and touch the tool to the spot on the bottom where the bottom of the pot should start. Push the tool at a 45 degree angle until you reach the bat.
- Stop the wheel and clean away the extra clay and put it back on your pile.
- To remove your pot from the bat, use a cutting wire and run it underneath the pot, keeping it tight against the bat. Your pot is now ready to cure! It will need to sit until it’s bone dry before you fire it.
Throwing pottery is a fun, useful skill to have and if you already have a wheel when SHTF, you’ll be a step ahead of most people. Once you read about how to make your own clay, build a kiln, and fire your own pottery, you’ll be good to go.
If you’re like me, pictures are really helpful. I found some great ones on this site. And here is also a video that might help you:
Video first seen on Ingleton Pottery.
If you have any questions or are an experienced potter with advice, please feel free to share them in the comments section below.
 This article has been written by Theresa Crouse for Survivopedia.


