


Who doesn’t need a ladder?
Let’s explore a few ideas about how to build a ladder for your homestead. This project is fun and it has its purposes, but the main thing is that you can save a few dollars in the process while learning new things, especially basic carpentry, and that’s always fun and useful for a true prepper/homesteader.
If you take a look on Amazon for example, you’ll find cheap Chinese-made ladders starting from $30-$40 apiece; ladders that look pretty frail and fragile; truth be told, I wouldn’t bet my life and limb on their sturdiness if I’d ever have to use’em.
Not to mention that you can’t use one of those for decorative purposes, which is the case with an authentic wooden ladder.
Okay, maybe I am exaggerating a little bit, but you understand what I am talking about. Now, if you want to buy a rustic-looking, genuine solid-wood ladder, you can get one of those bad boys from specialty stores, too, but the price tag will skyrocket.
The idea is that, provided you have the willpower, some minor carpentry skills, and a few tools, you can DIY your own wooden ladder for a fraction of the price and you’ll also have some fun in the process.
Building a ladder is a super easy endeavor and, considering that the price tag of an authentic wood-ladder starts from $249 and goes up to $400 and even more, you’ll understand what’s up with today’s article.
How to Make a Rustic Ladder for $20 or Less
Let’s begin with the supply list. I would advise you to get cedar boards instead of pine ones as cedar has a rough side, which works wonders in terms of the rustic look and feel.
Here’s what you’re going to buy for DIY-ing a 6-foot-tall and 18-inches-wide wood ladder with 4 rungs. Obviously, if you want a bigger or a smaller ladder, you can always adjust the amount/dimensions of the lumber required in order to fit your desired size.
Supply list:
- 2 pieces of 1x2x8 cedar boards (or pine or whatever wood fits your bill)
- 1 piece of 1x4x8 cedar board
- 20 wood screws
- a saw
- a drill
- a level
- any type of black paint
- wood-colored stain
- gray stain
- 3 paint brushes (go for the cheapest ones, it doesn’t really matter).
With the supply list taken care of, in the first part of the DIY job, you’ll have to cut the lumber to your desired size. In our case, the 2 pieces of 1x2x8 must be cut to 72’’ long (each), as they’ll be the sides of your ladder.
The 1x4x8 cedar board will make for the rungs, i.e. you’ll have to cut it in 18’’ long pieces.
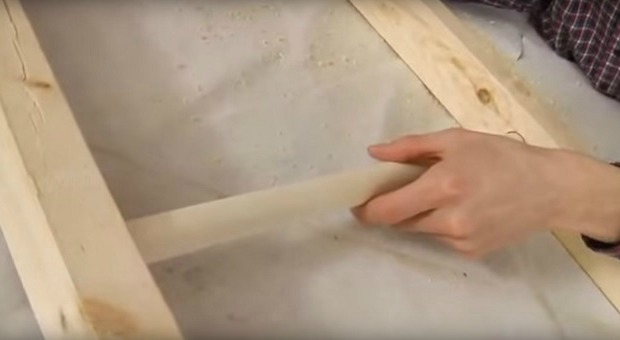
Next, you’ll have to assemble the pieces and build the actual ladder, so put the two 1x2x8 cedar boards side by side at sixteen inches apart and make sure they’re parallel, i..e the tops and bottoms line up.
Keep in mind that if using the cedar boards I’ve recommended, you’ll need to turn them with the rough side up before proceeding to assembling them.
Now, you must measure and mark the location of each of the rungs, then attach the rungs one by one to each side of the cedar board using 2 wood screws each. When you’re attaching the rungs, you should permit room for each to hang over the side boards by one inch on each side, thus making for an 18’’ wide wooden ladder.
https://www.youtube.com/watch?v=wqIR5dBjZ_w
Video first seen on Home Hardware.
Be very careful that they’re level from one side to another, or else you’ll end up with a wobbly ladder and that’s a no-no procedure.
As an alternative building/assembly method for your rustic-looking ladder, instead of using wood screws you can cut out notches for the rungs and put wood-glue inside the notches for securing the rungs firmly into place.
You’ll have to make sure that the rungs go all the way in and that the notches are centered and even, whilst the two 1x2x8 cedar boards are perfectly parallel after all the rungs are in. This design is more complicated to build but it’s sturdier. You can use the ladder for practical purposes anytime you want with much more confidence.
After you’ve assembled your rustic cedar ladder (don’t worry if you didn’t get your rungs spaced out evenly, it will add to the rustic flavor), it’s time to give it its final finish.
Here’s where the paint and stain come into play. You can use whatever paint you want, especially if you’re going to be using leftover stuff.
For the sake of argument, let’s say you’ll use black paint. Be careful to apply it strategically via the dry brush method, i.e. you’ll dip the top of the brush into the paint then use a rag/cloth/whatever to wipe most of the paint off.
Try to begin with the minimum amount of paint on the brush, as you can always add more if required. The other way around is more complicated, as you can easily imagine.
Using the dry brush method for painting your ladder is a strategic trick for making it look old, like it was sitting for a hundred years in your barn accumulating dust and dirt. Obviously, if you’re not into the old-looking/vintage school of thought, you can paint your ladder using the classic method. Just make sure you paint it, as paint protects the wood from rotting and pests.
After the paint job is complete, allow it to dry and then, provided you enjoy the look of vintage ladders, apply the gray stain using the same dry brush technique. Once it dries, apply the wood-colored stain. The end result will be a brand new cedar ladder that looks old and as vintage as it gets.
The advantage of a vintage-looking wooden ladder is that it can be used outdoors as well as indoors for decorative purposes. For example, you can use it for hanging your blankets or towels; there’s nothing like a unique, hand-made piece of furniture for storing your things.
Here’s a video tutorial about how to build a very simple lean-to wood ladder using common tools and pressure-treated 2 by 4s. Unlike the previous “vintage” job, which is more on the decorative side, this baby is everything about functionality; it’s like art vs engineering.
Have you ever tried to build your own ladder for your homestead?

This article has been written by Chris Black for Survivopedia.


 SVP POP UP Desktop (931 x 476 px)")
Looks like Knotty Pine! I would not use that for carrying weight! Pine breaks very easy!
Yes, knots in pine can weaken it, but in this case using 2x4s that have plenty of excess material it should hold up ok. I received a hard lesson from an old time carpenter who I watched building a ladder as shown with two screws in each side. Then a couple years later I was up picking peaches from the top of my favorite tree when a rung failed and I almost took a nasty long fall. Fact is, putting screws straight into endgrain wood is a really bad idea as they have very little holding power that way. A much stronger and safer way is to use some of your scrap to make up 6 in cleats to attach on the inside of the runners for the steps to rest on. Dont forget when working near the ends of any wood to drill a hole for the screw to go in. Otherwise the screw splits the end and is worthless. You may not even notice it until it fails.
I always thought ladders shouldn’t be painted, but I forget the reason.
paint hides cracks and wear very well same reason your not supposed to paint hardhats
Yes, I’ve made ladders in the pasts w/ treated 2 x 2s. I space the rungs 12″ apart, cutting the width of rung about 1/2″ into each side. The rung is supported by this 1/2″ deep ledge. Stainless steel screws secure the rungs to side.
I leave the last top rung about 8″ longer than others, drilling holes to insert screwdrivers and plier handles into them, as well as hanging a small bucket of fasteners when needed (Caution – remove bucket when dismounting ladder or risk counterweight causing ladder to fall).
Thanks for post – good topic !
Want to see the notches with fittings way.
This is unsafe. Never use a faster attached to the endgrain of a board to support weight. Even cleats which are a much better choice should be avoided.