


What do you do now if you want a recipe for something you don’t know how to make? You go to the internet, or perhaps to a cookbook, though that’s becoming a rarity.
However, if you’re faced with an emergency where you have no power or no access to your cookbooks, you’ll have to know how to make some basics from memory.
Today, I’m going to tell you about 5 foods that will help you fill bellies in an emergency situation. Memorize them!
Pemmican
This is crazy simple to make, and was a staple food for Native Americans. It stores well and contains enough nutrients that you can effectively survive off it for a long time. It’s also easy to carry and doesn’t require refrigeration, which is why it was a staple for nomadic tribes or for hunters.
Traditional pemmican has three primary components: fat, lean dried meat, and dried fruit. That’s it. Add some flavor, nutrition, and texture by adding honey and nuts.
Tip:
Don’t use pork or bear for this recipe due to high fat content of the meat. Use any other lean meat, including beef, venison, caribou, or moose. Here’s how to make it.
Ingredients:
- 2 cups dried crushed meat
- 2 cups dried crushed berries or dates
- 1 cup melted fat
- 1/2 cup crushed nuts
- 1/4 cup honey
Instructions:
Trim all of the fat off the meat, then dry in a dehydrator until it cracks and breaks. If it bends, there’s still too much moisture in it. Do the same thing with the berries. Render the fat into a liquid form and crush your nuts. You can grind them if you want, or leave them a bit chunky to add texture.
Crush the meat and berries into a fine powder. Using your blender or food processor for now will work better but if you’re making it without power, just grind them with a pestle. If the meat is a challenge, use the pestle or a hammer, or even your fingers to get the meat as finely ground as you can.
Add enough fat to the meat and berries (and the nuts if you’re using them) to make it stick together; no more. Add enough honey that it’s sweetened but not overly sticky.
Roll it out and cut it into bars, or do it as the Native Americans did and roll it into balls. Store in a bag in a cool, dry place.
In the video bellow you can discover the great Pemmican recipe inspired by The Lost Ways guide. You can prepare right now this delicious pemmican.
Many other survival secrets and recipes that helped our ancestors survive gloomy days are about to be discovered in “The Lost Ways” book. CLICK HERE for more information about this awesome survival book!
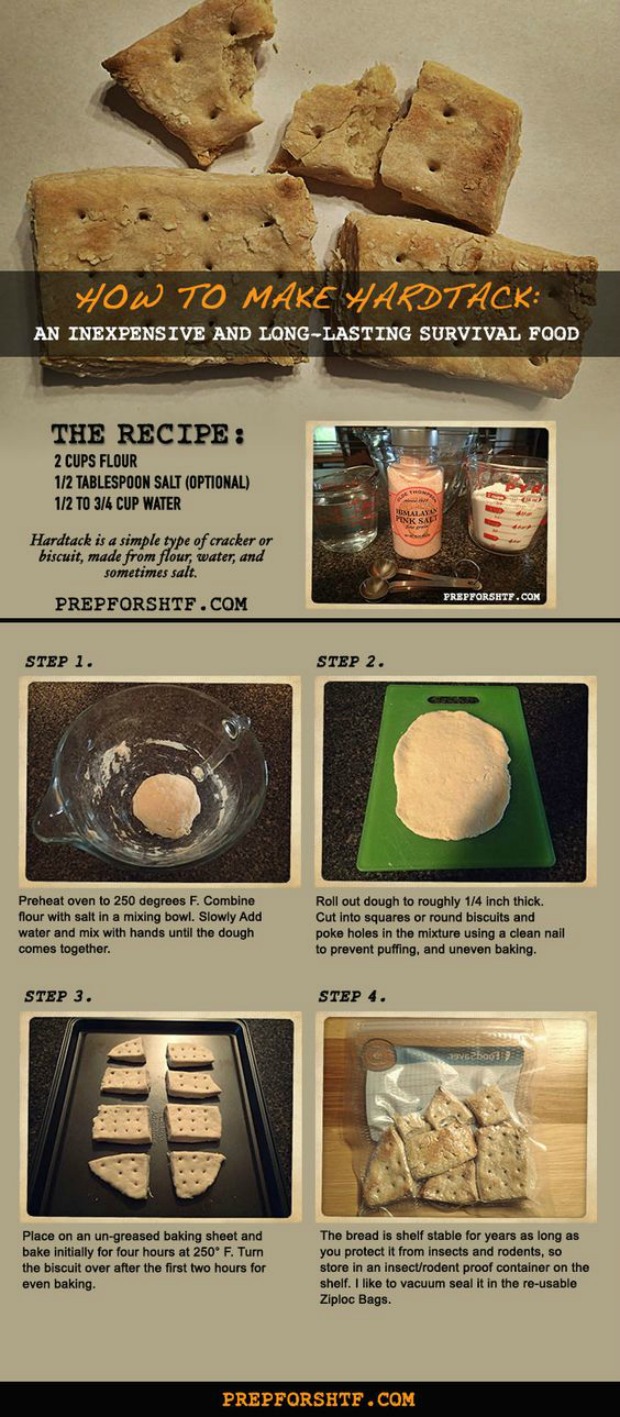
Hardtack
If you’re like me, when you hear the term hardtack, you might think of candy, but traditional hardtack is basically a cracker that will last practically forever as long as it stays dry. Cowboys carried hardtack with them to eat when they had nothing else. It was a staple for soldiers on long military campaigns.
It’s not as nutritious as pemmican, but it will fill the hole in your belly and provide you with carbs that you need to keep moving. It’s extremely hard, which explains the nickname “molar breakers”, and is easier to eat if you dip it in your coffee or water or add it to your soup.
Hardtack is extremely simple to make and consists of only three ingredients. You can cook it on the trail, too. Some recipes call for milk, sugar, and butter, but those ingredients significantly reduce the shelf life.
Ingredients:
- 3 cups all-purpose flour
- 2 tsp. salt
- 1 cup water
Preheat oven to 375 degrees F. Combine the salt and flour, then add the water. The dough shouldn’t stick to your hands, so either add the water a bit at a time, or add a bit more flour if it’s sticky.
Roll the dough out into a rectangle until it’s no more than 1/2 inch thick. Cut the dough twice lengthwise and twice across the width into 9 equal squares, then use a nail to poke 12 holes (a 4×4 grid) into each square.
Place each square onto a cookie sheet or into your Dutch oven or covered iron skillet if you’re cooking on the trail. Bake for 30 minutes on each side. Remove from oven and allow to cool. Store in an airtight container.
Beans and Rice
Though this recipe is extremely simple, it’s packed with nutrients and is a complete meal. If you’d like, throw in some bacon or some cayenne to taste to spice it up.
Ingredients:
- Equal parts beans and rice (not instant or quick-cook). Any type of beans will work, but pintos, great northerns, or black beans are exceptionally good.
- Salt and pepper to taste – start with a teaspoon per cup and add until it suits your taste.
- Three times as much water as you have beans and rice
Instructions:
Rinse the beans and let them sit overnight. The next day, bring to a simmer and let them cook until the beans are still slightly crunchy, but starting to get tender – about 2 hours. Add rice and cook for another 30 minutes. If you’d like, throw in some bacon when you start cooking the beans. Add spices such as cayenne pepper, onion (fresh or powdered) or garlic to suit your tastes.
Trail Biscuits
You can make biscuits in your oven or in your Dutch oven or a skillet on the trail. Though ingredients such as buttermilk make them fluffier and more delicious, you can make biscuits with much simpler ingredients. These are heavier, but still soft and go great with gravy.
This is a stick-to-your-ribs food that will help stretch rations or fill bellies. The egg and lard is optional, but if you’re not using lard, substitute the baking powder for a couple of teaspoons of baking soda.
Ingredients:
- 3 1/2 cups all-purpose flour
- 2 tbsp. baking powder
- 1 egg (optional if available)
- 1 tsp salt
- 1/2 cup butter or lard
- 1 – 11/2 cups milk
Preheat oven to 370 degrees F. or stoke your coals so that they’re hot enough to cook in.
Combine flour, salt, and baking powder in a bowl, then cut the cold butter or lard (bacon grease actually makes them delicious, but heavy) into the flour mixture until you have pea-sized pieces. Add milk until dough is barely sticky. Don’t overmix or your biscuits will be tough.
Drop about 1/4 cup at a time into a greased pan or Dutch oven.
Cook for 20 minutes or so until biscuits are brown. If using a Dutch oven, put the biscuits in, then put the lid on the oven and bury in the coals for 15-20 minutes.
Sausage Gravy
This recipe can be modified to use bacon, hamburger, or just about any other meat, but you will need a fat source. That means that venison is likely out unless you have some bacon grease or other flavored grease because that’s where the flavor comes from.
Though this recipe calls for milk, I’ve made gravy with only water. It’s not nearly as good, but it’s edible. It’s better to carry some dried milk than to skip the milk altogether. You can also use all milk, but when it’s in short supply, the amount listed will do just fine.
Ingredients:
- 1 pound sausage
- 1/4 cup all-purpose flour
- 1 tsp salt
- 1 tsp black pepper
- 1 cup milk
- 1 1/2 cups water
Directions:
Fry the sausage, crumbling it up with the spatula as you cook it.
Sprinkle flour, salt, and pepper over the sausage and allow to brown, stirring as you go. Smash it with the back of the spatula to keep it from clumping.
Add the water a 1/2 cup at a time, stirring and smashing with the spatula well to prevent lumps. Once you have it smooth and it’s turning from a thick paste into a thin paste, pour the milk in, stirring vigorously as you do.
Gravy is easy. You don’t have to use exact amounts. Just add enough flour to make the grease a thick paste, then add enough milk and water to bring it to a gravy consistency. If it starts to get thin, stop adding liquid. If it’s too thick, add more. Remember that it will thicken slightly as it cools.

There are many different easy recipes that you should learn so that you can make them off the top of your head. Fried cornmeal mush is one that I can think of. Cornbread is another.
Remember that in all recipes, dried milk, dried eggs, and dried butter are all perfect substitutes for fresh ingredients and will make your recipe better than if you don’t have it at all.
Eventually, you’ll have to make it up whatever you have on hand, just like our ancestors did in times of need. Click on the banner below to find out more about the way they survived during hard times!

This article has been written by Theresa Crouse for Survivopedia.


You should have a bannock recipe as well. It’s easy and quick and I remember reading that you could wrap the dough around a long stick like a willow and hold it over a campfire. I’ve never tried that but I have made it many, many times in a 10″ cast iron skillet over a kitchen stove. You can tell when it’s ready to flip when you shake the skillet and it slides around. Then simply grab the skillet handle with both hands and toss the bannock up in the air and catch it as it turns over and cook the other side. I sometimes flip it back over to get more crunch. If you are making it on a griddle you can use a spatula to flip it.
And you can incorporate berries, nuts, cinnamon etc.
It’s a meal in a wheel so to speak. It’s perfect all day food to munch on.
Basic recipe for a 10″ skillet is: 3 cups flour- 3/4 teaspoon salt -3 teaspoons baking powder- approximately 7 oz water. But go slow adding water so you don’t make it too soft.
Possible additives are:
Honey
Chopped nuts
Sunflower seeds
Mini chocolate chips
Chopped craisins
Chopped sun dried tomatoes
Good luck!
When I was a Girl Scout leader we cooked this ‘bread on a stick’ over the campfire. The girls loved it.
Thank you. This is inspiring.
I am especially interested in vegetarian survival.
We are happy to help, JD Burton.
Here’s something that might be interesting for you: 7 Basic Survival Foods For Vegetarians
When using lard, reduce the amount. You do not need as much lard. I can’t give measurements. I learned to make biscuits the old way. Nothing was measured. You have a good sized bowl full of flour. Sift flour into a mound in center. Scoop fat with working hand. Work into mound of flour with fingers til feels ‘right’. Add milk or buttermilk and work with fingers til feels right. Knead and pinch off dough. Shape into biscuit and put in pan. Press down with back of fingers to even thickness.
Bake at 450 degrees F.
They are very light and good with everything.
These recipes look great! I have a question about the hardtack. I am gluten sensitive. Can I use rice flour or another gluten free flour instead of wheat flour? Would the measurements be the same? Would substituting affect the shelf life of the hard tack?
Karen try this recipe out. I have my sweetheart has gluten issues . http://indiaphile.info/rice-flour-flat-bread-chokha-ni-rotli/ good luck
“…Render the fat into a liquid form and crush your nuts. You can grind them if you want, or leave them a bit chunky to add texture…”
This sounds painful
Sausage Gravy
I learned how to make Sos from Alton brown (food network) You need to learn how to make a roux. turns out high heat makes the flour stick to the fat. its tricky. so you cook the meat to get the fat, turn heat up high, mix flour, turn heat down, then add milk/water to expand it out. you should practice. not enough heat, no flour fat combined, too much heat too long, fire in pan. did i say it was tricky. too much flour, globby, too much water/milk, soup. military sos is flavored with salt pepper and worcestershire sauce using hamburger or any unflavored meat. good luck.