


You might be a healthy person and not prone to accidents, but a survival situation can change that.
Travelling through unknown areas, coping with fatigue and stress, or running for your life will put your body at risk, so you can wind up with a broken bone or some other injury.
If you can’t get to a doctor, then you’ll have to at least immobilize the injured area of your body until you can get help. Making a mud cast might get you out of trouble, so you make sure you know how to make one if nothing else is available.
Why to know how to make a mud cast? Whether you are camping, need to take refuge in a natural setting, or are somewhere where there’s no doctor around, mud casts may be your only option for immobilizing a broken bone.
This Timeless Collection of Forgotten Wisdom Will Help You Survive!
If you don’t feel like lugging around several pounds of plaster of paris, then you’ll need to know how to make a mud cast. Since you can use a mud cast in any situation where you would use a plaster cast to immobilize a broken bone, it is a valuable skill to learn with no monetary cost for special tools or supplies.
Why to Use Mud Cast
Aside from being the only material you might have on hand, there are some other advantages to immobilizing broken bones with a mud cast:
- It offers solid support for broken limbs. Even if you break a leg or an ankle, the mud cast will be more than strong enough to support the broken parts of the bone and keep them from moving. Depending on the type of fracture, broken bone parts rubbing together can be very painful at best. At worst, these fractured ends can rub together and break off, which will only make repairing them more difficult.
- Mud casts are much easier to work with compared to trying to immobilize broken bones with other natural materials. Unlike vines, branches flattened into splints, or or even leaf wrappings, you only have to apply the mud in layers to get the most benefit from it. If you are in pain or afraid of disrupting the bones, the relative lack of tugging, pulling, and other potentially disruptive actions makes mud cast application much better than other methods.
- You can change the cast as often as needed since the materials for mud casts are fairly easy to locate. You can take the cast apart as often as you need to let air get at the covered areas. When done correctly, you can reduce the risk of skin infections and other problems that commonly occur when you cannot remove the cast as often as necessary for good skin health.
What to Beware of When Using Mud Cast
No matter how much you may need to immobilize a broken bone, you must also pay careful attention to the drawback associated with using a mud cast:
- Mud cannot be formed without water, but water, in turn, is absolutely necessary for the growth of bacteria and other germs. No matter where you get the mud from, there is every chance that it will contain any number of disease bearing organisms. While most experts don’t recommend boiling the mud before using it, I would not rule it out as a vital safety precaution. This is especially important to consider if your skin is prone to breaking down, or if you have cuts and other skin openings that may come into contact with the mud in the area to be immobilized. Even if you don’t see or smell signs of mold, moss, or fungal organisms, that doesn’t mean they aren’t in the mud and capable of wreaking havoc once they get past the barrier of your skin.
- If you thought plaster of paris casts were heavy, be prepared for mud casts to be much worse. Even though the cast will be about the same thickness as a mud cast, you can expect it to weight a lot more.
- Be prepared to wait for the cast to dry. Remember, even if you find relatively heavy or drier mud, it can take several hours to dry out enough to support broken bones.
- Depending on the mud type, it may have very little strength even if it is built up in layers. If you have ever removed caked dry mud from the bottom of a bowl or even your shoes, then you know just how easily it can break apart. Since mud deposits can vary drastically even from one mud puddle to the next, it will take some experience to figure out which ones will make the best cast, and how best to make use of the others.
How to Take Care of Wounds in Conjunction With a Mud Cast
Even with a plaster of paris cast, the lack of air flow around wounded sites can cause all kinds of problems. If you have open cuts in the area to be covered by the mud cast, try to lay down some kind of barrier that will prevent the mud from getting into the wound.
If you have antibacterial ointment available, you can also do that to reduce the risk of infection. Unfortunately, even if the open wounds are scabbed over, the increased moisture from sweat building up under the cast will still create a breeding ground for germs to multiply.
Use sticks and wraps to create tunnels for air to flow or other openings as long as they do not interfere with the ability of the cast to support the broken bones. In most, if not all cases, you will probably need to use a sling or some other additional support device to prevent the bones from moving or rubbing together.
What You Need to Have On Hand
If you have all the essentials in your bug out bag, then you should already have most of what you need to make a mud cast. Here is a basic list so that you can include these items in your bug out bag if they aren’t already present:
- popsickle sticks or other materials that can be used to form splints
- surgical gauze and tape
- antibacterial ointment
- bandages
- towels or other padding material
- material that can be used for a sling or other restraining device for arms or other areas that need to be secured close to the body in order to avoid further injury.
- straps or other material that can be used to manipulate bones back into position if needed. Just make sure that you take a good quality first aid course and know how to pull and manipulate bones to bring them back into alignment before trying it in a crisis situation. When in doubt, you will be better served by simply immobilizing the bone and letting a doctor take care of it as soon as you find one.
- A quart or more container to hold the mud that you gather from an appropriate source
Substitutes for Casting Materials in Nature
Let’s look at a situation where you ran from your home in such a hurry, you didn’t bring your bug out bag. Alternatively, your bug out bag is missing one or more essential elements that are needed to make a viable mud cast.
Here are some items in nature that you can use to substitute for things you will need:
- Use tree branches and small limbs for making splints. Start off by selecting the straightest limbs you can find. Cut them down to a size that will enable you to immobilize the entire joint. It will also help to split the branches or limbs so that the affected area rests on a flat surface. If you cannot find branches or limbs that are wide enough for your need, lay thinner sticks together to form a flat surface. You can also tie them together to make a more solid foundation.
- In place of gauze, you can use wide, long leaves from grass or other plants. Narrow, long leaves can also be used as long as you can wrap them around the affected are and the splint at least once or twice. When you get into using the leaves for holding the mud in place, see if you can shred the leaf a bit so that the mud has an easier chance of seeping through as it would with gauze.
- Try using honey or other natural herbs in the area that have anti bacterial properties.
- Leaves that have antibacterial properties can be used as bandages or coverings for areas that need to be protected from dirt and debris. Hold them in place with vines or other materials that will prevent them from slipping and sliding out of position.
- Moss, leaves, and other soft materials can be used to pad around the splint as well as provide some relief from the weight of the cast. Make sure that the materials you choose are clean and free of insects.
- In place of straps, longer, thicker vines can be used for pulling bones back into place and for other purposes.
- Large leaves, depressions in rocks, and even a hole dug into the ground can be used as a place to hold mud that you retrieved from another location. Since you may wind up looking in several locations to find suitable mud, it is best to have a way to transport it to your campsite before trying to assemble the cast.
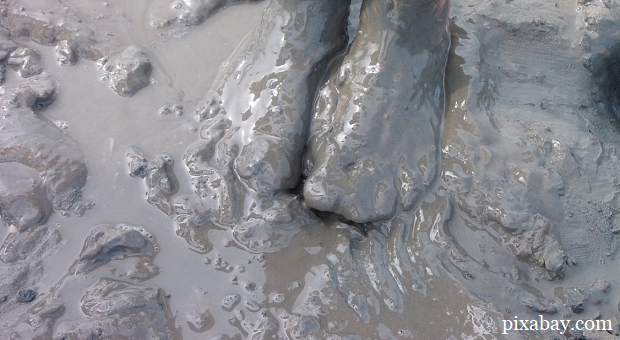
Where to Find the Mud
When it comes to finding the best mud for a cast, you will find that the term “mud” is something of a misnomer. Typically, you will be looking for material that is much closer to clay in terms of its plasticity and ability to be worked. As such, the mud you select will have a higher degree of organic matter in it, and will feel different from regular mud.
During the process of looking for suitable mud, take some of the material and let it dry out just enough so that it leaves very little residue on your hands. If you have ever worked with clay to make pinch pots or other objects, then you know that clay at this stage can still be bent and manipulated without creating cracks or other problems. By contrast, regular mud will crack easily at this stage and be completely useless insofar as forming it into usable objects.
The best places to find mud for making a cast are at the bottom of ponds or other areas where organic matter collects and easily mixes with soil over long periods of time. It should be noted that clay can take centuries to form to a point where it can be used for pottery making. You can still use “younger” or less well developed clays for making a mud cast. If you cannot find a clay like mud for the cast, you can still use regular mud, but it will be more difficult to manage and less likely to provide viable support for the areas that need to be immobilized.
How to Make a Basic Mud Cast
When all is said and done, making a mud cast is no more difficult than making a plaster cast. Here are the basic steps:
- start off by making sure you have addressed any open wounds and set any bone fragments that you were able to take care of.
- Use padding and a splint to provide support for the bones so that they have an additional layer of support. Worst comes to worst, even if the mud portion of the cast falls apart or fails for some other reason, the splint may be enough to keep the affected area immobilized and free from further injury.
- Next, begin using thin layers of mud and leaves to hold it in place. If the day is breezy, then it will take less time for the layers to dry out. Do not let them dry completely, but do make sure that the water is wicking out properly from each layer of the cast. This may be a bit difficult if you are using leaves and forgot to make suitable holes in them because they will block the wicking action through the mud.
- Once the cast is dry, finish off the process by using towels, vines, or anything else that can be fashioned into a harness that will hold the affected area as close as possible to your body. For example, if you broke an arm, you would make a sling that prevents your arm and cast from hanging downward or moving around freely at an uninjured area.
How to Remove a Mud Cast
Removing a mud cast is not so different from removing a plaster cast. You will still need to cut into the cast and then separate the parts to set the injured area free. If you used leaves and thin layers of mud, it may also be possible to simply grab a hold of some leaf material and then pull it away from the rest of the cast.
As the leaf puts pressure on the underside of the mud layer, it should break away easily. You may or may not be able to achieve the same results if you used gauze wrapping. If the fibers of the gauze became deeply enmeshed in the mud, the gauze is not likely to separate it into neat layers.
Alternatives You Can Make From Natural Materials
No matter if you are in the woods or a desert, or some other natural setting, there are few things that are similar to mud or plaster of paris that can be easily gathered and turned into a cast.
On the other hand, if you are in the woods, you can take advantage of pine sap to make pitch. This pitch, in turn, can be used to bind together layers of gauze. Try to keep the pine pitch as thin as possible, as you will find it can be difficult to remove.
Once you establish in a wooded setting, there are things you can make ahead of time to deal with broken bones. Aside from making pine pitch, experiment with maple syrup and turn it into a moldable material that will harden in place. If you already know how to make hard maple candy, then you will have a good start for figuring out how to make a cast from the same material.
Finally, do not forget about using other kinds of sap to make variants of latex, rubber, and other pliable materials. As long as you can find a way to apply a the material while it is soft, and then produce a hard shell, you will have the basis of a cast for broken bones.
In some cases, the ability of the material to stretch may also be of use, especially if you need to bind together splint material, or you need to prevent layers inside the cast from moving around too much.
During the course of trying to escape from a disaster, you may fall, or do something else that results in broken bones. No matter whether the bones are in an appendage, your ribs, hips, or shoulders, it is very important to find a way to immobilize the bones until you can get medical attention.
Mud casts have a number of drawbacks, they can still provide key support and relief when nothing else is available. This is an important skill to learn, as well as how to manage pitfalls so that you can make the most of this emergency medicine method.
When you don’t have access to hospitals and doctors, the only thing you can do to survive is relying on what nature provides you in order to stay alive!


really great info