


If I were told that I could only grow one vegetable (technically fruit, but that’s irrelevant) in my garden, I would pick tomatoes.
Why? Because they’re delicious, nutritious, easy to grow anywhere, and you can use them in so many ways that you’d likely never get sick of them. You almost have to grow tomatoes for survival if you want your garden to be complete.
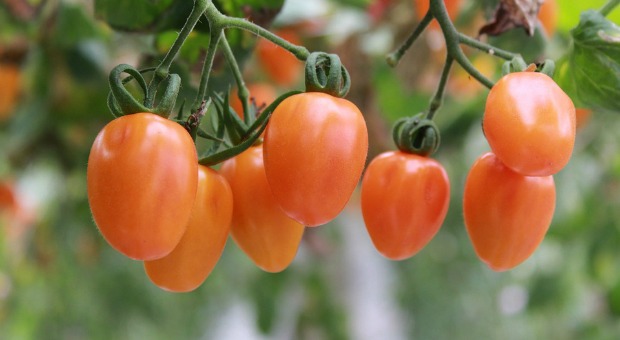
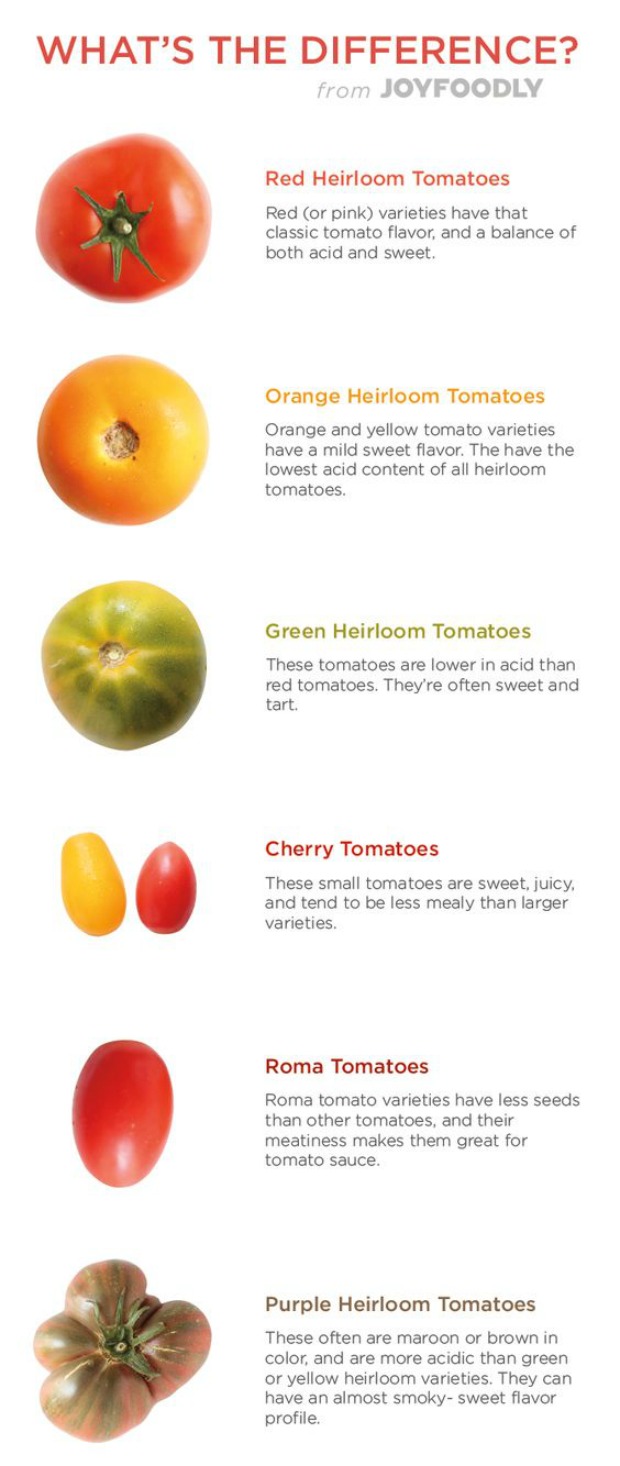
Just a single cup of tomatoes provides about half of your RDA of Vitamin C (move over orange juice), 25% of your RDA of Vitamin A, some Vitamin K just for kicks, and minerals including iron, potassium, folic acid, Lycopene and calcium. Plus, tomatoes have been linked to cancer prevention. Not too shabby for a little red, yellow, green, purple, orange, black, or pink fruit/vegetable, is it? Oh and did I mention that they come in an array of colors?
But which ones should you grow? How long do they take? Do they have particular needs? How much space do you need? There’s definitely a bit more to growing quality tomatoes than just grabbing a pack of seeds at the dollar store, but throughout the following paragraphs, you’re going to learn enough to get you started.
Different Types of Tomatoes
Many people grow several different varieties of tomatoes because there are so many uses for them. Just like anything else, most tomatoes are better for one purpose than another. For instance, if you want to grow tomatoes for juice and for eating raw, you’ll likely want two different types of tomatoes.
Of course, there are definitely good all-around tomatoes, but variety is most certainly to spice of life. And since there’s very little difference in planting and growing, why not grow different ones best suited to your individual needs?
Here are some of the reasons you may want to grow tomatoes:
- Slicing, or eating tomatoes
- Cherry tomatoes for salads
- Plum tomatoes for eating or cooking
- Juice tomatoes
- Sauce tomatoes
- Whole canned tomatoes
- Tomatoes for chutneys.
Now, think about it. If you want to slice a nice, meaty tomato to put on your burger, you want plenty of “meat,” right? But if you want to can whole tomatoes, you’ll want something a bit smaller, and with a different consistency. And of course, if you want a little tomato for a salad, you need yet another type.
That’s the beauty of tomatoes; there are hundreds of options. All you have to do is find the ones you like best!
Learn from our ancestors the old lessons of growing and preserving your own food for harsh times.
Types of Seeds
There are four main types of seeds out there: GMO, hybrid, heirloom, and open pollination.
GMO
These seeds have been genetically modified at the DNA level in a lab. They’re meant to make the seed better in some form or another. However, because the plant has been altered at the genetic level, you may find it difficult to get the next generation of seeds to grow, or to produce tomatoes that are the same as the ones in the first generation.
Hybrid
These are often mistaken for GMO, but they’re vastly different. They’re a naturally-occurring plant that occurs when one variety pollinates with another. Think of the hybrid as a family – a mother and dad get married and have a child that shares their traits – hopefully the best of each parent.
Hybrids have no problem growing but may not be consistent from one generation of seeds to another. First generation plants and fruit tend to be more consistent in size and shape and are often more disease resistant than heirlooms, but you don’t know what you’re going to get next year.
Open-Pollinated
These plants are the result of plants that are grown close together pollinating each other in a natural manner. You’ll have some genetic variability because of this, and when the seed is saved, those traits are passed onto the next generation. Open-pollination tomatoes are often regionally unique and have unusual shapes, colors and flavors.
These are the seeds that most farmers count on, because they’re reliable. You can save the seeds with a high degree of confidence that they’ll grow next year.
Heirlooms
The queen of seeds. Heirloom tomatoes come from seeds that have been carefully preserved for generations – usually 50 years or more. They’re carefully tended so that the traits are consistent from one generation to another. The one trait that heirlooms have is that the fruit can vary greatly in size and shape even on the same plant. That’s not always the case, and it’s not really a bad thing – just something to make note of when you’re growing them.
Heirlooms grow consistently from one year to the next, so you can save your seeds and have the same exact plant next year.
So What Seeds are Best?
Many people grow hybrids and love them; for that matter, I have too. But if I’m saving seeds, it’s the ones from my hybrids and open-pollinated ones because I know that they’ll grow and I know what I’ll get.
Growing Conditions
This is yet another trait that I love about tomatoes – no matter where you live, there’s a variety that will grow for you. Well, almost. If you live in an area that has no warm weather to speak of, or an extremely short (less than 50 day) growing cycle, your choices are limited unless you want to grow them inside, or in a greenhouse.
Altitude affects every single aspect of growing – temperature, soil conditions, precipitation, and humidity. In high-altitude climates, you often have short growing seasons, soil that’s either rocky and alkaline or shaded and acidic, too much rain, not enough rain, and a ton of wildlife that’s just waiting for you to grow them some delicious food.
But don’t despair, you can grow great tomatoes just about anywhere you want as long as you’re willing to put in the effort.
What do Tomatoes Need to Grow?
I read a story about a couple who invested all of their summer into a tomato crop only to yield a single fruit. They’d gone out of town one weekend and forgotten to tell their friends to water them, and that’s what did it.
Now of course, that’s a tall tale, but it’s not far off. Tomatoes need a consistent amount of water, especially when the fruit is ripening. But if you water them too much during this period, they’ll be washed out and flavorless.
So if your tomato could pick its ideal situation (and it can because if you don’t listen, it won’t grow) what would it be? There are some variances in their needs, such as length of growing seasons, but in general, the necessary components to successfully growing tomatoes are:
- Temperature – tomatoes need an average of 3-4 months or warm, fairly dry weather to grow and produce well. In order to “set” fruit – a gardening term that means that your plant will produce fruit after flowering and pollination. Generally, they need nighttime temperatures of 55-75 degrees F for this to happen. They won’t develop the proper color if night time temps are above 85, and most will quit growing if nighttime temps are over 95 degrees. Now, there are tomatoes that thrive in hot weather, so if this is your situation, do some research and find them. Otherwise, you’re wasting your time.
- Sunlight – Your plants need at least 6 and preferably 8 hours of sunshine per day. If you live somewhere temperate, 8 is great. If you live in the sweltering south, then 6 with a nice shady afternoon will be appreciated.
- Consistent Watering – This part is SUPER important. You want your soil to be moist but not wet. Too much will kill the plant, too little will stop the fruit from growing, or will give it a poor texture and flavor if it does grow.
- Proper, regular feeding – Tomatoes like nitrogen in the soil, so prepare the soil with ripe compost and a scoop of aged manure in the bottom of the hole when you plant it. Another trick is to add some Epsom salt to the soil monthly.
You can do this via just sprinkling a couple teaspoons around the plant, or by mixing a couple of tablespoons in a gallon of water and watering your plants with it. Be careful though, because too much nitrogen will give you a beautiful plant but will delay ripening. Add nitrogen when the top leaves turn yellow and the stem turns purple.
- Loose soil that drains well – honestly, they prefer this but will grow in nearly any type of soil as long as you provide the proper nutrients. If you have plants that harvest early, sandy loamy soil is best. Plants that bear fruit late like heavier loamy clay. They also like slightly acidic soil with a pH somewhere between 6 and 7.
- Take Care of the Roots and Leaves – tomatoes are a good plant to start inside because if you live in most zones, you want your plants to be 8-10 weeks old when you set them out 2 weeks or so after the last frost. It’s important that you wait this long because if you get an “oops” freeze, your plants are done.
You also need to protect them from wind that can break them and try to keep the vines off of the ground to help protect them from mold and bugs. Bugs love tomatoes, so be proactive in your insect prevention and check the leaves, top and underside, regularly.
Planting Your Tomatoes
 Ok, not that we have that set aside, let’s talk about how to grow your plants. This is the exciting part – well, one of them anyway!
It’s best to prep your soil a week or two in advance by turning in some aged manure and compost. A bit of Epsom salt may help too, if your soil is low in nitrogen. Rest easy – though salt will kill your soil, Epsom salt isn’t actually sodium – it’s actually magnesium and sulfur. The magnesium helps your plant absorb nitrogen.
Some people just dig the hole for the plant and plop a trowel full of compost/manure in the bottom. This may be OK, but make sure that both are well-aged so that you don’t burn up your plants. I’d recommend mixing it into the soil.
If you started your plants from seeds, they should be at least 8 weeks old now, and you should harden them off for a week or so before you plan to plant them out doors. This just means that you’ll start putting them out for a couple of hours per day, protecting them at first from the sun and wind, then gradually increasing their time spent outside so that it’s not such a shock when you actually transplant them.
Now, let’s plant. You can plant them in your garden, or tomatoes make excellent container plants. 5-gallon buckets work great.
Dig a hole with your trowel about 6-8 inches deep. Remember that your soil should be loose. Pull off the bottom few leaves of the plant, then put it in the ground so that the root ball is buried and the remaining leaves are above the surface of the ground.
Plant them about 2 feet apart.
Water well to help reduce shock to its roots.
Stake or cage immediately. This doesn’t seem like a big deal now, but trust me – in a few weeks when they’re growing like gangbusters, you won’t find it nearly so easy as you do right now.
Water your plants well for the first few days to help prevent shock and help it to acclimate. Water consistently throughout the season so that your soil stays at about the same saturation. In some growing conditions, you may be able to get away with watering once a week, but 2 or 3 times is better. They’ll need about 2 inches per week.
Just a tip here – using homemade mulch is a great idea because it helps hold moisture in AND it helps fertilize at the same time. You can put the mulch down when you plant or you can wait a few weeks to do it. Don’t forget about liquid manure compost, either.
Keeping a steady fertilization schedule is good, too, Follow the tips above about that.
When your plants begin to vine and you get them staked, it’s a good idea to pinch off sucker leaves – those leaves that don’t lead to more vine but only exist to suck the moisture from your plant.
Wait for your bumper crop of tomatoes to appear!
Video first seen on Rogers Gardens.
Preservation Methods
Now comes the fun part. The best way that I like to preserve my tomatoes is in between two slices of bread – oh wait, it doesn’t last long like that! Seriously though, there are a number of ways that you can preserve your tomatoes. Each way ends up using a canning method, but there are many different ways that you can prepare them for preservation including sun-drying and adding to olive oil, or dehydrating.
Juicing and Sauce
I can’t even tell you how many tomatoes I’ve mashed through a sieve with a wooden pestle to make juice! All you need to do is cut your tomatoes into quarters and toss them into a saucepan. Bring them to a boil for 5 minutes to soften them up and get the skins all loose. The juice will start separating out.
After they’ve simmered for that five minutes, turn off the heat and pour some of them over into your sieve or food mill (which is over a pot or bowl, of course) to separate the juice from the skins and seeds. Mash them through and pour the juice back into a pan and bring to boiling again for another 5 minutes, then can.
You should add a tablespoon of lemon juice to each pint just to boost the acidity enough to preserve it. I also add in a teaspoon of salt per quart (1/2 tsp. per pint).
Water bath can as usual or 35 minute for pints and 40 minutes for quarts. If you’re pressure canning, it’s 15 minutes for pints and 20 for quarts.
Note that your juice may “clarify”, or separate so that the bottom is dark red with the tomato pulp in it and the top is almost clear. This is perfectly normal – just shake it up before you use it.
If you want to make sauce instead of juice, it’s simply a matter of cooking it longer so that the water evaporates and the juice thickens. You can make plain tomato sauce if you want, but this is a great time to jazz it up by adding seasonings such as garlic, oregano, rosemary, etc. Think spaghetti, pizza, taco sauce, etc.
Whole, Crushed or Diced
Blanch your tomatoes for just a couple of seconds – that is, dip them in boiling water for 10 seconds then toss them into an ice bath. An old Italian guy (because nobody knew more about tomatoes than this guy) taught me that if you slice a small ‘x’ somewhere on the bottom of the tomato, it makes it easier to peel. The skin will fall right off and you can proceed to the next step.
Once you get the skins off, cut away any bad parts or green sections. If you’re canning them whole, stuff them into the jars. If you’re halving, quartering, dicing, or crushing them first, do it now. And add them to the jars and top with water so that you leave 1/2 inch headroom, at least. Add lemon juice and salt, seal, and can.
Paste
The process of making tomato paste is similar to making the juice except you cook it WAY down into a super thick sauce, then add olive oil and salt and bake it in a 200-degree oven, spread evenly in pan, until it’s the thickness of tomato paste.
Chutney, Salsa, Etc.
This is possibly the best part! Make your favorite salsas and chutneys with tomatoes, onions, garlic, herbs, and other spices and can them up so that you have some of this deliciousness year round!
As you can see, there’s a lot that goes into growing tomatoes, but there are so many different ways that you can use them that it barely qualifies as work. It’s like growing an entire winter’s worth of possibilities all with just a few plants.
Study what kind of tomatoes you want to grow and get started! What are some of your favorite tomatoes? Do you have a recipe or an idea you’d like to share?
Discover how our forefathers produced their own food during harsh times! Click the banner below for more!

This article has been written by Theresa Crouse for Survivopedia.
References:
http://leitesculinaria.com/87323/recipes-homemade-tomato-paste-conserva-di-pomodori.html


A great way to protect seedlings in spring is with mini-greenhouses made from 1-gallon plastic milk jugs. Cut the bottom of the jug off with a sharp pocket knife, then place the jug over the seedling and scoop up the soil around the outside to keep it from blowing away in the wind. Leave the cap off, otherwise it gets too hot and burns the plant. The milk jug keeps the air inside warm and humid, so it creates a tropical micro-climate. A nifty trick is to put a large, dark stone inside. That will absorb heat during the day and keep the plant warm longer in the evening. Use a funnel to pour water in the top, so you don’t have to remove and replace the jug every time to water. Once the plant is well established, you can just water the outside and it will get to the roots. When the plant fills out the jug and needs more room, you can either remove the jug, or, if it is still too early and chilly, you can elevate the jug. To do this, take the jug off, scoop more soil in toward the plant to raise the ground level, so more roots will grow along the stem, which also makes for a stronger plant; then put the jug back on and scoop more soil around the outside. This gives the plant more room to grow.
My favorite cages for indeterminate tomatoes are cylinders, 6 feet high and about 2 feet in diameter, made from wire fencing with 6″ squares. I bought a 100′ roll of it, enlisted the help of a strong kid, and we probably got about 15 or 16 cages out of it. This is good and sturdy, it will last for years, and the 6″ openings make it easy to get your hands in to tend the plants and harvest the fruit. If you pound a wooden stake into the ground and attach the cage to it, it will hold up. If it is still chilly and the plant has outgrown the milk jug, take a large, clear plastic trash bag, cut the bottom open to make a cylinder out of it, and drape it over the outside of the cage so the top stays open. Clothespins will hold it up and small stones or scoops of soil will hold the bottom edge down on the ground and keep the wind out. Once the weather is reliably warm, take the bag off.
Cut the bottom horizontal wire off your cages, leaving 6″ long vertical metal spikes, Ellen. Then just wiggle the cage as you push down, and that cage isn’t going ANYWHERE. We plant our tomatoes and peppers in our raised beds, then put down sections of newspaper about 6 pages thick, making sure they overlap about 1″ and tear small slits to fit around the plant stems.
When we have covered the entire raised bed, we cover the papers with an inch or 2 of fresh grass clippings and water the entire garden with the sprinkler. Once everything is soaked down, we put our cages over the plants. A firm shove and wiggle will get the 6″ horizontal spikes to pop through the wet newspaper. You will never need to pull a single weed all year, and water consumption drops drastically. We had a 2 month period where the high temp for the day never dropped below 90 degrees Fahrenheit for 6 weeks. We watered a grand total of 3 times during that period. The newspaper and grass clipping REALLY keep the moisture locked in. We never had a mold issue, either. That may be due to mixing 1 part sand to 3 parts topsoil when we initially filled the raised beds. Hard to tell at this point.
Thanks for the tips, Jeff! I did cut off the bottom horizontal wire and push it into the ground, but it still falls over in a strong wind, if the plant leaning on it is big and heavy. But I’ve also found that tying two cages together works well. Great tips about the newspaper and grass clippings too. Wood chips are also an awesome covering.
Olive on south Florida just south of the tropic line and I cannot grow more than 1 or 2 tomatoes. I put them in containers and I get lots of foliage. Many friend down here have said the same thing