


It seems that in these troubled times when the coronavirus is causing panic, a lot of people are looking for ways to take care of themselves without having to get out of the house.
Being able to self-medicate and heal your wounds is a priceless skill during this pandemic, and this article aims to teach you how to make antiseptics at home.
There’s been a lot of talking and debating on the internet about how to properly disinfect your home and how to buy certain products that would kill the Covid-19 virus. One of the most frequent topics I’ve seen on forums and various group chats regards the use of antiseptics since these work well on bacteria as well on coronaviruses.


The powerful antiseptics listed in this article can be easily made at home, and it will help you disinfect and treat your wounds when professional medical aid is not available. I’ve used them on various occasions, and I can personally guarantee these actually work.
These antiseptics were used by many generations before us, and in fact, many corporations have turned them into commercial products for profit, even though the essential ingredients remained the same.
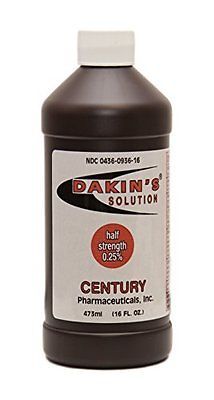
Dakin’s solution
Dakin’s solution is an antiseptic solution with a great history behind it and success stories that made it into a profitable commercial product. In fact, this now, common antiseptic was developed during World War I to treat infected wounds.
It was discovered by Henry Drysdale Dakin, a brilliant English chemist that helped save the lives of thousands of soldiers during War World I. At that time, it was called Carrel–Dakin solution or Carrel–Dakin fluid, and it was seen as a miraculous solution that could successfully cleanse wounds and prevent infections.
It was very popular, and it only lost some of its popularity in 1943 when penicillin became an established antibiotic with a vast distribution. Even so, Dakin’s solution continues to be used due to its broad activity against aerobic and anaerobic organisms, including fungi and antibiotic-resistant organisms. Even more, it’s a very low-cost solution, and it can be found almost everywhere.
Dakin’s solution contains sodium hypochlorite (ordinary household bleach) and water. In my opinion, this is perhaps the most viable homemade antiseptic for preppers and survivalists.
It can be easily prepared by passing chlorine into a solution of sodium hydroxide or sodium carbonate. It can be used on humans without any risk, and it can also be used on animals. Homesteaders love this product as it helped them save many of their animals.
How to make Dakin’s Solution:
In emergency situations, you can make it at home without hassle since you might already have all the ingredients in your home.
You will need the following equipment: a sterile jar with a sterile lid, a clean pan with a lid, and sterile measuring spoons and cups. As for the ingredients, you will need water, baking soda, and bleach.
Once you have all the equipment ready and you gathered the needed ingredients you should do the following to prepare Dakin’s solution:
- Measure out 32 ounces (4 cups) of tap water. Pour the water into the clean pan you prepared.
- Boil the water for 15 minutes with the lid on the pan. Remove the pan from the heat.
- Using the sterile measuring spoon, add 1/2 teaspoon of baking soda to the boiled water.
- Now it’s time to add bleach and complete the Dakin’s solution. You can make one of several strengths, and you should measure bleach according to the chart below.

Once you made the Dakin’s solution, place it in the sterile jar and close it tightly with the lid. It can be stored at room temperature, away from light.
Recommendations:
- Before you start preparing Dakin’s solution, it is mandatory to sterilize all your equipment and contact surfaces and wash your hands with soap and warm water. Cleanliness is crucial if you want to make a good batch of this homemade antiseptic.
- It is mandatory to label the jar and write the date on it. I can tell you from experience that if the jar is not opened, it can be stored for 2-3 weeks.
- Once you open the jar, use the antiseptic as needed because once 48 hours have passed, you need to throw it away.
- Keep it out of the reach of children.
- It can be used as a mouthwash and to treat dental abscesses, but remember, DO NOT SWALLOW IT!
- If you are allergic to any of the ingredients listed above, don’t use it.
- I usually recommend using distilled water if available since tap water may contain unwanted chemicals.
- If your condition worsens or you develop a rash, the solution might have a stronger concentration than needed, and you need to stop using it.
Sugardine
I first learned about Sugardine more than ten years ago, and it was actually by accident. I saw my father-in-law use a sticky brown paste on a wound, on one of his horses. When inquiring about what he was using and doing, he told me that it’s an old remedy called Sugardine and that every serious homesteader knows how to make and use.
Digging a little more into this antiseptic, I found out that it’s actually a folklore medicine that was used in the old days as a primary method to treat abscesses and thrush on the hooves of horses. Even though it was used by many generations, it wasn’t until 1981 that science proved it works.
A five-year study was published in the Southern Medical Journal in 1981, and it stated the following: “The use of Sugardine seems to accelerate granulation tissue and epithelial tissue production, thereby covering wounds, burns or ulcers with skin.”
The topical application of Sugardine was proven to stimulate wound healing by activating keratinocytes and fibroblast functions. Besides having an anti-microbial effect, it promotes re-epithelialization and granulation tissue formation.
Sugar accelerates the extra-cellular urokinase-type plasminogen activator (u-PA) and stimulates the transforming growth factor (TGF). The mixture of sugar and iodine acts on wounds not only as an antibiotic agent but also as a modulator for keratinocytes and fibroblasts.
Just like Dakin’s solution, this is an ideal solution for preppers and survivalists since it’s cheap and easy to make in the comfort of your own home. And to make things clear, this is proven healing methods backed up by science.
So if you have to deal with a cut, a burn or an abscess is giving you a hard time, you can use Sugardine, and you won’t have to worry anymore.
How to make Sugardine:
To make it easily at home, you will need table sugar and 10% povidone-iodine or Betadine (more expensive alternative).
Follow these steps:
- Mix one part 10% betadine or povidone-iodine with sugar
- You will need to add more or less sugar to reach the desired consistency. It should be like thick honey when all mixed together
- Once it has the desired consistency, put it on the wound. You can also store the leftover in a container for later use.
Check on your stored Sugardine and stir it every now and then. The best part is that Sugardine never goes bad, and it only changes color (gets darker).
It’s a great alternative, just like Dakin’s solution, to keep in your bug out bag. I carry Sugardine with me whenever I go camping for extended periods of time.
Recommendations:
- If the wound is leaking, you need to replace the Sugardine or add more sugar to the wound. Avoid letting it get waterlogged as it will do more harm and good. Your goal is to make a thick paste with a granulated texture. The texture of Sugardien should be similar to the one of peanut butter.
- Keep it out of the reach of children.
- Make sure you use the Betadine solution and not Betadine Scrub. They look almost the same, but the scrub is slightly bubbly.
Honey and sugar mix
These are two ingredients that can be found in pantries all over the country because they have an indefinite shelf life. If you lack iodine or bleach and you can’s make the first two listed antiseptics, there’s still a chance to make your own homemade antiseptic.

Using a mix of honey and sugar on open wounds is the most ancient method of self-healing known to man. It dates back to the Ancient Egyptians when the process of using this remedy was first documented. Even more, this self-healing aid is also mentioned in the Bible, Koran, and Torah.
It became so popular that armies all over the world used this remedy to cleanse and heal traumatic war wounds where the loss of flesh lead to infections. This remedy was even used for gunshots wounds.
Why this mix works
Sugar is a short-chain, soluble carbohydrate composed of carbon, hydrogen, and oxygen. It can be found under many names, such as glucose, dextrose, fructose, galactose, sucrose, maltose, and lactose. Sugar has high osmolality, and it’s able to draw fluid out of the wound. It reduces water content in the injury and inhibits the growth of bacteria. It is also helpful in removing dead tissue while preserving the tissue that is still alive.
Honey is a viscous, hyper-saturated sugar solution made from 75-80 percent sugar and 20 percent water. It is very effective at killing staphylococci, including the community-acquired methicillin-resistant Staphylococcus aureus, within a few hours. Honey also has anti-inflammatory activity, and its ability to absorb water provides antiseptic action. Scientists believe that the healing proprieties of honey are derived from its ability to produce hydrogen peroxide from the glucose oxidase enzyme found in its composition.
How to use honey and sugar on wounds
One important step is to make sure that the wound has stopped bleeding and was properly cleaned. You can clean the wound with a bar of mild soap and warm water if nothing else is available. Most preppers I know keep the saline solution at hand for this purpose, but water and soap will work as well.
Once the wound was cleaned, pat the area with a sterile pad until there is no more moisture inside the wound. The honey and sugar will react and bind with calcium, and calcium will not be present due to bleeding. That means no clot can form.
Now pour the granulated sugar into the wound, making sure it gets as deep into the wound as possible. Do not just sprinkle it on the surface and outer rim of the wound. If the wound is too large, you need to apply honey first and then add sugar on top (you can mix sugar and honey until you make a thick paste).
Once this step was completed, you will need to cover the wound with a clean bandage and secure it with tape or clips. A bandage is necessary as it will prevent the honey and sugar from leaking out while at the same time will protect the wound from external debris and bacteria.
Recommendations:
- Use only granulated sugar for this antiseptic as it creates a ticker texture when mixed with honey.
- Change the bandage and repeat the cleaning and sugar application once a day.
- You will have to change the bandages more than once per day, depending on your wound, and when you notice the bandages are wet from the removed fluid.
- Commercial honey is not as effective at treating wounds as raw honey.
- The best honey you can use is Manuka honey. Although it is more expensive, it is much more efficient, and even the New Zealand army forces use it.
- Avoid using this antiseptic on infants since they may develop botulism from honey.


Concluding
The antiseptics listed in this article are ideal for the layman, and I recommend reading and learning about them as much as possible. I’ve tried them on myself, and they worked great for me. Even so, that doesn’t mean they will work just as well for you, and you should research them furthermore in order to make sure you are safe when using them.


I would like to suggest adding ethanol to your list. It is a great antiseptic as well as surface and hand cleanser. It has the added benefit of also being useful as a fuel and is a consumable.
I would add colloidal silver and tannic acid to the list. Both are very easy to make. I am not going to make a list of directions. One can research those for themselves.
How do you make a saline solution?
Despite criticisms that have been launched against hydrogen peroxide, my reliance upon it as a teenager and young woman permitted my escape from all acne scars.
Additionally, although I rely on a daily non-fluoride, aloe vera based mouthwash (since I have no allergy to aloe vera!)…. there have been occasions when hydrogen peroxide solution had more quickly stabilized periodontal flare ups
Bob, thanks for your mention of the antiseptics. I was not familiar with them; and now I know more.
I agree with RM P about hydrogen peroxide (H2O2). I have learned that Dr. Thomas E Levy, MD, JD (MD + Attorney), who wrote Rapid Virus Recovery, recommends nebulizing with Hydrogen Peroxide diluted with Normal Saline (that is 9.5% pure rock salt –from ancient salt mines) and purified, filtered or distilled water. Do not use table salt. Dr. Mercola recommends nebulizing with hydrogen Peroxide diluted with normal saline. I have learned that many dentists do this, because, after all, they have their faces just inches away from a potentially sick person’s mouth and nose. Also people suffering from seasonal and other allergies, etc. So as a precaution they nebulize with H2O2 diluted with Saline frequently during a day. Other MD’s support the practice. But it costs the price of a nebulizer (usually less than $100), and a face-mask accessory that works best for me, because I can snort the solution into my sinuses and kill viruses, bacteria, allergens, parasites, and toxins there, as well as in my mouth and past my tonsils, and into my lungs within five to fifteen minutes of inhaling the very fine nebulization mist. I breathe easier and rarely have to do it more than once at the “runny nose” phase of a head or chest cold. The Normal Saline is added to bring the mixture to the near viscosity (it is sort of like density) of normal blood that is in the lungs and elsewhere. I have been using a 3% grocery store bought Hydrogen Peroxide (by the way, not recommended by the doctors I read, because most have unknown stabilizers in them); and Normal Saline. On the other hand 3% hydrogen peroxide is better than nothing as said by all supporting doctors. I mix my hydrogen peroxide in a separate container, with half normal saline to get a 1.5% Hydrogen Peroxide in Saline solution. What Hydrogen Peroxide breaks down to is: hydrogen, oxygen, and water, the three most essential minerals in the body. Also Dr. Levy explains that the body makes its own H2O2 and uses it to kill viruses, bacteria, parasites, allergens and toxins in cells throughout the body, and when used with Vitamin C in the body (such as from a pill taken thirty minutes before inhaling) a body-made Fenton Reaction occurs. Apparently all viruses and bacteria have an iron molecule on their back. Vitamin C can spark the Hydrogen to burn the iron molecule that kills the virus and bacteria (my explanation is overly simplified), after which immune system “eaters” haul the bad-boy virus off, recycling anything useful to the body, then flush the rest down toward to the poop tube. However in a grid down situation one would need either a fuel-based or solar generator to produce electricity to power the nebulizer. So in this example, hydrogen peroxide is beneficial NOT JUST FOR skin surface cuts and wounds, but also for reducing the amount of virus, bacteria, etc. inside the body; and Doctors recommend H2O2 for ear-ache wash and for gargling in the mouth (but don’t swallow it). At least in a Bug In situation this works. I suspect in a Bug-Out situation, one would need a medium size Bug-Out-Bag to haul nebulizer with li-ion battery, and fluids, and pills of all sort, and bandaids, wraps, splints. Medicine is a big deal. BTW I did not intentionally mention any of this to discount in any way, what Bob has presented.
I was hospitalized with Cellulitis. It was suggested to spread Manuka honey on to the inflamed skin. In 2 days the intense swelling, red skin and pain subsided enough to be released from the hospital. I sware by Manuka honey for all of my cuts and abrasions.
A local OBGYN used local honey on his patients who just c-sections. His infection rate was far lower than other doctors using “medicine” on the stitches.