


You don’t need a lot of room to have a garden!
In fact, you can start a container garden that takes hardly any space.
Many people have a vision in their mind about what a garden “should” look like. And if they don’t have the space or resources to make it happen, they just give up on the idea of gardening.
But, there’s not a right way to garden. You can find creative ways to grow food wherever you are living.
Don’t hold off improving your ability to produce your own food because you can’t yet plant the garden of your dreams. Start now, and slowly build your gardening experience. Then when you do have the space and resources to expand, you’ll be ready.

Container gardening is a method that’s perfect for beginners, or people without a lot of room. Ready to get started? Great!
Evaluating Your Space
Take time to honestly evaluate the space around you. Where can you make room for a container or two? The ideal space will have sunshine for 6-8 hours every day.
To keep this project as simple as possible, you can either make room outside, or inside by a window that gets plenty of sunshine. Of course, you can start a container garden anywhere in your house, but then you’d need grow lights and this article isn’t going to focus on that.
Take a good look around you and decide what can get moved to make room. Can you squeeze a container onto the windowsill in the kitchen? Would one fit on your deck if you scooted the BBQ over?
Get creative, and you’ll be amazed at how many little spaces you can find.
Gather Containers
Now that you know how much space is available, it’s time to find your containers. You have plenty of options, so don’t feel like you must rush out and purchase special pots or cedar beds.
If you plan to upcycle, make sure the container you select has never stored toxic material. You will be eating what you grow and don’t want anything to seep into your plants. Also check your container and make sure there’s no peeling paint.
 You want containers that are deep enough to hold plenty of soil, to support the roots. At a minimum, you want it to be six inches deep, but eight or twelve gives you more variety in what you can plant. Some plants (like tomatoes) require even more depth, so the containers you have space for will impact what you can grow.
Consider upcycling:
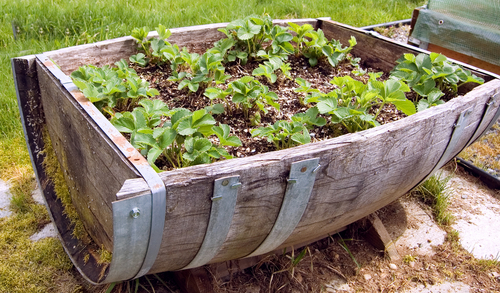
- Wine crates or wooden fruit boxes
- Plastic gallon milk jugs
- Large ice cream containers
- 5-gallon buckets
- Reusable grocery bags
- Wicker style baskets
- Plastic storage container
You need water to be able to drain from your container of choice. If the material isn’t porous, drill a couple of holes into the bottom.
You want to avoid tiny containers, as they won’t hold enough soil to keep the plants moist.
Plan Your Plants
Before you start sticking seeds into your containers, take time to plan. When you’re getting started with a container garden, you want to grow foods you want to eat. You also need to match the plant to the depth of your container.
Bigger plants need bigger containers. If you just have a tiny space, salad greens or herbs are a great way to get started!
Here are ten of the simplest plants to start with, along with how deep of a container they need. You can use this as a quick reference to plan your garden.
- Arugula – 6-inches
- Bell peppers – 10-inches
- Carrots – at least 12-inches
- Cucumbers – at least 16-inches
- Lettuce – 6-inches
- Onions – at least 10-inches
- Radishes – 6-inches
- Spinach – 6-inches
- Tomatoes – at least 12-inches
- Turnips – 18-inches
For root vegetables like turnips and carrots, you want to make sure and read the details about the variety you plant. You don’t want your vegetables to wind up pushing against the bottom of your container.
Decide what you want to plant in each container. If you have large containers, you may be able to plant two or more smaller plants in it. The seed packet you use will tell how much space is needed between plants.
Fill with Soil
Your plants need soil to grow, so now is the time to fill your containers. But, your container will get heavy when you fill them with soil. It’s a good idea to have them where you want them first. That way you don’t have to try to move them when they’re planted.
It will take several gallons of soil to fill each one. For a circular pot that’s 10-inches in diameter, you can plan on using at least 3 gallons (.46 cubic feet) of soil mix. A container that is 18-inches in diameter will need much more, at least 15 gallons (2.3 cubic feet.)
 You have a couple of choices for your soil.
The most expensive is to purchase potting soil or other bagged soil and use it to fill your containers. One benefit of this is that your plants will typically grow better with this soil. It’s been formulated for containers and drains well.
You can also fill your container with regular old dirt if you have access to some. However, this increases the number of weeds you must deal with. It also will require more fertilizer or compost to get a good yield.
Finally, you can do a combination of regular dirt and potting soil. This is a good way to get the benefit of potting soil without the total expense.
There are many add-ons you can mix into your soil. These include peat moss, dolomitic limestone, perlite, and compost. Each help improve the soil. Some keep plants watered the appropriate amount, and others give plants nutrients.
As you learn more about gardening, it’s a good idea to experiment with these add-ons. You can find the perfect combination for growing in your area.
But, it’s easy to get overwhelmed with all the information when you’re first starting out. So, I recommend keeping it simple, especially for your first year.
Whatever type of soil you use, don’t pack it into your container. You want it to be fluffy and loose.
Time to Plant!
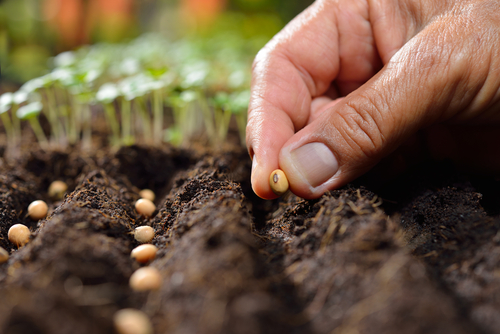
Once your soil is ready, it’s time to start planting. You can plant seeds or plant starts in your containers. Seeds are less expensive but take longer. Starts cost more but reduce the length of time it’ll take to see a harvest.
If you are starting with seeds, don’t make the mistake of burying them too deep in your soil. Most seeds thrive close to the surface, where they benefit from the sunshine.
Keep the soil loose around the seeds, don’t pack it down.
Once you’ve planted, it’s time to water. Carefully add enough water to soak the soil, several inches down. This deep watering will help keep the soil ready for where the plant’s roots will be.
After the initial watering, your gardening set-up is complete. Now it just needs consistent care until it’s time to harvest.
Keep It Growing
Since you’ve made it through the initial stage of starting a container garden, a lot of the hard work is behind you. Now, it’s a matter of keeping your plants happy and healthy as they grow.
Water and sunshine are essential. You need to make sure your plants don’t get thirsty. Because there isn’t as much soil in a container to hold the moisture, your plants need watered frequently.
If you are leaving town, see if someone else can water for you. Or, invest in some watering bulbs to ensure your plants stay moist.
Check the soil daily and make sure it still feels moist an inch or two down. If it isn’t, gently water your plant.
While you’re watering, you can quickly pluck any weeds that have started to grow. If you do this frequently, you’ll never have to spend a ton of time weeding.
You can also check the status of your plants. They should be healthy looking. If you notice them wilting, getting spots, or looking poorly, make sure they’re getting enough sunlight and water. Adding fertilizer or compost can help plants stay strong and healthy.
Expand Your Container Garden
I recommend starting small with any garden. You don’t want to have a ton of time and expense into your project when you first start.
Your first year, you may decide to grow two different kinds of plants in containers. And that’s okay! You can gain valuable knowledge and experience from just getting started.
The next time you plant, you’ll have more confidence and can expand your container garden.
Have you ever grown plants in a container? Would you add any advice to beginners? Please share in the comments.


I really enjoy the creativity of small space gardening, and realizing how much harvest can be obtained even though the setup may not look conventional. I did learn that many times soil dries out faster in containers than in the ground or in raised beds, so get creative there too. For example, if you have terracotta pots, paint the outside (only) with polyurethane to slow down how much the soil dries out compared to in-ground planting. You can do the same for old wine barrels or wooden boxes. If you use plastic crates, including those with an open weave, line them with plastic garbage bags before putting the soil in.
Then be creative about water usage, especially if your area is in a drought, or you just want to be an “energenius” to help the planet like my grandson says. Figure out ways to take showers in a way that conserves water to offset what you use in the garden, ditto with washing dishes and other household use of water. All these measures help with consistent watering of a container garden w/o stressing your water bill too much, or the planet.
I have done a variety of gardening over the years, including container gardening. The author is correct in mentioning that container size is an important aspect to consider. Tomatoes do not do well in shallow containers, they need more like a 5 gallon bucket. I also will emphasize that using ‘plain old dirt’ in containers does not work well. You don’t need to ‘break the bank’ buying potting soil, mr. google can give you directions to make your own, using your own soil and some purchased amendments. And as Deborah mentioned in her comment, containers need more frequent watering than ‘in ground’ planting, usually daily, and she offers some great ideas on that.
I am an American living in the Philippines and the lack of space in some areas is because of the many red ants in the soil. To get around this my wife plants using a hanging container made by cutting 2 liter plastic soda bottles in half and hanging them up off the ground.