


Soil is essential for growing a traditional garden. It nourishes your plants, and helps produce an abundant harvest. Your soil needs care.
You can’t just drop seeds in the ground and expect a ton of produce. Gardening depletes the soil of essential nutrients. As a gardener, it’s essential to put those nutrients back.
In today’s society, many people turn to chemical fertilizers. These have been specially formulated to give your soil an exact dose of nitrogen, phosphorus, and potassium. But, chemical fertilizers also contain undesirable ingredients. They also don’t take into account the other vital nutrients your soil needs.
A better solution is to save your soil naturally. You’ll be giving your soil exactly what it needs without any needless chemicals. You’ll also be prepared for a crisis situation. If you aren’t able to buy chemical fertilizer or fancy test kits, your garden will still grow.
What Nutrients Does Soil Need?
There are almost twenty basic nutrients that your soil needs. Three of them are vital:
- Nitrogen
- Phosphorus
- Potassium
The other nutrients are also important. But, not every plant needs exactly the same amount of each of these. That means some plants will still grow well even with a deficit. Those nutrients are:
- Magnesium
- Sulfur
- Calcium
- Iron
- Zinc
- Boron
- Chlorine
- Manganese
- Nickel
- Copper
- Molybdenum
- Hydrogen
- Carbon
- Oxygen
Over time, your soil will lose some of these nutrients. Ideally, you’ll take little steps each year to keep your soil healthy. You can create your own fertilizer and add a mulch layer in the fall. These maintenance steps will help keep your garden growing.
However, it isn’t always enough. There will be times when a more intensive treatment is necessary.
How Do You Know When to Improve You Soil?
If your garden has been producing well and then your harvest slows down, it could be time to recharge your soil. There are other signs to watch for as well. Let’s look at four common gardening problems that indicate a soil problem.
Discoloring Leaves
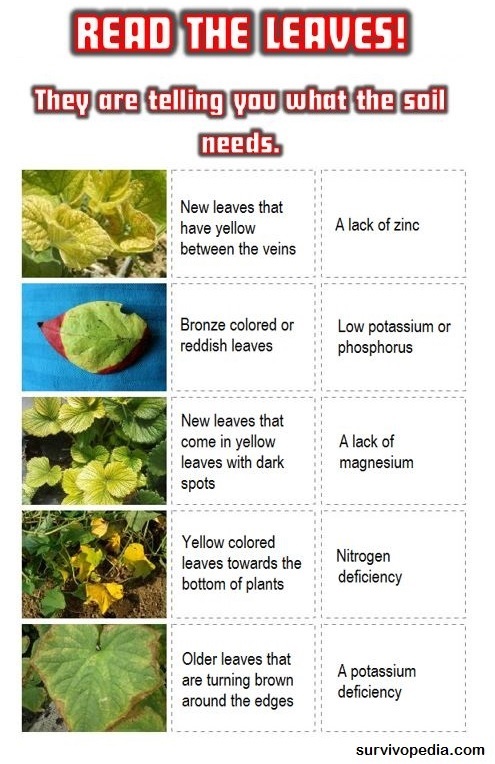
If your plant’s leaves are changing colors, your soil is trying to tell you something. Take time to examine your plants throughout the growing season to check on the status of your leaves.
Look for yellow colored leaves towards the bottom of plants (a nitrogen deficiency), bronze colored or reddish leaves (low potassium or phosphorus is the likely culprit), new leaves that come in yellow leaves with dark spots (a lack of magnesium), older leaves that are wilting and turning brown only around the edges (a potassium deficiency), or new leaves that have yellow between the veins means (a lack of zinc).
Discolored Plants
It’s not only the leaves that can change color. Whole plants can as well. Here’s a couple of common ailments that cause plants to be discolored:
- Purplish plants – a phosphorus deficiency.
- Pale yellow plants – a lack of sulfur
Diseased Plants
If you suddenly start having an increase in diseased plants, it’s time to check the status of your soil. A good dose of compost will help replace many of the nutrients your soil needs. Healthy soil is more likely to produce healthy plants.
Diseased plants also indicate it is time to rotate your crops. Each crop takes a different amount of nutrients out of the ground. A simple rotation schedule will help revitalize your soil.
Excessive Moss Growth
Is moss starting to creep into your garden? Moss thrives in acidic soil. It’s an indicator that your soil is becoming too acidic.
How Do You Naturally Add Nutrients to Your Soil?
If you can get your hands on some rabbit droppings, you’ll go a long way to restoring the nutrients in your garden. Other manure helps too—just make sure to manage it correctly before adding it so you don’t burn your plants.
A compost pile is vital. If you don’t already have a pile going, start one today. That way you’ll be all set when you really need it.
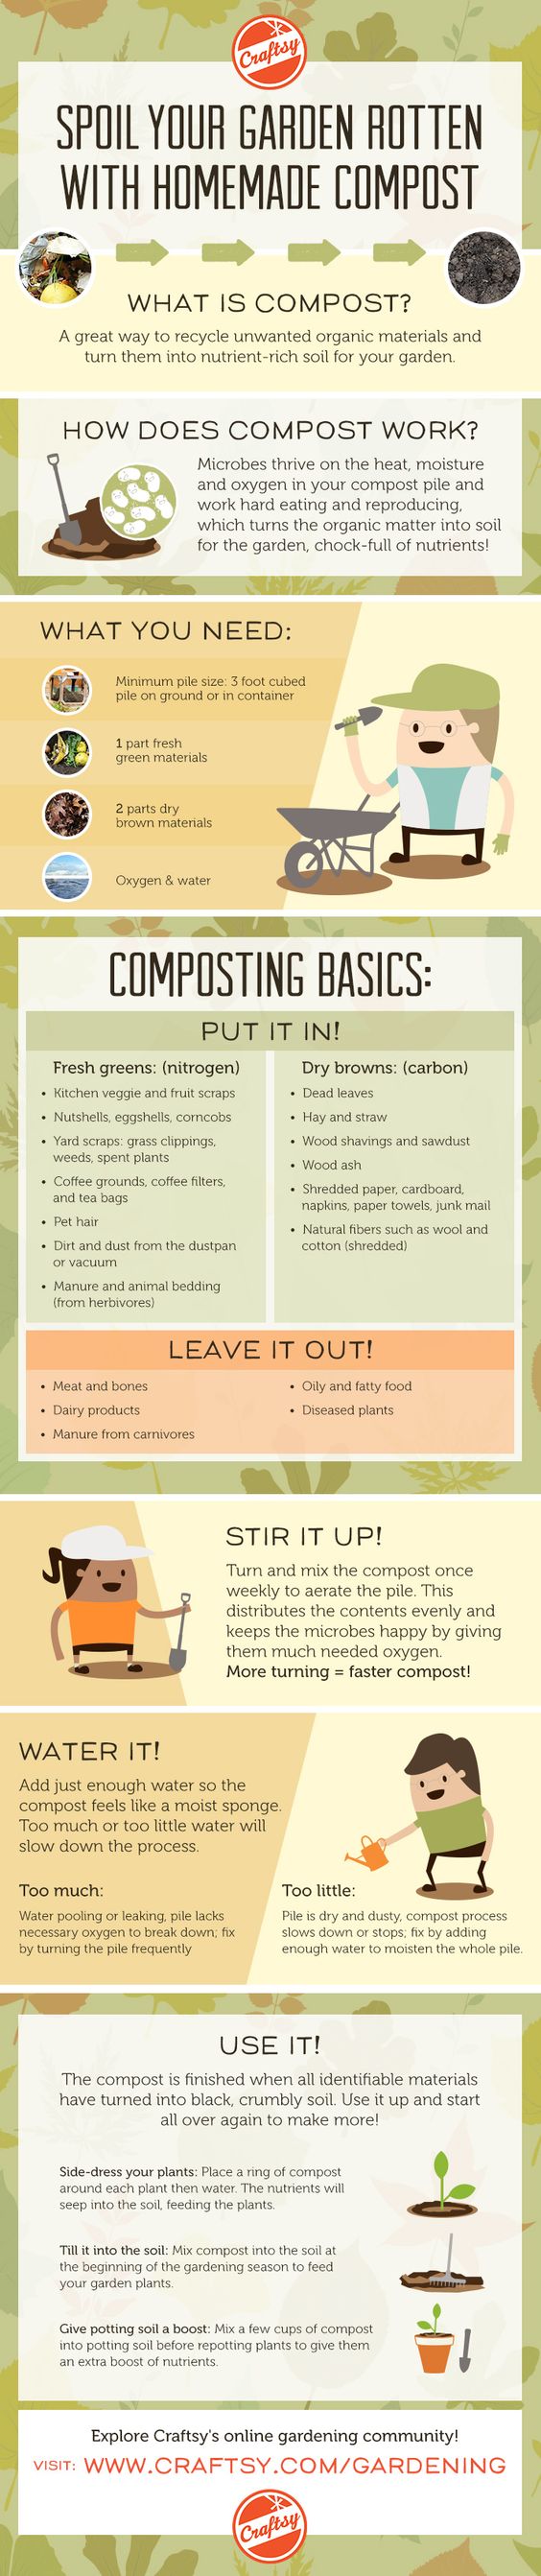 All the organic matter you add to your soil helps feed the tiny microorganisms living in your soil. Those creatures digest the material you added. This process helps improve your soil structure and increase your yields.
You want some bugs in your garden; just not the pesky kind. Here are a few useful bugs you should have in your garden, and the plants that you should grow to attract them:
- Ladybugs – Plant dill, fennel, yarrow, angelica and coreopsis to attract lady bugs and their mighty larvae.
- Lacewinds – Plant cosmos, angelica, sweet alyssum and coreopsis to attract lacewings to your garden.
- Pirate bugs – They are attracted by goldenrods, daisies, yarrow, alfalfa, buckwheat, corn, willows and flower pollen and nectar.
- Soldier Beetles – Attract soldier bugs with marigolds, catnip, hydrangea and goldenrod.
- Spined Soldier Bugs – Attract spined soldier bugs with perennial plants because that’s where they take shelter.
- Ground Beetles – Plant perennials to attract them and provide ground cover such as logs or rocks for them to hide under.
- Tachinid Flies – Plant flowers with lots of pollen and nectar to attract them. They also like herbs such as dill, parsley and sweet clover. Let a few of your herb plants flower for them because that’s the part that they like best.
- Dragonflies – To attract dragonflies, build a little pond or leave a marshy area alone.
- Spiders – Plant flowers with lots of pollen and nectar to attract them. They also like herbs such as dill, parsley and sweet clover. Let a few of your herb plants flower for them because that’s the part that they like best.
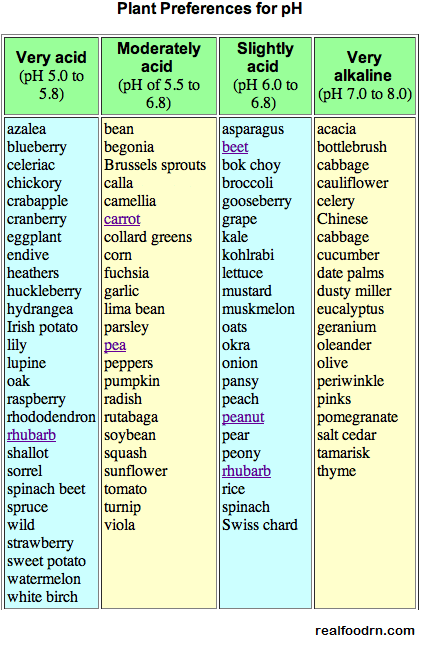
How Do You Naturally Adjust the pH of Your Soil?
In addition to nutrients, the pH of soil is important. Some plants prefer acidic soil. Others prefer alkaline soil. Many plants do well in neutral ground. pH test kits for soil are common in today’s society.
You can purchase DIY kits at the garden center, or pay for an analysis at an extension agency. If you’re able to test your soil today with a kit, you’ll get an exact pH reading.
But, we won’t always have these options. There are ways to naturally test the pH of your soil. While you won’t get an exact reading, these results will help pinpoint the status of your soil.
The Baking Soda and Vinegar Test
Baking soda and vinegar cause a chemical reaction when they’re combined. In fact, the fizzing, bubbling reaction is often used in children’s science experiments about volcanoes. These same ingredients can be used for a useful soil experiment as well.
The premise of this test is simple. You’ll get some soil and see how it reacts to vinegar. Then, you’ll see how it reacts to baking soda.
To prepare for this test, gather about a quarter cup of your garden soil. Divide this into two containers. In one container, add 1/2 cup of vinegar. Watch for any bubbles to form and listen for a fizz. If you don’t get a reaction, get your second container of dirt. You’ll need to mix this one with some distilled water to make a slurry. Then, sprinkle about ½ cup of baking soda over the top.
Here are what the results of this test indicates:
- Baking Soda Reaction: Acidic soil
- Vinegar Reaction: Alkaline soil
- No Reaction: Fairly neutral soil
Homemade Litmus Paper for pH Testing
You can also test the acidity of your soil by creating your own litmus paper out of cabbage leaves. My kids and I tried this as a science project one spring. It worked well! Here’s how you do it:
- Take a quarter of a red cabbage and roughly chop it into slices.
- Add your cabbage to a saucepan with a half-cup of water.
- Bring the water to a boil, and keep it boiling for 15 minutes. Then, strain out the cabbage and save your water.
- Cut a couple of coffee filters into strips, then soak them in your saved cabbage water. They’ll absorb the color. Let these strips dry completely.
To use your strips to test your soil, you’ll need to create a slurry out of your soil again. Just add distilled water until it’s nearly liquid. It’s best to test the soil from a few different parts of your garden, which means you’ll use more than one strip.
When you’re ready to test, dip a test strip in your soil slurry and hold it for half a minute. Pull it out, and watch the color change. It’ll turn a shade of red or pink in acidic soil. Conversely, it’ll be blue or green in alkaline soil.
More Shelf Stable pH Test
You can keep your cabbage based litmus paper for a couple of weeks before it loses the ability to accurately test pH. But, you may not always have access to a fresh cabbage. There’s an alternative solution to create your homemade pH indicator.
You can use a combination of turmeric and water. Turmeric is shelf-stable, so be sure to keep some in your stockpile of food. Whenever you’re ready to use it to test the pH, add a bit of distilled water to make a liquid. Then add distilled water to a few tablespoons of soil create a liquefied soil. Add a couple drops of your turmeric test solution to your soil mixture.
Watch closely for the color change. Soil with a pH below 7.4 will be yellow. Soil with a pH above 8.6 will be a dark orange-red color. It’s not quite as accurate as the cabbage test, but it will give you a good idea about the condition of your soil.
 How to Amend Soil pH Naturally
Now that you’ve tested your soil, you can take natural steps to improve it. If your soil is acidic, you’ll want to add wood ash or a generous amount of crushed eggshell. These elements will help move your soil closer to neutral.
If your soil is alkaline, you’ll want to add different natural matter. Pine needles work well to help adjust this type of soil. Spread a layer on in the fall so they have time to decompose over the winter.
Start Saving Your Soil Today!
Are you gardening? If you’re not, you should be. Even if you just grow one or two items, the practice will help you learn how to save your soil.
Building healthy soil isn’t a quick project. It requires time and effort. But, it’s possible.
What other tips and tricks do you have for naturally testing and improving your soil? I’d love to hear them, so please share in the comments below.

This article has been written by Lisa Tanner for Survivopedia.


THANKS SO MUCH FOR YOUR ARTICLE ON SOIL. THE WAYS TO TEST YOUR SOILS PH IS SOMETHING VERY HELPFUL TO ME BEING THAT IT DOESNT REQUIRE A PH TEST KIT OFF A SHELF. GOOD THINGS TO KNOW. MY CHILDREN AND I GROW A GARDEN EVERY YEAR AND CAN ALMOST EVERYTHING. I ALSO PURCHASED THE AQUAPONICS MATERIAL FROM ALEC DEACON A COUPLE YEARS AGO AND HIS METHOD WITH ALL THE VIDEOS AND INFO IS EASY TO UNDERSTAND FOR A BEGINNER. PEOPLE NOW DAYS HAVE NO CLUE WHERE THEIR FOOD COMES FROM OR HOW TO GROW ANYTHING. SADLY, MOST PEOPLE DON’T KNOW WHAT A MATER PLANT EVEN LOOKS LIKE. YES, I SAID MATER PLANT, I LIVE IN ALABAMA AND SAYING TOMATO PLANT JUST ISN’T NATURAL! I REALLY APPRECIATE PEOPLE LIKE YOU WHO GIVE THEIR TIME AND KNOWLEDGE TO WRITE THESE ARTICLES AND SHARING YOUR KNOWLEDGE. RABBIT MANURE IS THE ABSOLUTE BEST TO USE IN YOUR GARDEN. WE HAVE MEAT RABBITS AND THE RABBITS FEED US AND THEIR DROPPINGS FEED OUR GARDEN, AND OUR GARDEN FEEDS OUR RABBITS. PEOPLE THAT CAN’T SUSTAIN THEMSELVES OR THEIR FAMILIES AND DON’T HAVE THE KNOWLEDGE TO GROW OR RAISE ANYTHING WILL BE IN A WORLD OF HURT WHEN A CRISIS HITS. BUT EVERY INDIVIDUAL HAS THE SAME OPPORTUNITY TO LEARN AND EDUCATE THEMSELVES AND THEIR FAMILY TO LEARN THESE THINGS AND APPLY IT TO THEIR WAY OF LIFE. SADLY, PEOPLE ARE TOO BUSY DOING OTHER THINGS AND THINK GROCERY STORE SHELVES WILL ALWAYS BE FULL. AGAIN THANKS SO MUCH FOR YOUR ARTICLE AND I APPRECIATE EACH AND EVERY PERSON WHO KEEPS THIS SITE GOING AND ALL WHO POST ARTICLES AND SHARE THEIR KNOWLEDGE. YOU’RE VERY MUCH APPRECIATED.
KIND REGARDS
MARC
I throw a chicken bones in my wood stove when I have a good hot fire going in winter. I set the ashes aside until spring when I add it to my garden bed. It boost calcium and helps in combatingpreventing blossom end rot.
I throw chicken bones in my wood stove when I have a good hot fire going in winter. I set the ashes aside until spring when I add it to my garden bed. It boost calcium and helps in preventing blossom end rot.
Help? My squash and cucumbers die early most every year right after the
first harvest if i am lucky enough to get a harvest. I have no idea why
but the leaves turn white and moldy. I am wondering if the garden dust i
use to prevent Squash bugs is killing my plants ? Can any one tell me what
i need to do to prevent this please?