A simple hike can suddenly turn into a Bear Grylls episode, a struggle for survival, if you’re unlucky enough to find yourself in the wrong place at the wrong time. Basically, in a matter of hours, you may very well find yourself stranded in the wild with no help in sight, completely on your own.
And I am talking here about a sudden change of weather conditions, or you may simply lose your way, which may lead to numerous days of no one (including you) being aware of your whereabouts.
When it comes to wilderness survival, fire is one of the essential things to take care of, as it provides a number of benefits, including warmth, which helps with avoiding hypothermia. It also allows you to cook your food, boil water (read sterilize), signal for help or keep wild animals away.
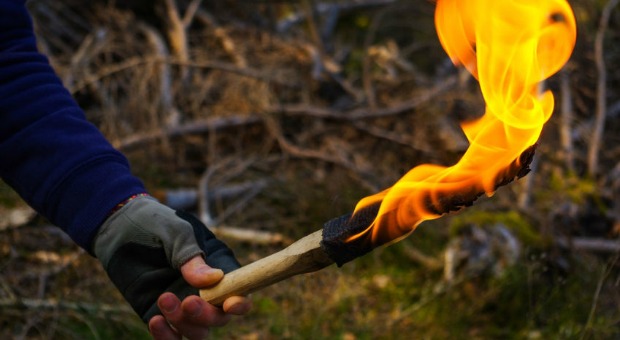
Today’s article will teach you how to make a torch in the wild.
The first lesson to be learned is to never go into an adventure unprepared! The thing is, if you’re planning an outdoors trip or a hike or whatever, always take survival gear with you, the essentials so to speak, which must include a compass, a map, a flashlight, a knife, a first aid kit, proper clothes, emergency food, waterproof matches/a fire starter kit, and always expect the unexpected.
3 Second SEAL Test Will Tell You If You’ll Survive A SHTF Situation
Speaking of torches and fire, one of the most underrated benefits of fire is the light it yields. And here’s where torches come into play.
Torches were used by humankind for thousands of years to illuminate the darkness of night, long before we discovered kerosene lanterns or electricity. When SHTF, DIY oil lamps and candles may be the preferred method of lighting for indoors use, but torches are the way to go in a wilderness survival scenario.
DIY-ing a torch using readily available materials is the perfect way to bring light wherever required; hence it’s an essential skill to master if you’re in the survival business.
To begin with, many folks have their minds warped by Hollywood movies that always make everything look incredibly easy, including making a torch in an emergency. If you think about a scene with someone, let’s say Rambo when he’s stuck inside a tunnel or a cave in Afghanistan, you’ll remember how our hero just grabs a femoral bone from some expired explorer, then wraps it up in rags and lights the gizmo on fire. And obviously, the fire lasts for hours and lights up the place like Frodo’s magic light of Earandil (if you know your LOTR). As you may imagine where this is going, reality is not as simple as Hollywood portrays it to be.
How To Make A Primitive Torch
In medieval times, torches were improvised from sticks of wood (or branches), preferably wet/green wood for preventing the fire from burning up one’s little digits. River cane, cattails, reeds and bark can also be used. However, certain types of torches must be bound using twine or similar stuff for keeping them sturdy. Obviously, certain varieties of bark, wood, etc. burn better than others, but in a survival situation, one can’t always be picky.
The most straightforward torch design is composed of a stick featuring a bundle of rags bound to one end, then soaked in tree sap, pitch, oil, or animal fat. In case you don’t have rags or clothes to spare, you can wrap bark around the stick’s end and stuff it with dry grass, moss, small bits of wood or leaves.
You’ll still need to soak some flammable material on the end (animal fat, pitch) to prevent your improvised torch from burning too fast or blowing out when you least expect it.
To get more specific, the most primitive torch that will last you for a while can be improvised from a freshly picked cattail. If you can get your hands on some grease or animal fat, not to mention lamp oil, this incredibly simple survival torch may last you for hours and hours. Here’s a little video.
Video first seen on bushcraftbartons.
How To Make A Minimalistic Torch
Provided you can’t get any cattail, you will have to use the good old method of using a frayed branch along with some method for improvising your torch. As I already told you, the idea is to add a slow-burning fuel at the end of the branch, so the torch will burn for a longer period of time.
Rather than simply lighting the end of a branch (which is the most basic type of torch, because it really works, for a while at least), the idea is to create a proper torch that wicks and burns very much like a candle.
It would be ideal to carry some fire accelerants in your EDC survival kit, the likes of paraffin or cooking oil; these are excellent additives for a survival torch. If you don’t have them at your disposal, you’ll have to settle for animal fat (bacon grease if you’ve packed food, for instance) or tree sap.
A minimalistic torch can be improvised from a branch or green stick at least 2 feet long and 2 inches thick, cloth/birch bark, and some type of flame accelerant (animal/vegetable fat, paraffin, kerosene, etc.).
The torch will require a wick of sorts, which can be DIY-ed from strips of cloth. You must tear the respective fabric from a shirt or something similar. Alternatively, you can go for soft barks such as birch; i.e. find a tree and peel off a strip that’s about 2 feet long and 6 inches wide.
In the latter scenario, you’ll also require rope, twine, string or similar stuff to tie it securely into place.
Video first seen on Survival Elements.
The wick must be attached firmly to the torch then soaked thoroughly with the flame accelerant before you light it up. A birch wick already contains natural resins that will burn for a long period of time, so you don’t have to soak it.
In the case of fabric/cotton wicks, make sure you saturate the fabric thoroughly with the stuff, whether it’s oil, gasoline, wax, animal fat, or whatever. If it’s dry, the wick will burn rapidly and fall away. Remember, it’s a wick, not firewood; your goal is to burn the oil, not the bark.
How To Make A Tree Resin Torch
One of the most effective torches to be used in the wild is the pine pitch variety. Even if you don’t have access to fuels, pine pitch, also known as pine sap, is an outstanding fuel and also readily available. All you have to do is to find a pine tree then to cut off a branch.
Afterwards, you’ll have to split one end of the stick 4-5 times then jam a handful of thin pine shaving into the gaps of the split end. Upon lighting it, the fire will wick the sap from the branch and it will burn for at least an hour.
Video first seen on OutsideFun1.
If you’re lucky enough to have some toilet paper with you, you can DIY a nice torch with this humble material. You’ll require 1 greenwood stick and about 50 ft of TP of any kind, together with flammable materials, such as cooking oil/animal fat (a cup).
The trick is to wrap the toilet paper around the end of the stick while spinning it, so it will end up looking like rope. The loose ends of the paper must be tucked into the torch head, so it resembles a huge Q-tip. In the next step, you’ll have to stick the wick into the oil and let it soak properly for 2 minutes or so. That’s about all there is to it; now you’ll just have to light it up. This one will last you for up to thirty minutes.
Now that you know how to make a torch, take a moment and think: are you ready to use this knowledge to survive?
I hope the article helped. If you have questions or comments, feel free to use the dedicated section below.
This article has been written by Chris Black for Survivopedia.


