


According to various assessments, the majority of the population remains unprepared when faced with even a minor crisis. This becomes evident whenever a natural disaster or a situation caused by human actions affects a certain area. And to be honest, you don’t need statistics to tell you this, and you’ve probably seen it firsthand when the COVID pandemic hit.
As the last-minute panic ensues, it takes merely a few hours for the shelves of local grocery stores and convenience shops to be completely stripped of emergency provisions. In fact, everything people assume would be useful to their survival will vanish in no time. The most “desired” items, as we’ve all seen, are non-perishable foods, bottled water, and various comfort items.
Even gas stations suffer a similar fate, with anxious drivers enduring long queues in a desperate attempt to fill up their tanks. And big box stores are not spared either since these are seen as cornucopia by many and are their first target when the brown stuff hits the fan.
Those who are prepared observe these frenzied spectacles with disbelief and astonishment from the comfort of their own homes.
But why is that?
It’s because preppers and survivalists possess a well-thought-out plan and ample supplies and usually emphasize acquiring the skills that might one day save their lives.
However, is that truly enough?
Imagine a crisis striking while you are away from home or if circumstances lead to your separation from your main stockpile.
Do you have a backup plan?
What would you do then?
After meticulous planning and accumulation of resources, the unexpected loss of your primary supply source could put you at a significant disadvantage. If only you didn’t put all your eggs in one basket. Now, don’t get me wrong, dividing your resources doesn’t have to be complicated, and you just need to make sure there are some fundamental items to give you a fighting chance.
Let’s explore the numerous reasons why you should seriously consider having a secret stash, or perhaps even multiple ones.
What is the concept of a hidden stash?
A concealed reserve, also known as a survival cache, refers to a collection of provisions, equipment, and other vital items that are discreetly and securely stored in strategically advantageous locations for future retrieval and use. Think of it as insurance for your prepping plans.
The underlying principle is this: there are supplies that may become crucial for your survival one day. By placing these items inside a container and concealing that container in a carefully selected and secure spot, you ensure that you have options when and where they are most needed.
Why is a secret stash necessary during a crisis?
Those of us who prioritize preparedness don’t leave anything to chance. We invest significant effort into research, risk assessment, and exploring different options. We make our own survival plans, put them to the test, and continually refine our preparations and skills as circumstances evolve or when we identify opportunities for improvement.
We learned to recognize that knowledge and skills will always hold greater importance than material possessions, and we consistently seek ways to expand our knowledge base.
However, imagine for a moment that all the supplies you have so meticulously gathered were somehow lost or rendered inaccessible. While you still retain your knowledge and skills, as they cannot be taken away from you, would your survival plan remain viable without those essential supplies?
Having a secret stash of survival items out there is a means to ensure you have a fallback position. In moments of desperation, a well-placed survival cache may very well be the only thing that saves your life. It is not difficult to imagine the countless scenarios where you may one day be immensely grateful to possess a survival cache.
The secret stash or survival cache
Imagine if you had the unique ability to glimpse into the future and see the disaster that will affect your living area. Would you leave yourself a preparedness package? What items would you include, and where would you choose to conceal it?
Each situation presents its own unique circumstances, and it is crucial to meticulously assess our individual needs when making preparations. However, certain broad categories consistently overlap due to logic and reason, and that’s why you find somehow the same needs, regardless of the SHTF scenario you are prepping for. In virtually any survival scenario, the essentials encompass water, food, shelter, security, first aid, and medical supplies.
While having these fundamental supplies is undoubtedly valuable, it is even wiser to think beyond the basics. This entails incorporating reliable modes of transportation, fuel reserves, communication tools, and defense measures into your planning. All of these items can be included in your preparations and strategically cached. The goal is to anticipate your specific requirements and pre-position supplies and equipment to address those needs.
Containers for concealment
There is an array of options available when it comes to cache containers. In fact, I believe that, to a certain extent, almost any container can serve its purpose as long as it is appropriate for the specific circumstances and environment. Now, if you bury your supplies in a plastic bag in a damp environment, don’t expect the items inside that bag to remain dry for long. Ideally, your cache container should be able to withstand moisture and extreme temperatures, but also rodents and insects.
Here are some suggestions to get you started:
The #1 choice for many preppers – Plastic storage buckets
These buckets are cost-effective, waterproof, durable, and easily accessible, making them the preferred choice for many preppers. Some folks may even be fortunate enough to obtain some for free from local restaurants or grocery stores.
When using plastic storage buckets, keep in mind that you should avoid any buckets that previously held hazardous chemicals or toxic substances. Instead, stick with those that were previously used for storing food products since these are the safest options available.
Now, the bucket itself is a pretty sturdy container, but you need to provide an added layer of protection, and this means that you need to use airtight lids. Even so, I can tell you from experience that it’s not recommended to put all your trust in the lids, and you should also consider using a five-gallon Mylar bag for added protection. Heat-seal the bag before closing the bucket, and you should have a pretty decent cache.
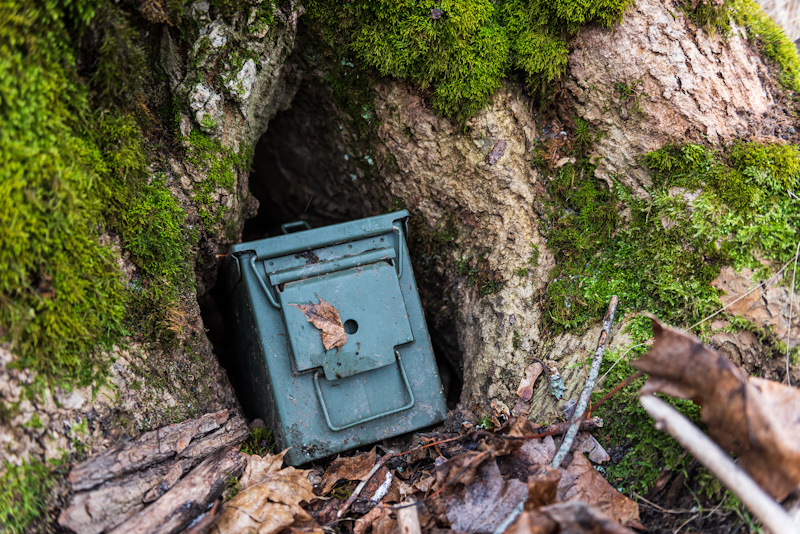
Ammo cans
For a more “professional” cache container, I recommend using ammo cans. Here you have two options, and you can use the steel or plastic ammo cans for your secret stash. Both choices come in various sizes and are equipped with rubber seals to ensure the contents remain clean, dry, and protected from the elements.
The steel ammo cans are sturdy and have great airtight and watertight properties, as well as the ability to be securely locked. However, keep in mind that prolonged exposure to wet conditions may lead to corrosion.
The plastic ammo cans, while similar to their steel cousins, are not as durable or robust. They are, however, lightweight and rust-resistant. These are also cheaper options and are a great choice for those working with a limited budget.
Regardless of the option you pick for your secret stash, make sure to secure contents that have been placed within using a Mylar bag, providing an additional layer of protection.
PVC pipes
For the handyman and pretty much anyone with enough curiosity and patience to build stuff on their own, the PVC cache remains king. I’ve built many survival caches over the years, including some for geocaching using PVC pipes with appropriate fittings. Everything you need can be readily found at your local hardware store, all for under $50.
A general note about mylar bags: Some folks will choose to use mylar bags as their cache containers, and this can be a proper choice, especially if you live in arid environments. However, even if these bags are versatile, they are not puncture-proof, and you need to pick a bag that is at least 4.0 mil thick to make sure it’s sturdy enough. Also, if you decide to store food items in mylar bags, it’s highly recommended to use oxygen absorbers. I, for one, never use just mylar bags for caches, and I usually place these in plastic or metal containers.
When picking a container for your secret stash, remember that it’s key to assess your specific circumstances, anticipate your needs, and choose cache containers that offer maximum protection and security for your supplies. With careful planning and implementation, you can create a hidden reserve that will prove invaluable when faced with unforeseen challenges.
How to make a cache container
If you’re looking to craft a straightforward and watertight cache container, using a PVC pipe is the way to go. It is an excellent choice. And all the necessary components can be found at your local home supply or hardware store.
Here’s what you’ll need for your cache:
- A two-foot section of 4” diameter PVC pipe.
- A 4” diameter PVC pipe cap.
- A 4” diameter PVC pipe threaded clean-out plug.
- Some PVC pipe cleaner and cement.
- Spray paint of your choice.
Follow these directions to assemble your cache container:
- First, you will need to pre-assemble all the pieces to ensure they fit together as intended. Lightly sand the inside of the PVC surfaces to be joined, and wipe them clean. Apply PVC cleaner to the surfaces and allow them to dry.
- Next, follow the instructions provided by the PVC cement manufacturer to apply the cement and join the individual pieces together one at a time. Avoid applying any cement to the threads of the clean-out plug because it would be difficult to access the items inside the pipe if you do so. Set the container aside to dry.
- Once dried, you can paint the container with spray paint for added camouflage and protection. The color and pattern you choose for the container should match the environment where you plan to stash it.
What should you include in your secret stash?
As I said previously, what you store in the survival cache depends on your needs, and it’s a matter of personal preference for many. Some may decide to store firearms, extra magazines, and ammunition, while others will go for prescription medication and glasses. I have a cache with a knife and small multi-purpose tools, but I also have a few others with MREs, maps and compass, paracord, and other items that would help me survive in the wilderness without stressing too much about it.
By carefully assembling your cache container and thoughtfully selecting the items to include, you’ll be better prepared to face unforeseen challenges and emergencies with confidence.
Where should you hide your cache?
For many folks out there, this is the most difficult aspect of survival caching, and finding the perfect storage location for your cache is not easy. The location is just as crucial as selecting the appropriate container, and this endeavor is even more challenging in urban environments.
Contrary to common belief, a cache doesn’t necessarily need to be buried to be well concealed, and you can often hide it in plain sight. In fact, I know from my army buddies that some of the caches their fellow brothers fail to notice were hidden above their heads in trees or other inconspicuous locations.
Consider the following suggestions when planning to hide your cache:
- Natural concealment: Take advantage of natural features in your environment to conceal your cache. Look for areas such as dense foliage, hollowed tree trunks, or rock formations that can provide natural camouflage. Ensure that these locations are not easily noticeable and remain undisturbed by regular human activity. In the wilderness, there are many such locations that would help you conceal your caches, and you just need time and patience while prospecting.
- In plain sight: Sometimes, the best way to hide something is right in front of everyone. Disguise your cache as something inconspicuous, allowing you to effectively hide your supplies while maintaining easy access and retrieval. For example, you could paint your PVC pipe to look like a log and store it with your firewood. Unless there is someone looking for free firewood, the cache should remain safe and undisturbed for a while
- In isolated areas: While this is usually an option for the wilderness, it can still work in urban environments where entire neighborhoods are abandoned. Seek out less-traveled but still accessible areas to hide your cache.
- Underground utility access points: Many urban and suburban areas have underground utility access points, such as utility boxes or manholes. These locations often blend in with the surroundings and may not attract much attention. By carefully securing your cache within one of these access points and painting the containers accordingly, you can take advantage of the existing infrastructure while maintaining easy access to your supplies.
A final word
Creating a well-planned survival cache requires careful planning, time, and effort. However, the potential benefits can be significant, and I find survival caches to be effective backups in case you cannot reach your base camp or the supplies you’ve stored at home.
Analyze your specific needs and identify items that address those needs effectively. Be creative and explore all available options for placement and retrieval. By being thorough and imaginative in your cache preparations, you’ll enhance your preparedness for unforeseen challenges and emergencies.


First, If you decide to bury anything in the ground, your site needs to be potentially visible from only one direction; and two at the most. It must be masked by at least two directions of planting observation. Anything less than that is very careless.
Secondly, anything you put in the ground will be “a Tell” if you do not go back and put more dirt (or plant weeds on the access point) in two to three weeks; and simply because everything put into the ground leaves a witness of earlier activity. This has always been true, even from the (USA) Civil War onward.
Thirdly, you will be a fool if you do not leave paper notes for yourself about everything your did, such as: Identifying the site in a way you remember, and identifying the depth of the top of you container. If you had to, take a rope with you and tie it to a tree nearby (then write down the rope distance, and do not lose the rope), dig and bury and cut the rope over the top of your dig spot (it will save you a lot of time, provided the tree or “landmark” you started your measurement with still exists when you go back to retrieve what you stashed).
Fourthly, you may be wise to bury ‘non-metalics” in one location, and bury metalics near a potential huge rock location. Why? Because many rocks are viewed as “hot rocks” meaning they have a lot of iron particles in it that metal detectors can pick up a signal, and especially in the woods—so a detectorist may assume (ass-u-me) that the signal came from the big rock and not from your buried container. If you use a landmark as a landmark, consider counting your steps and direction (from a compass) to the burial site and write it down so you can remember it).
Fifthly, Look at what is growing in the area where you plant your cache in the ground. Dig up weeds, grasses, whatever from fairly nearby and plant it over your cache site, but only so long as other grass or weeds are also in the area (because the soil is going to sink and create a visible depression where you dug (and potentially where you dug will appear sort of like a mini-crater, depending on how deep you dug. If I were to pass by your cache, I would spot it immediately, unless it was disguised by weeds, rocks, etc.
Sixthly, if you are going to plant an in ground cache, leave a note identifying yourself, why you did it, and your request that it be reburied. I say this because I have found plenty of hidden stuff, with no notes and could not determine if it could have been buried 20-120 years ago, or just 20 days ago. So here is the crux dilemma for someone like me (also a Prepper). If someone tells me the date it was hidden and if I stumble upon it. I ABSOLUTELY KNOW IT IS AN ACTIVE CACHE AND TO RE-BURY IT (PROBABLY WITH A NOTE TO EXPLAIN HOW I FOUND IT as a “learning lesson to the original hider”). But if I thought it might 20-40 years old, and not yet retrieved, now I face an indecision. If I needed it, I would probably take it. If I didn’t need it, I would consider it (as mine) if I were to retreat the same route, where I knew a cache existed and if I needed to.
So what am I basing my decision upon? “Looking for anything out of place that doesn’t seem right to me in the sense that say, for example, you bring some dandelions from your yard to disguise your digging spot, but no other dandelions grow naturally in that area. That is all! You can do anything you damn well please when you plant it, but if you do not disguise it with plants, rocks, or whatever suitable for your cache area (as they are already in the ground), it is going to seem out of place if me, or people like me, who are in the vicinity; and most people will just take it (and you have lost a preparation)
Let me give your another example. If I were to find a coin cache with mostly coins from the 1920s and 1930s, but also with “a brand new perfect condition” 1964 penny in it—then I know the cache was planted in 1964-1965. If I find it in 2023, that cache has been sitting in the ground for about almost 60 years. I’d take it with the idea that whoever planted it, lost it, forgot about it, or is already dead. But if the cache had modern paper dollars and coinage, or even a dated note from the burier—I would definitely think twice. I would rebury it with a note that I found it and the depositor had better move it. If I came back later, and after awhile, I might take it, but I might not. If you want the cache that could be found by an expert or an amateur to remain in your possession, leave a note with a date, and maybe an address or telephone number. If it was returned to you, why would you care that a founder returned it?
One more thing. It is easier to stumble upon a cache in woodsy areas, than it is in just about any city area. There are lots of ways, even old technology dating back to the Civil War.
If you want whatever you cache back, leave a note inside requesting that with an address and/or telephone number, and a name of your prefered “heir”.
One option for hiding field or wilderness caches that I didn’t mention is called “salting a site” against metal detectors. How may it be done. You bury your cache but bring with you, say 200 or 30o circular washers, and just walk around your cache site and put one into the ground a few inches; and maybe several in the same place, but much deeper. What have you accomplished? (1) You have created a ground picture of former habitation, like a former long-gone cabin in the woods Or a farmer’s shed in the back-20 acres. Or an old Boy Scout Camp site. By digging holes here and there, they will leave slight depressions and if there are a lot of these, then someone stumbling upon them (without experience) will give up trying to find what may be in the ground, because it is too much work. Now it would be better to also bury some old rusty tool that will strongly suggest the area was once a camp or work site. For example, in Wisconsin during the mid-1800s Forestry (chopping trees down) happened in over 10,000 acres of forest land. Certainly somebody dropped a tool. There is always stuff in the ground everywhere, So if you salt the ground around (but not too close) a place you bury a cache; you increase the odds that it won’t be found. Just keep in mind that experienced treasure hunters know this also and if they find bunches of “washers”, that will inform them that a cache is in the area. So use “excellent” salting sensibility at your cache site (a mixture of small rust-worthy metal object, preferably old ones from 1930s, 1950s, etc. If a finder can date them, the finder will conclude it is just an old camp or cabin site, and not a cache site.
But most important is to leave contact information. you name, maybe names of relatives in certain towns, so any finder can try to return it to one of your relatives, if that seems worthwhile to do. Without that information a finder can do nothing useful to you, other than to rebury it and maybe visit the place a year or two later, when it will likely be taken if it is still there.
Everyone can practice caching. You can do it in your own home. Find the best “hidey-hole” (an old 1930s era saying) in your bathroom. Put a cache of somesort in your garage or tool shed. Bury something not too valuable in your back yard and examine it after a week or so, and especially after a rain. Try walking over the top of it (depending on what type of container you used to protect it). Do your feet sense an unexpected depression in the ground, or softer than normal dirt?
In your home you could also consider, where is a fast retrieval hiding place; and where is a hiding place that no one would bother to check out. If you have a fireplace, are there ashes still in it? Is it dirty and dusty. Is there wood in the fireplace still,
Real stories. One guy bought a house and decided to put in a better oven-range. So he pulled out the old one and found $5,000 hiding inside the oven, with access only in the rear where it was against a wall. He found a cache from an old man former owner who died. The kids had somebody take all the “junk out of the house”, but leave the appliances. Something to think about if you are aged and if your kids may do that to you. Mine has already said, that is exactly what he is going to do.
If you live in an older home that you are renting, or that once had a number of renters. Search everything in your home. You checking for new nails in certain boards (and why would they be there? Or why would some screws be in a board that normally holds nails? Unscrew the screws and pull off the board and see if something is behind the board (a cache). Think about all the older teens and where they hid things their parents did not want found; then they went into the Army or College and forget about it.
All I am saying is that I search every home I have ever “moved into” and for the most part I have found something interesting, that may not have been a cache, but it was too good to throw away and somebody stashed it so parents wouldn’t find it. It all starts with finding something that seems out of place. So train yourself in your home, then yard, garage, attic, crawl spaces.
If you want tell your kids or teens or husband or friend that you hid something and it is there job to find it and then explain how they did find it. Make a game of it; and then give them a kiss or a cookie, whichever is the better thing..
After you train yourself in your home, you will be better prepared for doing something similar away from home.
I have a question that I don’t know the answer to. About 35 years ago I brought back from a war two metal bullet cans. They still reek of a chemical smell. Does anybody know if there is a way to get rid of that odor.? Or does anyone know whether it is likely that there will always be that odor?