


Whether we’re talking about off-grid survival or just having the opportunity to enjoy the benefits of living in the 21st century in our cabin in the woods, having hot water for taking a shower, shaving, or taking a nice long bath is one of the yardsticks of well-being.
What can be nicer than enjoying a hot shower after working all day outside in the cold? And even better, if that hot water is completely free of charge? It doesn’t sound bad, does it?
Moreover, it would be pretty nice to have hot water at your disposal without being dependent upon a utilities company, whether we’re talking about electricity or gas.
We’re Reviving Ancient Techniques
What I am trying to tell you is that nowadays, heating water is one of the most overlooked functions when it comes to the archaic wood stove.
Just a few decades ago, many wood stoves were built with a water tank (it was called a range boiler) behind/beside the respective wood stove, for producing free and virtually limitless amounts of hot water. A two for the price of one kind of a deal.
Basically, whether you’re looking to save some dollars on your utility bills or get hot water in some place remote without breaking the piggy bank, the main idea is that you can use your wood stove for more than warming your homestead, cooking and whatever else wood stoves are usually good for.
Truth be told, domestic wood stove-based water heating systems are not new; they were invented centuries ago.
The Romans constructed incredibly clever central heating systems for public buildings (and the rich also had them, because they were too expensive for plebes) in an era sans electricity, and we’re talking 2000+ years ago. I know it sounds incredible, but yes, they actually had central heating through the floors 2 millennia ago; that’s how smart Romans were.
The Roman system was called Hypocaust and it worked by producing and circulating hot air below the floors (even walls in some cases) using a network of pipes. Hot air passed through those pipes and heated the floors/walls and obviously, the air was heated via furnaces burning wood and/or coal, because there was no electricity or piped gas back in the day.
In the event of a grid-down situation, how many of you are planning on heating their home with wood?
Learn from our forefathers how to install an emergency wood-burning stove!
How the Heater Works
Hence, getting hot water using a wood stove uses the same basic principle as a Hypocaust, but with a twist: water is used in our case instead of air, because it’s difficult to take a shower without water, right? I know – there’s an invention called dry cleaning, but I wouldn’t recommend it.
Joking aside, to keep it simple: a regular water heater is nothing more than a tank of sorts, sitting on top or next to your wooden stove. As water rises when heated, hot water is drawn from the top and cold water is piped at the bottom via a piping system, obviously.
How does it work, you may ask? Well, it’s pretty straightforward: the stove water heater uses heat exchangers for transferring heat from the stove to the water. Depending on the design, the heat exchangers can be mounted inside of the stove, on the outside of the stove, or in the stovepipe.
Water is circulated through the heat exchanger when a fire is burning in two ways: naturally, via the thermosiphon principle which relies on water rising when heated or by using a pump.
The heat exchanger device is available in 3 main varieties:
- a serpentine coil made of, in most cases, copper pipe
- a small absorber, like a solar-collector
- a box-like mini-tank. Most heat exchangers are mini-tanks or coils mounted inside the stove.
The heat exchanger can be built using copper, stainless steel, or galvanized iron, and they’re commercially available or they can be built in local shops or DIY-ed depending on your skills. For our intents and purposes, we’ll have to rely on the thermosiphon system, because this system works wonderfully off the grid and it doesn’t require fancy stuff like pumps and all that jazz.
The Tips that Lead to Success
“Keep it simple stupid” is the name of the game in a survival situation. As things get complicated, the probability of something failing rises exponentially.
Whenever the stove is used, water must circulate through the heat exchanger in order to prevent it from boiling. The storage tank must always be located higher than the heat exchanger and as close as possible to the stove.
Thermosiphoning-based systems are better than electrical-pumped ones not only because of their simplicity and availability, but also because in the eventuality of a power outage, the pump will stop working, leading to overheating the water in the heat exchanger.
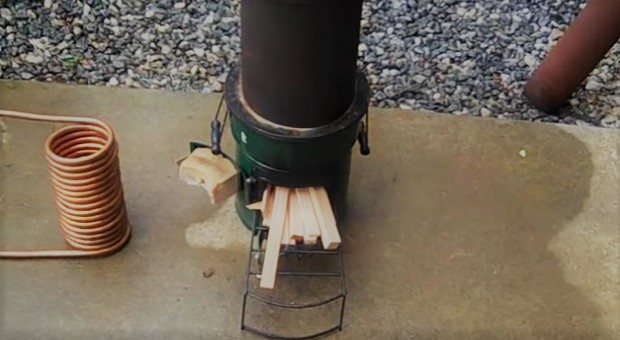
This is a DIY project that can provide you with endless hot water without requiring electricity, as it’s based on the thermosiphoning process. This one uses a therma coil – a homemade unit – which consists of a serpentine made of copper, which is put inside the wood stove and connected via plumbing to a water tank.
This is a hot water-on-demand heater which can help you in a variety of situations. And best of all, everything is made using scrap materials, more or less (except for the copper piping, I guess).
Video first seen on engineer775 Practical Preppers.
As a general rule of thumb, for best results, you should isolate all your hot water lines more than 3 feet away from the wood stove using slip-on foam insulation, which is designed for temperatures up to 250 degrees Fahrenheit.
Don’t forget to spend 10 bucks on a thermometer; it’s well worth the investment and it will help you with eliminating all guesswork with regard to determining water temperature.
Copper is one of the best piping materials out there, as it’s very easy to work with when building coils (the heat exchanger gizmo), but remember that when used with iron, the latter will corrode.
The second DIY job is made by the same guy but this time, instead of a copper serpentine placed inside the wood stove, he uses a simpler water coil made of stainless steel. The rest is basically the same, check out the video.
Video first seen on engineer775 Practical Preppers.
The third project also uses the thermosiphoning principle (hot water rises) and copper tubing for making the serpentines, but this is a “larger scale job” compared to the previous two, and more complex.
Video first seen on convectioncoil.com.
The fourth and last DIY project uses an interesting design, i.e. a double-walled water heater (a double-walled 6-inch pipe, basically) and between the walls there’s copper water pipe circling the inner wall, thus transferring the heat from the wood stove to the water circulating through the piping.
Video first seen on thenewsurvivalist.
That about sums it up for today folks. There are still many lessons to be learned.
Remember that knowledge is everything in a survival situation and take our ancestors’ example – they survived when there was no electricity.
Click the banner below to uncover their lost secrets!

This article has been written by Chris Black for Survivopedia.


When using the thermosiphoning method with a storage tank make sure to put a bleeder valve at the top of the system. Air needs to be bled off for it to work properly. If air is trapped at the top of the coil (heat exchanger) the water won’t flow and you could create high pressure steam. Air needs to be bled off from the water tank also. I heat my water year round with wood.