


As simple as it may seem, blood coming from a wound is never a good thing. If the wound is large enough, deep enough, or located in the right place, you can bleed to death in a matter of minutes. While it does not matter what caused the puncture in the first place, what you do to stop the bleeding can have a major impact on whether you live or die.
Outside of other first aid care such as managing breathing, heartbeat, and shock symptoms, you will also need to know how to stop the flow of blood as quickly as possible without doing further damage. Tourniquets and pressure bandages are two simple tools you can use to achieve this goal. You will also find that it is very easy to have the necessary supplies on hand and with you at all times.
A Fast Guide to Assessing Bleeding Wounds
Before you begin treating a bleeding wound, it is important to know a few things about it so that you can select the best method for making it stop without causing other problems. Here are some important things you should know about the wound and the type of bleeding:
- Location of the wound – Wounds to the upper body and head cannot be treated with tourniquets, but you can still use pressure bandages. The location of the wound will also give you some ideas about how to best position the wound in relation to the heart.
- Regardless of the wound type or location, it should always be positioned so that it is higher than the heart. For example, if the person is laying down and has a bleeding leg wound, you would elevate the victims leg until it further off the ground than the level where the heart is. Since the heart has to work harder to pump blood against gravity, this will reduce the amount of blood flowing into the wounded area. This will give the body a better chance to form blood clots and also reduce the amount of blood lost.
- The size of the wound, including its depth – In some cases the size of the wound can be deceiving. For example, a stabbing knife wound may not look very large at the surface. Within the body, however, there may be all kinds of damaged blood vessels and ripped tissue. The internal bleeding may be severe even if there is no sign at the surface. Therefore, you should always be aware of the depth of the wound and how much damage it may have done deeper into the tissue structure.
- The color and characteristics of the blood flow – If the color of the blood is darker red and moving slowly, that means it is coming from a vein. Since this is the blood returning to the heart after being circulated around the body, it will not be under as much pressure. For these wounds, elevating the injury and applying direct pressure for about 5 minutes should stop the bleeding. You can also apply a slight amount of pressure with your fingers just below the wound in relation to the heart (ie. the wound should be between the heart and end of the extremity.
- Arterial blood, on the other hand, is bright red and may come out in spurts as the heart beats. Since this blood is under more pressure from the heart, it will be harder to get the bleeding to stop. Once again, you will need to elevate the wound above the heart and apply direct pressure. This time, you will need to use direct pressure for at least 15 minutes. Unlike stopping venous bleeding, you would apply pressure above the wound, or in the area closest to the heart. For example, if you are dealing with a lower arm or hand injury, then you would apply pressure closer to the upper arm. This is also where you would apply a tourniquet if needed. Try to apply pressure as close to the wound as possible without causing further damage to the site. If the bleeding stops, then you can go ahead and pack the wound and cover it.
Get this lifesaving information about surviving when doctors, pharmacies and hospitals are shut down!
What is a Tourniquet?
A tourniquet is a simple device that is designed to cut off the flow of blood from the heart to an injured area. While many people are hesitant to make and use tourniquets, they have been in use for centuries and have saved many lives. If you wish to make a list of 10 things you must learn for survival first aid, tourniquets should be near the top of the list. Given the increase in stabbings, acid attacks, bomb attacks, shootings, and other attacks with sharp instruments, you never really know when you may be need to apply a tourniquet for yourself or someone else. Never forget that someone can bleed to death in as little as 3 minutes. In a situation where someone is cut and bleeding from an arterial wound, there may be no such thing as waiting and hoping that the ambulance will get there in time.
How Does a Tourniquet Differ from a Pressure Bandage?
Here are four basic ways a tourniquet differs from a pressure bandage:
- A pressure bandage is designed to be applied directly on top of the wound. It will slow down or stop the flow of blood in the injured area, but not to the rest of the limb. Consider a situation where you have a gash on the underside of your forearm. A pressure bandage applied to this area will not affect the blood vessels on the upper side of your forearm. As such, tissues in your hands fed by those arteries will still receive oxygenated blood. On the other hand, when you apply a tourniquet, it stops all blood flow into the limb below it; including areas that are not part of the actual wound site.
- A tourniquet is applied between the heart and the wound, not directly on the wound itself.
- A pressure bandage will need to be changed for the sake of keeping the wound clean and free of infection. Unlike a tourniquet, it does not need to be loosened periodically to restore blood flow to the rest of the extremity.
- Pressure bandages can be used at any point needed on the body. Tourniquets can only be used from the shoulders to hands and upper thighs to feet. They should never be used for head, or neck injuries. There is a special tourniquet available for lower abdominal injuries that can be used to block off the abdominal aorta. Tourniquets also cannot be applied to joint areas. They must go above the joint or below depending on the location of the wound.
Why Aren’t Zip Ties and Belts Good Materials for a Tourniquet?
Ideally, tourniquets aren’t supposed to cause damage to the tissue where they are applied or crush arteries and veins within the tissue. Contrary to popular belief, the largest number of problems stemming from tourniquet use don’t always come from leaving them on for too long. Rather, they come from using the wrong material for the pressure band.
In order to understand why the material type and width is so important, consider the difference between wrapping a zip tie around your arm and a blood pressure cuff. If you wrap a zip tie around an extremity, it is going to cut into the skin very quickly and cut off the circulation. At first glance, you might think this would be the best thing possible in a tourniquet. On the other hand, a blood pressure cuff will also cut off circulation when the cuff is inflated. Unlike a zip tie, however, the pressure is over a larger area. While the cuff may feel uncomfortable, it won’t cut a narrow band in your skin or increase the risk of injuring tissue and blood vessels located beneath the skin.
Think of arteries as being like a water hose with the water pressure set on high. Putting a narrow kink in the hose will stop the water from flowing. As you can clearly see in this situation, however, the area where the kink is will looked crushed. A water hose is made of flexible, non-living material that will pop right back into place and usually be no worse for the wear. An artery, and other tissues around it, as flexible and durable as they are, can still be damaged and take time to heal. When you add in the fact that the artery leading into the constricted area is still under pressure, it becomes much easier to see why a zip tie or other narrow, hard bands are not the best choice for a tourniquet. A wider area of applied pressure is more effective at cutting off circulation with less risk of damage to blood vessels.
In an emergency situation, if you only have a belt, a zip tie, or some other narrow material on hand, then it is still better to use them then letting someone bleed to death. Just be sure to shred up some clothing or other soft material as a cushion between the narrow band and the flesh. In fact, if you are going to use a shirt as a cushion, it is better to simply roll that and use it as a tourniquet instead of the belt.
Pros and Cons of Commercial vs. DIY Tourniquets
If you do some research on first aid gear, you are bound to see many different tourniquets on the market. Commercial tourniquets have the advantage of being tested and certified for safe use in an emergency situation. Some are also very cheap and can easily be carried in a pocket or EDC bag. For example, velcro tourniquets only cost about 5.00, are lightweight, and reliable. Alternatively, you can also purchase kits that include tourniquets and just about everything else you need to address bleeding wounds.
While some people feel that DIY tourniquets will never be as good as commercial ones, knowing how to make them in an emergency can still save someone’s life. Aside from that, if you have very limited space in your pocket or EDC bag, then using items that can be used for multiple things makes sense. In this case, a bandanna that can be used for a tourniquet can also be used as a breathing mask in dusty areas or as a water strainer. If you can get a good quality sari cloth, you will be even better off because, when properly folded, it can also remove most bacteria from water. By the same token, a metal tactical pen that includes a cutting blade and a flashlight, or even a screwdriver takes up the same amount of space as a windlass in a tourniquet kit, but serves many other purposes.
A Word About Learning and Practicing
There is no question that emergency room doctors and EMTs see the results of all kinds of strange things that people do. Unfortunately, coroners do too. Sometimes it is nothing short of overwhelming the number of ways that people think they can improve on the tourniquet or use it in ways it was never intended. In the worst case scenarios, people have strangled themselves or lost limbs just from “practicing”.
As simple as these devices are, using tourniquets responsibly and correctly is not a matter that you can just leave at reading an article and then devising your own practice drills. Any number of things can go wrong including selecting the wrong material or even securing it in a way that prevents you from loosening it easily.
The best way to learn how to make and use tourniquets is to take a good quality first aid class. Make sure you choose one that offers you a chance to practice your skills under the watchful eye of a competent trainer. After classes are over, never practice by yourself or away from someone that can help you get free of the tourniquet before it does serious harm to your body. Always choose materials that you can cut away easily, and make sure that all the necessary tools are available to address any problems that may arise. Before you practice on your body, practice using the materials of interest on a plastic pipe or something else that won’t be damaged if the tourniquet is left in place for too long. Practicing getting out of a tourniquet or loosening it is just as important as learning how to apply one.
How to Make a Tourniquet
If you do not have a commercial tourniquet on hand, it is very important to know how to make one. At first glance, you might be tempted to think that anything tight enough to cut off circulation will be enough to stop arterial bleeding. While you may even see some flesh color changes from a bandage that is wrapped too tight around your finger, deep arterial bleeding from a limb is another matter. In these cases, you will need material that is a bit wider to make a decent tourniquet that won’t cause nerve damage or other problems. Here are some common materials to consider:
- Necktie, bandanna, scarf, or ace bandages will all work well as the main material for a tourniquet. The material should be narrow, but not so narrow that it cuts too deeply into the flesh in a narrow area. Belts, zip ties, and even thicker rubber bands will not make suitable material for cutting off deep arterial bleeding from arms and legs.
- You will not be able to make the tourniquet tight enough without having something that you can use to insert between the extremity and the fabric in order to twist it. A pen can be used as a windlass for smaller areas, however they may not be strong enough for keeping fabric around the upper extremities wound tight enough. Metal rods, screwdrivers, or study wooden sticks can be used for this purpose. Just make sure the material you use for the windlass will not bend or break under pressure.
- Once the tourniquet is tight enough, you will have to keep it locked in place until it is time to loosen it again. Rubber bands and key rings can be used for this purpose. You can also hold the windlass with your hands if nothing else is available. If you must see to other wounded people or other matters, this can present a problem.

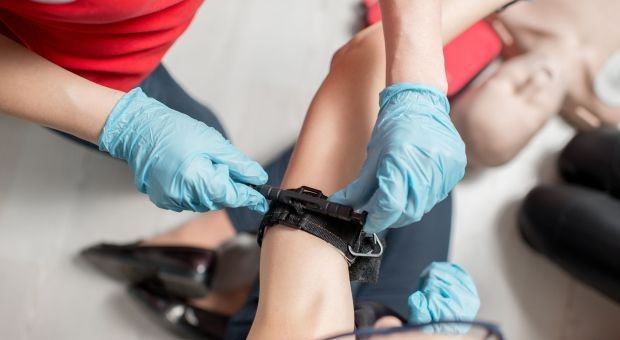
How to Apply a Tourniquet for Yourself and Others
To begin, locate an area a few inches above the injury that is between the wounded area and the heart. This is where you will apply the tourniquet. Next:
- Take the material for the tourniquet and wrap it around the extremity. If you only have a belt, zip ties, or other items that are too narrow or hard, use clothing to act as a cushion between the tourniquet and the flesh. Remember, your goal is to cut off circulation, not cut into the flesh or bruise internal structures.
- Tie a half knot with the material for the tourniquet. Never use another type of knot that may stick or be hard to undo at this level. If you make a mistake or need to loosen the tourniquet, you do not want to wind up getting stuck at this point.
- Take the item you are using for the windlass and set it so that it is perpendicular to the tourniquet.Tie a full knot over the windlass.
- Now go ahead and twist the windlass so that the material for the tourniquet tightens up. The tourniquet is tight enough when you no longer feel a pulse in the arteries located on the opposite side of the wound or the bleeding stops.
- Secure the windlass so that it cannot unwind unless you remove the retaining device.
- To loosen the tourniquet, remove the retaining device and turn the windlass in the opposite direction you used to make it tight.
Even if you have never applied a tourniquet before, you may have heard that you must loosen it every now and then so that tissue below the wound can receive oxygenated blood. There is quite a bit of controversy over how long a tourniquet can be left on, as well as how often it should be checked. Some sources claim you can leave a tourniquet in place for up to 2 hours, or not loosen it at all. Others recommend keeping ice on the limb or keeping it as cool as possible to slow down the risk of nerve and tissue damage.
Perhaps it can be said that the amount of time a tourniquet is left in place depends on the severity of the wound and how quickly you can get to a medical provider. If you are in a situation where it takes more than two hours, or even days to reach a doctor, then you may wind up leaving the tourniquet in place rather than take a risk of more blood loss. While you may lose the limb or partial use of it, that is usually seen as preferable to bleeding to death.
This is one of those places where quality training and experience will give you the best chance of figuring out the best way to use a tourniquet and save the rest of the limb. Take at least one first aid class, and then see if you can find medium to advanced level courses on wound management. If none are available in your area, you can always ask doctors or P.A.s in your local hospital if they are willing to give community seminars. Emergency room, urgent care, and surgeons are also good options for medical providers that see a lot of bleeding injures and may be willing to provide a few hours of instruction from time to time.
Overall, you will find that knowing how to make and apply a tourniquet are both very valuable skills. Many people today avoid learning about this important topic because they are afraid that they will make a mistake and cost someone their limb because the tourniquet is applied incorrectly or left on for too long. Consider that the person who is injured might rather take the chance of losing a limb than losing their life from bleeding out.
Now is a good time to take a first aid course and make sure that you know how to use tourniquets correctly. Do not stop asking, taking classes, and practicing until you are confident in your skills and know that you can help yourself and others in a crisis.


Thank you, Fred. I wonder – Chilling or Icing the extremity below the tourniquet is a topic of many debates – Environmental Temps. are a big part of this process. ONLY Docs and Real Surgeons can guide you on this.
Current standard for emergency responders is to use direct pressure on the wound, which will be effective most of the time, and, if that does not stop the bleeding, apply a tourniquet. Elevation of the wound and/or pressure points have been found to be ineffective and a waste of time allowing unnecessary blood loss.
Along the way in the article you changed “windlass” to “cutlass”. Cool visual, but a mistake. 😉 Otherwise, great article. 🙂
The last ist aide class I took said to use a tourniquet right away, not to leave on more than 24 hrs! the instructor seemed puzzled when I even asked the question (length of time) and when I asked about pressure points, he dismissed it. I see another commenter ridiculed the use of pressure points, but I have used them MANY TIMES usually with much success. I agree there is controversy, but why apply a tourniquet, with its attendant issues, if something else works? Obviously if the bleeding is soooo bad, using a moment or two to try pressure points will cause traumatic blood loss, then the answer is obvious, but to say this is true for all wounds is absurd! (former US military, former ist aide instructor, outdoorsman, teacher and coach).
How do you secure the retaining clip to the tourniquet?