


No matter how much you may love camping, hiking, and outdoor life, there is nothing quite like having clean clothes on hand. Unfortunately, during your escape from a riot situation or some other form of social collapse, you will find that washing clothes will be far more difficult than expected.
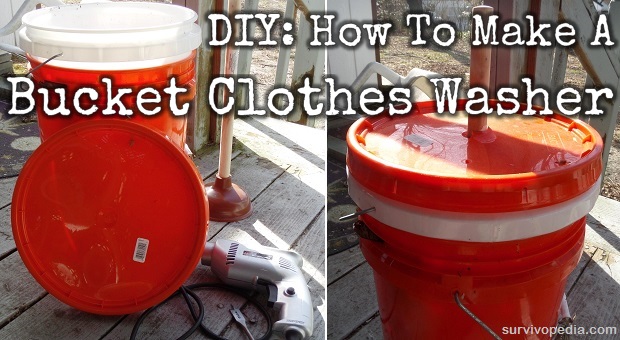
If you don’t have a lot of money in your budget, this simple 5 gallon washing machine may be ideal for your needs. As an added bonus, you can repurpose the parts for other survival needs such as making burnable paper bricks, carrying items while you are bugging out, or just about any other need that arises.
How and Why It Works
Even though modern washing machines tend to be big, noisy, and use a lot of water, they operate on the same principles as the bucket washer. Essentially, a central agitator swishes the water and clothes around, which causes the dirt to be released from the fabric.
Soap aids in the process because one end of the soap molecule attaches to dirt, while the other attaches to the water. As the water agitates, soap them “pulls” the dirt from your clothes. For this particular design, a simple plunger acts as the agitator. You will find it much easier to use than a scrub board or a nearby rock sitting in a stream.
Tools You Need:
 Drill
Drill- Spade bit or round hole bit
- General purpose bit
Parts:
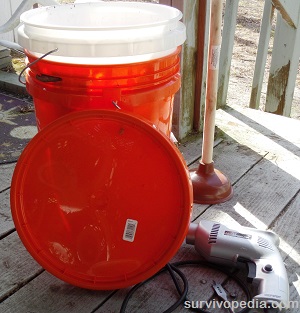
- 1 plunger
- 2 – 5 gallon buckets. You can also use bigger buckets or trash pails as long as you can get a long enough handle for the plunger
- 1 – 5 gallon bucket lid
Building Steps
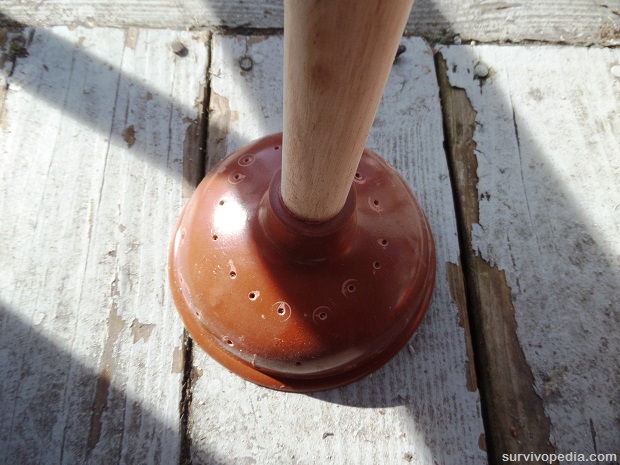
Step 1: Drill holes in the sides and bottom of one pail. When drilling these holes, try not to make them too large or too close together. Remember, this inner bucket will take a lot of pressure from agitating with the plunger.
Even though the outer pail will keep the water in, you will not want the plastic sagging or breaking apart just as you lift your clean clothes out.

Step 2: Drill holes in the plunger. As with the inner pail, it is best not to make too many holes, or ones that are too large. The plunger will fall apart faster, develop cracks, or not move the clothes around as well if the structure is too weak.
If you find that the plunger does not work for heavy garments, you may be better served by making a finned agitator and attaching a wooden handle to it.
Since most plungers are fairly weak, you can expect them to fold up or not work very well if the garments are too heavy. They work well for blouses and t-shirts, but not denim or fleece.
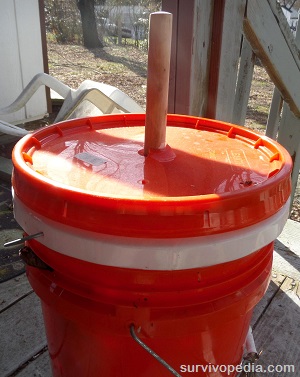
Step 3: Drill a hole in the center of the top lid. Make sure that the handle of the plunger fits easily through the top of the lid and can be pushed up and down with no problems.
As time goes by, this hole will also wear a good bit. If the hole is a little tight to start off, it is better than too loose. As time goes by, you may need to replace the lid, or use some kind of sealer to keep excess water from coming out while washing the clothes.

Operating the Bucket Clothes Washer
 First, place the bucket with holes inside the bucket without holes.
Next, add a small amount of soap to water at the bottom of the pail. If you are using bleach, be prepared to use less than usual. Make sure the bleach is diluted before adding clothes.
Add garments, plunger, and then fill with water. Leave about 1 1/2 inches free at the top of the pail. This will give some room for bubbles to form and reduce the chances of water leaking out from the bucket top.
(As an aside, the bucket clothes washer is best used outside where there is plenty of room. Water can and will leak out around the rim of the top while clothes are being agitated with the plunger.)
Once you have added the garments, fit the lid of the washer on top, so that the plunger handle fits through the central opening.
Push and pull the plunger vigorously for about 10 minutes.
Empty out soapy water and refill with clean water.
 Agitate garments for another 5 minutes to remove soap and dirt. Empty water, refill, and agitate as many times as needed to remove all soap from your clothes.
Once clothes are clean, remove bucket with holes from the surrounding pail. Take the bucket without holes and push it into the pail with the clothes in order to push as much water out as possible. (Note – place a piece of clean plastic between the clothes and the pail so that you do not get debris on your clean laundry.)
After you have removed as much water as possible from the clothes, hang them up to dry.
Caring for the 5 Gallon Bucket Washer
Store the washer in a clean, dry place. The plunger can be kept inside the bucket and stored as a whole unit. Just make sure that the buckets and plunger are completely dry before putting them away. Even though plastic is not easily ruined by mildew, mold, and fungus, spores can still get onto your clothes during the washing process and wreak havoc.
As a means of prevention, you may also want to rinse the buckets and plunger out with boiling hot water prior to use in order to eliminate risks posed by these noxious fabric killers.
Notes for Future Development
There are many ways to modify the 5 Gallon Clothes Washer to make this chore easier. You can suspend the inner bucket from a tree with a rope, and then spin the bucket in order to remove water from the clothes.
Alternatively, drive a shaft through the bottom of the bucket. Attach a motor to the shaft and simply let the water drain out as the motor spins the bucket. Just make sure that water cannot reach the motor and wreak havoc with it. When making changes to the bucket washer that involve adding electrical devices, always make sure that you have a waterproof chamber for the motor.
Taking the time now to prevent water from draining onto motors can save your life, prevent fires, and reduce the chances of other mischief while you are inventing. It will also be of immense help to shift from plastic tubs to metal or non-flammable tubs, since your experiments can still go awry.
As you may already realize, the washer also uses the same principle as a butter churn. Try sealing the top lid, and then make a waterproof hatch that can be used to add laundry, soap, and water. Next, turn the device on its side and mount on rockers. Since the five gallon bucket washer is fairly small, you may be able to mount it under a rocking chair and relax while you are washing clothes.
For individuals interested in motorized washing machines, once again, create a tub that is waterproof. Next, create an agitator with paddles instead of using the plunger. You can attach a motor to the shaft and then let that agitate the clothes for you.
Next, you can put a center hole in the inner and outer buckets and attach a hose to the hole. Put a valve on the other end of the hose, and then open that to let the water out during the “spin” cycle. This version will work better if you have the buckets in an upright position.
As you prepare for a crisis, it is often hard to think about how life will proceed after the first round of chaos has passed. If society is badly damaged, it may take decades, or even hundreds of years before commercial electricity and equipment becomes available. While many people think they can just “go back to the old ways” it may not be so easy.
When it comes to laundry, you may not be able to wash in a nearby stream simply because so many streams and potable water sources are already polluted with all kinds of toxins. One thing is for certain, if you would not drink the water because of toxins, heavy metals, or pathogens, then you won’t want to wash your clothes in it. From that perspective, being able to wash clothes in a controlled, water efficient, low-tech environment is very important.
The bucket washer may not be complicated, but it will enable you to have clean clothes. You can also modify this design to meet a range of other needs. This may include making variants from other materials to make butter, burnable paper bricks, and even paper for writing.
Why should you suffer with dirty clothes and all the diseases that go with poor hygiene when this lightweight bucket design can be carried along to any bug out location and put to use at a moment’s notice?
This article has been written by Carmela Tyrell for Survivopedia.


 SVP POP UP Desktop (931 x 476 px)")
I have used a bucket washer (our washing machine died, and we didn’t have the money to repair it for nearly 4 months) and it works very well. I did end up using a washboard for my husband’s work clothes though- the bucket just simply couldn’t cope. As a matter of fact, the washboard works better than any other washing method I’ve tried for truly grungy work clothes, but it is a LOT of work.
I wish I had thought of drilling holes in one bucket for wringing out the water though- I wrung them by hand and that was hard!
I don’t understand the negative votes on this article. Not only is this one of the most inexpensive and effective improvised systems there is, the author clearly has “wrung out” the bugs in the system by actually using it for a long period of time. Five stars.
I use my bucket washer in my bath tub in the winter. Keeps whatever water may spill over contained.
HERE is a trick I used before I got my own washing machine. I discovered that my bed clothes (and everything else) were filthy because the laundry was using the same wash water without ever adding clean water.
You need a bathtub with a shower curtain bar. Put 4 or 5 inches of clean water in (drain is stoppered, of course), add detergent, plus bleach, mix well. Throw the bedsheets, etc. in. Step into the tub with clean feet, stomp the whole thing for maybe 5 minutes, get out, drain. Refill with 3 changes of clean water, good mixing for each fill. Hang up the clothes to dry.
Thank you for a comprehensive article on the bucket washer. Our washing machine died while cleaning cloth diapers. They were sitting in poop water. We really needed those diapers cleaned and our leasing agency said it would a week before they could get someone out to fix it. Then we don’t know if the replacement pump would be in stock or have to be ordered. This system allowed us to finish cleaning the diapers and later clean our clothes. I was able to purchase and make the bucket washer in an hour and wash diapers immediately afterwards. I did wrap screen material around the plunger to help it hold it’s shape and prevent clothes from getting stuck in it. We now plan to use this while camping too. We will be purchasing a wringer. Our kids did enjoy helping with the bucket washer laundry!
I am so glad I came across this article. I remember back when I was 16 and pregnant with twins I would place clothes into my bath tub and walk back & forth to wash clothes ( had no washer or money to go to laundry mat). So After I walked back & forth for 15 minutes I would let them soak then drain and refill tub with fresh water then back & forth for another 15 minutes drain & wring out by hand then tug them outside to the clothes line. Yes it was heavy but I liked it. I don’t know why I got away from doing it that way. I may even can lower my electric bill by going back to this. Now I need a clothes line. Have any ideas on that?
EXCELLENT ARTICLE , THANK YOU !
The hole that plunger goes through can be reinforced by forcing a small length(say 1 or 2 inch) of heavy duty pvc pipe.
Hello. I am looking forward to making this in the spring to use at my off-grid cabin. What sizes are the holes you drilled in the plunger and theb2nd bucket?