


If you’re like me, if you see something you like, you wonder how to make them instead of just buying it from somebody else.
This is how many of my friends have gotten into home canning – they’ve tasted something that I’ve made (I regularly give away my jellies, jams, and salsas as gifts) and then they want to learn how to make it.
When I tell them, I also teach them how to avoid several common home canning mistakes, and now I’d like to share them with you.
Whether you’re making peach preserves or entire meals in a jar, don’t make the following mistakes!
Not Wiping the Rims
This is one of those rookie mistakes that a person only makes large-scale once. It’s common even for an experienced canner to have a jar or two not seal, especially when canning greasy foods like meat or sauces.
Having just one or two not seal is fine; you just throw it in the fridge and eat it soon. Losing a whole batch, or at least several jars, is a disaster. It’s a waste of food, time, and money and is terribly discouraging.
But you can avoid it. My approach to canning is that you can’t be too careful with any step. It’s a precise process, sort of like baking. You need to complete each step properly if you want a successful end product.
In that vein, I wipe all of my rims with a clean, damp cloth, then go back and wipe them with a dry cloth just to make sure.
Not Sterilizing the Jars
While it’s true that the food inside the jars boils, you run the risk of locking pathogens in the jar if you don’t sterilize them first. Trust me – if there was a way to skip this step, I would. But there’s not. As a matter of fact, you can’t skip any of the steps in this article – that’s why I’m emphasizing them.
All you need to do is scrub them well in hot, soapy water and rinse them well. Now you know that there are no pathogens and there are no traces of oils or any remnants of food left from whatever you used the jar for last.
Even if it’s new, you still need to wash it. I’d venture to say, especially if it’s new!
Over-filling or Under-filling the Jars
It’s important that you leave enough room – called head room – in a jar to allow for expansion and boiling, but it’s also important that you fill it enough that the jar will seal properly. If you have a lot of air left in the jar, it may be tough to get the jar to seal or stay sealed. Usually a half-inch is about right.
Your recipe will tell you exactly how much space to leave, so follow that. If you have a little left over, instead of using a jar, throw it in the fridge.
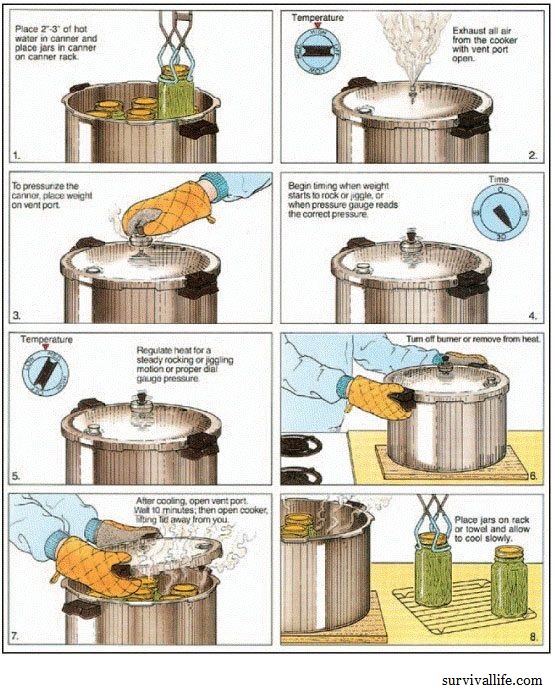
Not Processing Correctly
If you don’t take anything else away from this article, this is the one to hold on to. Non-acidic foods such as meat, some fruits and most vegetables MUST be pressure-canned. Unless of course you fancy a raging case of botulism, which attacks your neurological system and kills you and stuff. Personally, I’ll use the pressure canner.
Seriously, though, the reason that this is necessary is because botulism is anaerobic, meaning that it thrives in low-oxygen environments. It doesn’t do well in an acidic environment, but when you get a low-acid, low-oxygen environment, you’ve basically built it a beach house and rolled out the welcome mat.
Each recipe will call for a different time and pressure, so it depends on what you’re making and what type of machine you have. Don’t let this intimidate you; I know a lot of people that don’t use pressure canners or pressure cookers because they’re scared of them. Follow the directions and you’ll be fine. Plus, you can cook a roast in a pressure cooker in forty-five minutes or so. Bonus!
Signs that your canned goods are contaminated with botulism are bubbles at the top (after it’s been sitting for a few weeks or months), a popping sound when you open it, a leaky lid, and a slimy white film on the food. If you have any of these, don’t risk it – toss it. A jar of green beans is not worth dying for.
Not Releasing the Air Pockets
You need to use a spatula or wooden spoon to release the air pockets in the jar so that it will seal properly. There’s actually a tool designed specifically for this if you want to buy it. You want all of the air out of the jar for a couple of reasons – first, it seals better when there’s very little air. Second, botulism that we talked about above.
Once you fill your jars, run the spatula or spoon down the sides of the inside of the jar and just wiggle it around a little so that all of the air pockets release. Do this right before you wipe your rims so that you can add more water or sauce if you need to.
Putting Cold Jars in Boiling Water, or Vice Versa
Canning jars are known for their durability, but be careful mixing temperatures. Even the best glass can only take so much. You need to be especially careful going from hot to cold. Never put a hot jar in cold water.
As a matter of fact, when you take it from the canner, handle it carefully because there’s still quite a bit of pressure in there. I’ve pretty much blown up a jar a time of two because I knocked it on the edge of the counter pulling it out of the bath. You want them to cool slowly, too, so cover them with a towel when you take them out of the bath. That’s not a requirement, but I’ve found that my stuff seals a little better if I set them on a towel, then put another towel over them.
Using Damaged or Non-Canning Jars
It’s perfectly fine to reuse Ball or Mason (or whatever) jars that are made specifically for home canning, but using commercial jars like pickle jars that aren’t meant for home canning aren’t acceptable. Now that you have the right jars, check them for cracks and run your fingers along the rim looking for chips. If there’s even the smallest one, don’t can with it.
Re-Using Lids
I know a few people who re-use their rubber-sealed lids and to be honest I’ve done it myself when I was in a pinch and was one shy of having enough. But don’t. Seriously. There’s no way to make sure that they’re free of bacteria and the rubber is only made for one use so there’s no way to guarantee that it will seal. If you have a thing about throwing stuff out like I do, keep it to use on jars that aren’t going to be used for canning.
There are now reusable canning lids available though. They appeal to my sensibilities and in the long run are cheaper than single-use lids.
Using Over-Ripe Fruit
You want your produce to be ripe, but if it’s too ripe, it’ll cook to mush. On the other side of the coin, if it’s not ripe enough, the flavors won’t be fully developed. There are different guidelines for every fruit and vegetable, but in general, you don’t want it to be so ripe that it’s soft. At that point, it’s either time to eat it or turn it into jelly or sauce.
Canning is a pleasurable, satisfying end to all of your hard work, as long as it works out well. It’s a relatively easy process as long as you follow the basic guidelines and avoid the home-canning mistakes made above.
And the most important thing is that you’ll be able to make your own food for long term survival, so you won’t rely on what you may or may not find on the shelves!

I know that there are all kinds of mistakes that you’ve made if you’ve canned much, so please share your experiences with us in the comments section below.
This article has been written by Theresa Crouse for Survivopedia.


Wonderful article Theresa! You are a very good writer. What you had to say about canning is very true. Even those of us who have canned for years can benefit from your tips for sure. I really love canning! I am so glad I’ve done it for so many years; now I have one daughter joining me in the task, and she enjoys it just as much as I do. There are too few young people who have followed in their mothers’ and grandmothers’footsteps, even here in Utah! I wish everyone could know the satisfaction of putting food a side.
great article, makes me want to start canning again
Great article you covered the each mistake thoroughly. Wish you had been around when I was learning as I made most of the mistakes through trial and error.
Anyone reading this article please adhere to what she has written exclent advice will save you a lot of time and heart ache
I think not using any but canning jars, and lids only once was invented to sell jars and lids. I pressure can in used pickle jars with used lids, Used LOTS of years. every now and then one breaks. Have had JUST AS MANY canning jars or brand new lids fail. In fact I have had MORE brand new stuff break/ and or pop the top before opening. i have been canning over 50 years.
One other important thing is to test your jars as to whether they have weakness in them, before processing your precious goods in them. They can bump against other objects and you don’t realize that they have a flaw in them until you are processing, when you lose the entire jar.
How do you test them Sande?
Great refresher ON CANNING THANKS! oNE OF MY MISTAKES WAS NOT LABELING WHAT IT WAS i CANNED OR THE DATE IN WHICH i DID CAN
Now THAT was a good Report! bRIEF, EXPLICIT, READABLE, cLEAR! i WISH all the reports were like this. I hate, hate , hate the ones that blather on and on.
“..because there’s still quite a bit of pressure in there. I’ve pretty much blown up a jar..”
Sorry but this is a false statement.
It just is.
The canning jar lid is designed to keep pressure OUT, not in. the whole system is designed to allow even small amounts of pressure out of the jar…that being the point to canning…
you are putting two (2) phases together from two (2) different sentences trying to make a single statement that is misleading. not fair to the author! The jars were “blown Up”, she specifically says, is “because I knocked it on the edge of the counter”!
The technique described for “sterilizing” jars is not sterilization. It is a thorough cleaning, which is absolutely necessary. Sterilization involves very high heat through either boiling or placing the jars in the oven. Sterilization used to be “required”, but no longer is.
I have been canning 45 years and I really enjoy doing it. Your article was very thorough and I learned something even though I’ve canned for so long.. I never thought of putting the towel over the tops of the jars while they were Cooling that’s a good idea thanks. I have also taught a lot of people to can…men and women. It is amazing how many have never even thought of it not only in my generation but even older than I am and of course the younger ones
I’ve had excellent results cleaning jars in dishwasher – hottest setting – add 1/4 C bleach at start – use dry cycle.
Pre-heat jars in oven @200° for standard scanner water pre-heated to simmer. Have been known to pre-heat jars in oven with contents. Doing so w pressure cooker is redundant. VERY GOOD article. Talent for some humor/metaphor is great!
Forgot to mention band tightening. Hand tighten only -holding jar with one hand & turning band with other. If pre heated jars too warm, glove or mitt with rubberized palm and fingers -or thin silicone/rubber sheet both excellent. Due to varying strengths of persons, how tight is iffy. My rule is to turn until band starts to ‘argue’. We know that too loose isn’t good and too tight may not allow expanding inside air to escape enough to create inner vacuum. Jars can explode through too much inner pressure created by TOO tight bands. Jars adequately cooled will allow easy band removal removal.
My neighbor cans 80 to 100 jars of green beans each year and has since we met in 2002. But get this…she lets her blanched beans sit covered in their water overnight on the counter to cool, packs them with their water in clean cool jars, puts cool water in the canner, then carefully pressure cans them strictly per the book…20 min.@ 11 lbs pressure. No botulism ever, and a rare few unsealed jars. She hates dealing with scalding hot product. I’m intrigued..
A pop when you open the jar is a sign that you had a good seal. That is why there is the dimple in the lid. So that it sucks in as the jar cools, and it pops out when the seal has been broken.
I’ve had problems with green beans so I tried them in a pressure cooker finally this year. My first experience with it was much longer than I anticipated so I was still waiting for the canner to depressure by midnight. I didn’t know how long the process was so I went to bed. Removed them four hours later and now find that they have spoiled. Sealed but spoiled.
Can you ReCan within 24 hrs if your first batch of venison does not seal?
Once jars are removed from the canner, they should be carefully kept upright, moved to a counter covered with a towel out of any drafts and placed 1.5″ apart. Do not touch them for 12 to 24 hours. Do NOT cover them with a towel. That will slow the cooling process and runs the risk of developing “flat sour,” a form of spoilage that is not dangerous but changes the flavor of the contents, making them inedible.
Do not heat jars in an oven. They are not tempered to withstand dry heat, only wet heat, i.e., boiling or steaming. Washing them before beginning and processing for at least 10 minutes will sterilize the jars and contents sufficiently. Additional processing time will depend on the recipe.
There ard specific recommendations regarding the safety, or lack thereof, when jars do not seal. Check the National Center for Home Food Preservation for more information – http://www.NCHFP.org.