


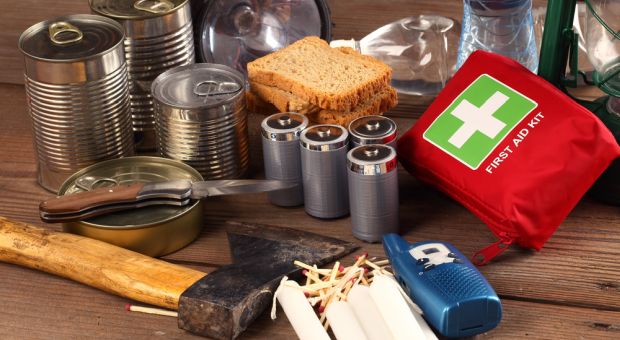
Your 72-hour kit should contain everything you need to keep you alive for three days.
If you’re facing a short-term emergency, lose power, or need to bug-out, your kit will help keep you going while you wait for a rescue or get yourself where you need to be.
Ideally you take time to prepare a kit for each member of your family. This distributes the weight of the supplies and ensures everyone has what they need individually. You want your kits to be light-weight, self-contained in a portable bag, bucket, or pack, and ready to go whenever a need arises.
Food is an essential part of your 72-hour kit. You need to eat to keep your strength up during emergencies. But with so many different types of food available, how do you know what to put in your kit?
The best food for your emergency bag meets the following criteria:
- Lightweight
- Nutritious and calorie dense (at least mostly!)
- Compact
- Easy to prepare with no cooking or heating necessary
- Something you can stomach

The food in your 72-hour kit doesn’t need to be a culinary delight to your taste buds. Compared to what you’re used to eating, it’ll probably fall short.
But, don’t pack something you despise. You don’t want to have to force yourself to eat your emergency rations on top of all the other stress you’ll be dealing with. This is especially true if you’re packing kits for children. You want to know that everyone will eat without a huge fuss.
Why I Select No-Cook Food
You can opt to put food that needs cooked or heated in your 72-hour kits, but I don’t.
Instead, I pick food that can be eaten as is, straight from the package.
The biggest reason is to cut weight. If you need to heat the food, you also need a safe way to heat it. You’ll also need a container for heating it in, like a pan. And most food that needs heated requires water. Water weighs a lot, so carrying extra just to make food hot seems like a waste.
If you’re sheltering in place with your 72-hour kit, feel free to store extra water in the house and make plans for hot meals. I have some hot-options to cook on the top of my wood stove when necessary. But, when it’s time to grab the bags and leave, I don’t want the weight dragging any of us down.
Rotate the Food in Your 72-Hour Kit
I purposefully didn’t select long-term storage food to put in my 72-hour kits. I wanted it to be food that my family was used to, and we could easily rotate.
To save money, I bought or purchased some items in bulk. Then I bagged them into snack or sandwich sized zip-style bags. This was much cheaper than buying individually packaged items and allowed me to better control the portion sizes appropriate for each family member.
I plan on us rotating the food about every six months, though most would be fine going a full year. To use the food, I take the food kits along with us on a car trip.
It’s also perfect to take along on a hike, or while camping. You can even use it for snacks after ball practice or something.
Whenever you take food out, make sure you replace it. Then your kits will always be ready.
Here are some of the foods I include in my kits. They aren’t fancy, but they will keep my family going in an emergency.
Food for Breakfast
Don’t skip breakfast! In an emergency, you may need to walk to seek rescue. Or do other physically strenuous activities.
Your body needs fuel to make that happen, so start the morning with a calorie dense compact meal. Mix and match the following items.
- Breakfast Biscuits: They come in a variety of flavors, so see which ones you and your family think are best. Each individual package contains four crackers, which you can spread out a bit throughout the morning. They also hold up well to packing, because even if they break they still taste good!
- Bags full of Dry Granola: I make my own granola mix and put it in zip-top bags. You can also buy granola and then bag it up. For maximum nutrition, you want granola with a good mix of oats, nuts/seeds, and dried fruit.
- Breakfast Cookies: Starting the day off with a nutritious cookie? Yes please! The cookies seem like a treat which can help make the situation seem less scary.
- Shelf Stable Protein Shake: Everyone needs a good amount of protein, and this is an easy way to get it. However, these tend to be one of the higher priced items in the food part of the 72-hour kits, so I only buy enough for one for everyone. Brands and flavors vary greatly, so try at least one before you buy a larger pack.
- Soft Granola Bars: I go with store-brand for these to save some money and pick up a variety.
- A bag of nuts: You can buy individually packages or buy nuts and bulk and bag them yourself.
Food for Lunch
Here are some of the best foods for lunch for your 72-hour kits. Mix and match them according to taste preferences.
- Peanut butter in “To-Go” style packaging: Pair this with some animal crackers for dipping for a good source of protein if you aren’t dealing with peanut allergies.
- Crackers: From animal crackers to whole-grain woven ones, I typically put several crackers in each 72-hour kit. These make a quick snack, or addition to any meal.
- Dehydrated Meat: Beef jerky and shelf-stable pepperoni style sticks are my choice of meat, but you can find plenty to choose from. You could even make yourself some pemmican.
- Bags of Trail Mix: A good one for eating on the go, you can find several styles of trail mix. My favorite is one with nuts, fruits, and a bit of chocolate.
- Dehydrated Fruit and Veggies: Your body needs nutrients from fruits and vegetables. Dehydrating a variety is a good way to make them portable. You can also go with fruit leather if you prefer.
Food for Dinner
Simple dinners with some protein are my goal. Make sure you are accounting for appetite differences when packing these. I pack more food for the adults and teens in my family than I do for the younger children. Try these foods for your 72-hour kit dinners.
- Tuna and Crackers: You can buy these packs ready-made, or just get a can of tuna and crackers. If you pack a can, you will need a can opener. Throwing in some shelf-stable mayonnaise packets can help improve the flavor.
- Protein Bars: A little heartier than plan old granola bars, protein bars are a good choice for dinner.
- Shelf-Stable Meat: There are plenty of options for packaged, ready to eat meat. These range from little packs of smoked salmon to a can of chicken spread. Pick up a couple of varieties that sound good and give them a try before stocking up. These typically taste good paired with some crackers.
- Pretzel sticks with dippable cheese: These little packs of pretzels or bread sticks with cheese hold up pretty well to being tossed in a backpack.
- Squeezable Applesauce Packs: Applesauce in the little plastic containers with foil on top tend to leak if they’re squished. That’s why I prefer the squeezable packs.
Food for Snacks
You may need some snacks throughout the day to help increase your calories, or to keep a child from screaming at an inopportune time. You can pack more of any of the foods listed above, or try some from this list to toss in your 72-hour kits:
- Fruit Snacks: Though not very nutritious, these are a good way to boost your blood sugar if needed. They also travel well.
- Crunchy Style Granola Bars: These still taste good when broken and come in a ton of flavors.
- Electrolyte Drops for Your Water: You need to make sure you have plenty of water for everyone! These drops pack well and add some flavor.
- Individual sized boxes of cereal: You’d have to eat these dry, but cereal is enriched with vitamins and minerals.
I used the above foods to complete 72-hour kits for each member of the family. When packing the kits, I stored the food for each day in a gallon-sized zip style bag. This helps with rationing, so the food lasts for the whole three days.
Inside each bag, you can pack each meal into quart-sized bags. You can even use a marker to label everything (ie: Breakfast Day 1, Lunch Day 2, etc.). This preparation now will help keep you from having to really think about what to eat when you’re in the middle of an emergency.
What are your favorite foods to add to a 72-hour kit? I’d love to hear your ideas in the comments below.


The main drawback with packing only non-cook, ready-to-eat foods is that they’re of no use in supplying heat to your body core if you happen to be evacuating in cold/wet conditions. A hot cup of soup or a hot meal can mean the difference between life and death if you’re battling hypothermia. The food, itself, need not be any heavier or bulkier than your ready-to-eat stuff. It can consist of anything from packets of dry soup mix from the grocery store to the fancier freeze-dried meals found in the camping section of any sporting goods store.
Yes, you’ll be carrying extra weight in the form of a container to heat/cook in, but there are many small, multi-purpose containers and mess-kits available from many sources, from military surplus stores to Amazon.
Building a fire in rainy or snowy conditions is probably beyond the ability of most people who are not skilled outdoors persons.. Fortunately, they can carry fire with them in the form of a can of Sterno, chafing fuel or a small camping stove that burns cubes of solid fuel. Again, it’s additional weight, but in adverse conditions you’re going to need heat to survive, anyway, even if it’s nothing more than a tiny flame from a can of chafing fuel to stave off frostbite to fingers and toes.
You’ll need extra water to heat/reconstitute hot meals, but you should have a water filter in your pack, anyway. That’s a no-brainer essential and weighs little. Unless you’re in the middle of Death Valley, the Sahara, or some other desert, you should be able to find some source of water to filter and since you’ll be heating it along with your food, bacterial or viral contamination is no problem as long as you get it hot enough and maintain that temperature for a few minutes. Besides, if you’re consuming only ready-to-eat foods, mostly in the form of crackers, granola/protein bars, cookies, nuts, jerky, etc. you’re going to be drinking a LOT of water, anyway! You may as well use some of that water to make a hot meal.
For the addition of one or two pounds in the form of a mess kit and a can of chafing fuel or small camping stove with solid fuel cubes, you can have at least one hot meal per day as well as a source of warmth. Either or both may save your life in cold/wet conditions. Well worth the extra weight.
Excellent article and excellent comment.
Since it is only me, my on the move rations are a bit simpler in some ways, but also incorporate some of the ideas in the one comment so far.
My base is my homemade jerky. Elk when I can afford it, next buffalo (American Bison), or beef, all high-quality cuts that I have cut to my specification. (Pretty much the standard 1/4″ thick by 1″ wide.) I do not do any type of marinating or seasoning, other than just a scant amount of sea salt. I dry it to a much lower moisture level than commercial jerky and even drier than any other homemade jerky I have experienced. I dry it until the meat fibers start to break when a strip is bent to about 45 degrees. Then I let it cool thoroughly in a very dry area so it does not pick up much, if any moisture from the air. Then it is vacuum packed in small packets. I have had jerky prepared like this last for over 30 years.
Second is my home recipe GORP. Approximately 16-ounces of premium mixed nuts, approximately 16-ounces of plain M&Ms, and approximately 8-ounces of dried chopped dates. I use approximately because the manufacturers tend to change the package sizes around sometimes. The last I made both the nuts and the M&Ms were 15-ounce packages. After mixing I also vacuum seal these in small packs.
The third food element is Millennium Ration Bars. They are individually packed 400-calorie bars very similar to lifeboat ration bars. They are produced by one of the major supplies of lifeboat rations. But the Millennium bars come in 9 flavors at the moment, most of which I like, and a couple I do not care for, just as I do not care for the taste of any of the lifeboat rations. With the variety of flavors I get a break from any one of them.
The jerky provides protein; the GORP protein, fats, a bit of salt, and sugar; and the Millennium bars provide some of the additional nutrition needed for good health.and provide extra calories.
However, I also carry tea bags (I am not a coffee drinker), instant hot chocolate, beef bouillon, sugar packets, and CoffeeMate packets. Since I started using my modular grab & go system, I also have a second food bag with salt packets, honey packets, Chicklets gum, Tootsie Rolls, hard candy, Emergen-C packets, water flavoring, fruit cake, instant oats/grits/potatoes, and dried fruit, depending on the season. These additions give some added variety and other warm foods.
In winter the hot drink in the evening before bedding down can be very important to getting a warm sleep, and in the morning helps get one going. My cooking kit is minimal to use these items, but is for another thread.
Just my opinion.
SOS (no cook) emergency rations. Take a pot…you might need it to purify water (plus a hot beverage or soup is a morale booster). Pack some hard candies for an energy boost.
When the ladies of our church put together 72 hour kits, I included $5.oo in quarters, dimes, and nickels, and $20.00 in loose, small bills ($5.00’s and $1.00’s). It was very easy to fit in the kit and did not add to the weight appreciably. If an emergency occurs that necessitates using the 72 hour kits, its likely the ATMs would not be working immediately.