


One of the problems we all face is where to store our stockpile of prepping supplies.
Unless you are fortunate enough to have a really big home, you probably don’t have enough storage space as it is; then when you try to put several months to a year’s worth of extra food in there, you can feel like the walls are starting to cave in. If you just had more space…
How To Build The Ultimate SHTF Stockpile!
I’ve dealt with that problem too. While I have had a big house for a number of years, it doesn’t have a basement. Where I live, we can’t have basements due to the high water table. So, my preferred storage place for my stockpile (the basement was totally out of the question. I had to come up with alternate ideas, and my kids weren’t going to go along with the idea of stealing one of their bedrooms, in order to convert it into a pantry.
Where Not to Store
Before getting into the ideas I want to share with you; I want to take a moment to talk about some of the areas people use for storing their stockpile, which I don’t agree with. Each of these has problems; and while they might work in an emergency or work for certain types of food, they really aren’t ideal for general food storage.
- The Attic – Besides the basement, the attic is the main storage area in most homes; at least those which have an easily accessible attic. But the attic of the house is the hottest part of the home, easily running 20 degrees hotter than the floor below, especially in the summertime. This can shorten the life of foods stored there. It can also freeze in an attic, although that won’t happen in most homes, even in a cold climate. However, the attic can be used for storing non-food items, like toilet paper.
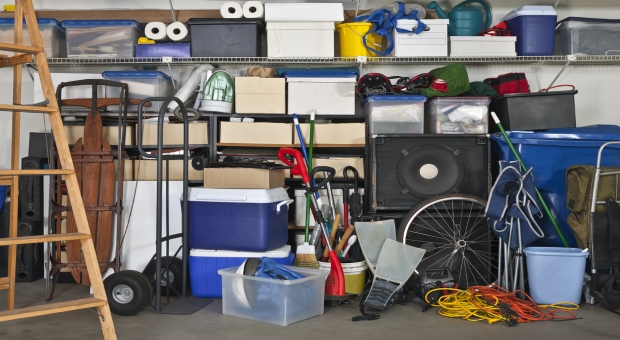
- The Garage – Basically the garage has the same problem as the attic, although not as bad. Garages are not heated or air conditioned, even though some are finished out with drywall to look like another room of the house. The only things I used the garage to store were non-food items, like laundry soap, canning jars and trash bags.
- Rental Storage Unit – Again, the problem here is heating and cooling. There are some which are temperature controlled; but they are rather costly. If you’re willing to pay that price, then by all means rent one; just make sure that the food is packed in such a way that people can’t tell what it is.
- Sheds and Shipping Containers – This is another tempting option, especially if your home doesn’t have enough storage space. But once again, we’re looking at problems with heating and cooling. You might also find that you have a problem with creepy-crawly things getting in there or rain leaking through the roof.
I’m sure there are other places which you should be careful about using for storing your stockpile. These are just a few of the more common ones I see people talking about, which I would counsel people to avoid.
Places Where You Can Find Hidden Storage
The average home has a lot of wasted space in it. We just don’t see it. Part of that is because we’re used to seeing our home in a certain way. Part is because we don’t understand how our homes are built and another part is that we just haven’t bothered to look. So I want to show you a few that I’ve found, hoping that they can help you with your own survival storage problems.
Under the Stairs
Any two-story home has space under the staircase. The question is, is that space being used? I’ve seen a lot of homes where part of the space is being used for a coat closet; but what about the rest of the space? Typically, that’s just going to waste, left empty.
If you already have a closet under the stairwell, you can access that extra space by installing a hatch in the back or side of the existing closet. That will even serve to keep the new storage space hidden, even as people are getting their coats.

If the home has an angled or switchback stairway, chances are that there won’t even be a closet. In that case, you could install a built-in bookcase, which swings out to expose the storage space behind.
Inside the Walls
The interior walls of a home have 3 1/2” of dead space inside them, with nothing taking up that space but a few wires, heat ducts and pipes. This 3 1/2” dimension is created by the framing studs, which are spaced every 16 inches. So, if you cut off the drywall, you can build shelves in there, giving you a great place to store canned goods. This works out especially well behind bookcases and other large wall units, where the shelves in the wall can be hidden by other furniture.
The trick here is to figure out where the wires, air ducts and pipes are, before punching a hole in your wall. If there are any of those things hiding in the section of wall that you want to use, you either have to build around them, move them, or put your hidden shelves elsewhere.
- Wires – Look to see where light switches and electrical outlets are. A wire will usually go straight up from any light switch, to the ceiling, although occasionally it will run horizontally over to a wall outlet. There will also be a wire running from electrical outlet to electrical outlet, around the perimeter of the room, connecting them all together.
- Heat Ducts – Places where heat ducts may be hidden in the wall are easily spotted, because of the vent mounted in the wall. If you have a place where there is a heating vent in the wall, you can pretty much be sure that there will be a heat duct in the wall, using the space between the adjacent studs.
- Pipes – If you have a single-story home, than the only walls that are likely to have pipes in them are the bathroom walls, behind the sink, toilet and tub and the kitchen wall, behind the sink. Some of these will be 2” vent pipes, running up through the roof. You should be able to see them poking through the roof from outside. There will also be smaller ones, brining hot and cold water to the sink and tub, up from the foundation or basement.
- More Pipes – If you have a two-story home, it gets a little more complicated, because you have fresh water and drain pipes in the first floor walls, leading up to the upstairs bathroom. The trick here is identifying the wall which is directly below the upstairs wall that has the pipes in it (as mentioned above). As long as you avoid that wall, you should be good.
To make this space into a shelving unit. All you have to do is trim out the studs, add a frame around the opening to match the room’s trim and cover the inside of the drywall. Caulk all the corners and edges and paint it. It should end up looking like something the builder did.
Another Idea for This
I like building spaces like this on the inside of my closets, on either side of the folding doors, as well as above the folding doors. Even when a thorough search of a house is performed, few people think of looking at that wall. It’s a great place to store guns, where people won’t think of looking for them.
Bookcases
Speaking of hiding shelves with bookcases, the bookcases themselves might be able to be used as storage space, depending on the kinds of books you have. Most bookcases are 11 to 12 inches deep. But if you’ve got it filled up with paperback books, you’ve got an extra 5” or more of depth that’s not being used. Simply pull the books forward to the edge of the bookcase and you can store food behind them.
If you want to take that a step further, buy some foam-core and some contact paper that matches your bookcase. If you can’t get an exact match, go for something a bit darker, as it will be in shadow anyway and that will look right. Cut the foam-core to fit between the shelves and cover one side with the contact paper. Then you can stack food in the back of the shelves, putting the foam-core piece in place, before stacking your books in the shelf.
Under the Beds
A lot of people have talked about using the space under your beds for storage, specifically for storing gallon jugs of water. But you probably have more space under the bed than you think you do.
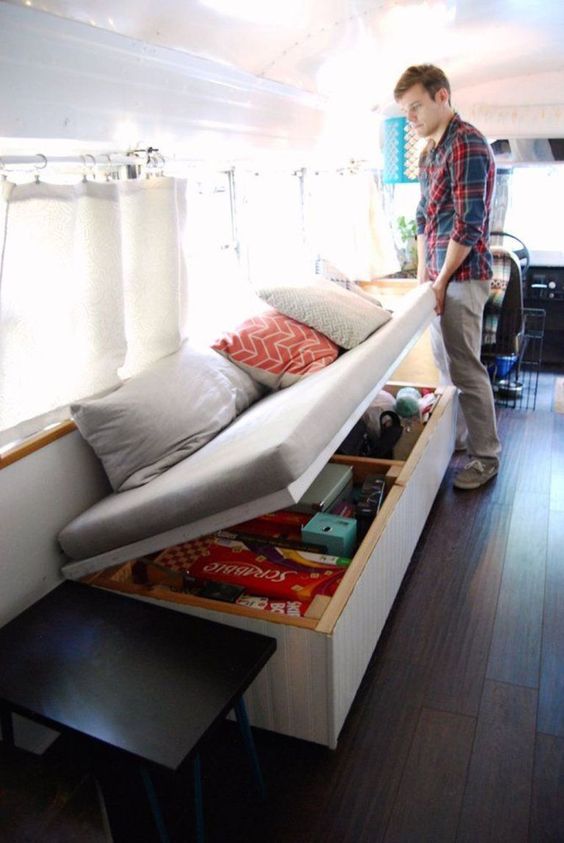
Modern beds don’t use a box springs anymore, as the springs have been incorporated into the mattress. Rather, that’s just a box. Take a look inside one sometime, looking through the bottom; all you’ll see is empty space and a few thin pieces of wood to support the mattress. You can make use of all that space, by modifying your bed.
What you need to do is build a large plywood box, which takes up the space the other box was using, as well as the space below your bed. Use 2”x 2” dimensional lumber in the corners, as well as around the perimeter at the top to give it strength. Then either make a pair of hinged doors or one piece that drops in place for the top. Be sure to support this, both with stringers underneath it and with some sort of a center support, to hold up the weight of the mattress with you on top of it.
You’ll be amazed how much space you can create in this way. A queen sized bed will yield 50 cubic feet of space. That’s a little over half the volume of an average closet, stacked up to the ceiling. You can fit a lot of food or other supplies in that area.
All you have to do to hide what you’ve done is to attach the bed skirt that comes with most better comforter sets. If you don’t have a skirt for your bed, you can accomplish the same thing by buying fabric which will go well with your comforter and stapling it to the top of the box, draping over the sides to make a skirt. Darker colors will be less noticeable for this than lighter ones.
Build a Root Cellar
The old root cellar was a great way of storing food. Of course, if your home doesn’t have a basement, because of a high water table, you might have a bit of a problem putting in a root cellar and not having it flood. But there is an answer to this problem.
There is a company which is manufacturing spherical fiberglass root cellars for people to install in their backyards, in lieu of using a normal refrigerator. Supposedly, these will maintain a 55°F temperature, year round. Being fiberglass, it would be waterproof, allowing you to fill it up with food and not have to worry about the food getting wet.
If you don’t have the problem of a high water table, then you can build a root cellar out of cement block, with a cement floor and roof. Not only is that stronger and less expensive, but it will also give you a lot more storage space than the fiberglass ones can.
Bury it
Perhaps one of the simplest ways to gain storage space for your prepping supplies is to simply bury them. Many of us store our dry foodstuffs in five-gallon plastic buckets anyway, and those are totally water and moisture proof. So, instead of stacking them up in the basement you don’t have, dig yourself a series of holes in the ground and bury them individually.
If you’re going to do this, I’d recommend burying them in a grid pattern, with careful measurements. That way, you won’t have to go digging all over your yard, trying to find your buckets. Make yourself a little map, telling you what you have buried where, so that you can find exactly what you need, when the time comes.


My thoughts on caches:
First a couple of observations:
Caches (plural) in the context to which this article pertains, hiding items, is pronounced ‘cashes’, and when referring to potpourri type sachets is pronounced ‘cash-ayes’.
Singular is ‘cash’ for the hiding and ‘cash-aye’ for the potpourri sachets.
The caches I have made have all been similar to one another in design, if not contents. I always wanted to recover the bucket so I had something to carry the items in once recovered, in case I did not have any transport or LBE when I needed the cache.
The way I do it is a bit more expensive and labor intensive getting the cache put in than most, but much easier and faster to recover than the way some do it, which is better than the other way around, I think.
So here goes, for an earth buried bucket cache. A tubular cache container will be about the same. Scout out a likely spot and monitor it for a few weeks or months to make sure it will not likely be discovered by accident. Check the local flood plain maps to see if the area is subject to minor or major flooding. If it is, that does not mean you cannot use the place, but you will need to use the same precautions you would when making an underwater cache.
Make sure there is a spot some distance away where you can cache a couple of things, just under the surface of the ground. Once you are confident that the place is secure enough, make sure you have what you need.
Bag up the items, even the canned ones, in 2-gallon heavy duty Zip-lock freezer bags and stack things as tightly as you can. If it is a food cache, be sure and include everything you will need to use that food. Including a can opener for sure. But I would put in a knife/fork/spoon, folding handle cup with water bottle, water filter, a solid fuel or gel fuel folding stove if needed. I would also have as much water as would fit in the bucket to fill it up completely.
Special note: NEVER put fuels and other flammables in with anything they can contaminate. The same goes for highly aromatic items. If either leaks, they can ruin other items. Not only do you not want fuel soaked food or clothing, or corroded weapons and tools, you also do not want your clothing smelling like gun cleaning solvent.
Once the bucket is packed, keeping it as light as possible, seal the lid with silicone. Use two smaller buckets that are easily carried, rather than one larger, heavier bucket if you need more space.
Have a second, nesting, bucket for each cache bucket you have made up. Find something to put in the empty bucket that will support the cache bucket just shy of being a glove fit when inserted into the empty bucket.
Get a good pick and shovel, plus a small shovel or e-tool, which should be oiled and put in a zip-lock bag; several more buckets or boxes, and fill them with good, clean, dry mortar sand. Take a small tarp, and some heavy duty clear plastic sheeting and head for the cache point sometime when it will be very unlikely for anyone to see or come up on you while burying the cache.
If you can arrange to place the cache or caches in the fall, just before high winds are expected, or heavy rains, or even a snow storm, all the better. The high winds will be blowing leaves and debris around, if there are any at all in the area, and the rain and snow can help cover up any traces of the ground having been disturbed.
You can place a cache any time of the year, just be extra careful of setting the site to rights so there are as few signs as possible that anything has been done there.
Now this is where I do things rather different than most. Move any surface material away carefully before digging. Lay down the tarp. When you dig the hole, make it two good shovel widths larger all around than the diameter of the bucket, especially if you want to recover everything. Place all the extracted dirt onto the tarp as you remove it from the hole.
Once you are deep enough to have the buckets at least 6″ and preferably 12″ to 18″ below the level of the ground, put in the empty bucket and carefully fill around it with some of the sand until it is stable. Put in the support and then the cache bucket. Make sure it will slide in and out easily. Fill the rest of the hole up to within 6″ of the top. Spread out the plastic sheet, digging the hole wider if it is likely to flood or get a lot of rain in the area, so the plastic covers well past the edges of the bucket. Add a bit more sand, making sure none of the plastic shows above it, and finish filling the hole with the dirt that was dug out. Do not leave a depression, but you also do not want a mound. Just enough to allow for a little settling.
Load up the extra buckets/boxes used to bring out the sand with the rest of the dirt. Gather up the tarp and tools and take them, and the buckets/boxes of dirt and haul it off so there is nothing left indicating a hole was dug. Carefully camouflage the area, replacing any surface materials you moved before digging.
Record the location, using coded instructions, on a coded map. Take the small shovel or e-tool to a spot nearby where you can cache it just a few inches below the surface of the ground. Drop a sawn off piece of broom handle, sharpened slightly on one end nearby, on the surface of the ground.
Have a second set of coded instructions, using alternate landmarks, just in case one or more of the original ones are changed in some way.
If there might be a real problem relocating the cache, such as in a large open area, among really rocky areas, or any area with plain terrain features, bury a
Neodymium rare earth magnet just under the surface of the ground, somewhere near the cache as an ‘anchor point’ from which measurements and bearings can be taken to relocate the cache. One simply walks the area, with a compass attached to a stick so it can be kept close to the ground. Watch the compass needle. When close to one of these powerful magnets the compass needle will deflect and the magnet can be located. Then with the location of the actual cache determined.
When the time comes to recover the cache, middle of the night, blowing rain, trying to snow, with five guys and two mean dogs after you, recover the broomstick, dig up the trowel, scoop the thin layer of surface dirt free of the sheet plastic, scoop out the easy to move sand off the top of the cache bucket, down to where it is sitting in the bottom bucket. If enough room was left when the buckets were nested, the cache bucket should pull out of the bottom bucket easily. If there is too much space sand will have worked down and locked the two together. If not enough space is left, the compression of the bottom bucket will make it more difficult to get the cache bucket out. But it is not that hard to hit the right medium.
Pull the bucket and if you have time, try to fill in the hole best you can, hoping it will not be discovered until too late so the pursuers do not know you recovered anything, or if it is obvious you did, not what it was in the cache.
Now, if you have plenty of time, and conditions are not too bad, you can fairly easily recover the bottom, empty bucket, if you want. By having the hole a good shovel width around the bucket, filled with that dry, loose sand, it can be scooped out enough to pull out the empty bucket for future use. The main reason to use it is to make it easy to recover the cache bucket.
Another option, rather than just a brick or 2×4, or something to hold up the cache bucket, you can stash some additional supplies in it to do the same thing. If the cache is found, chances are the people will not dig out the bucket, not realizing how easy it is. Just get down to the lid and pull it off to get what is inside, leaving the remains of the bucket on top of the things in the bottom bucket.
You can carry that one step further, since getting the second bucket out is not all that hard, and have some double bagged and wrapped items below the bottom bucket. Even if the cache bucket is found and pulled out, and anything in the bottom bucket, it would take someone as devious as me to keep digging to pull out that bottom bucket to see if there was anything else underneath.
An option, if it is going to be difficult to not be observed by chance, is if the site is at all suitable as a campsite, set up a fairly large tipi or other tent with no floor over the cache spot. You can do all the work without anyone seeing what you are doing. Just leave the surface of the ground in the same condition as it was when you set up the tipi and no one should be any the wiser. Carry out the excess dirt in the same buckets in which you brought the sand.
The basics of caching drums are very similar to those for bucket caches. But there are some differences. Here are some things specific to the drum caches (This refers to open top drums with sealable lids, not drums for liquids with bungs.):
First, 55-gallon drums are big and heavy. Think about using 30-gallon drums if you can find them.
Second, if you are planning to just dig down to the top of the drums, remove the tops, and recover the items, I would think about that twice. The drums will be a valuable asset in and of themselves in the PAW. Also, by recovering the drums and repacking the contents (if you have to unload them to recover), it will be much easier to move everything by simply rolling the barrel rather than moving all the individual components or containers.
To facilitate this, I would have rope sling bridles tied up, using rope impervious to the type of ground you have, that you can put under and around the drums. This will allow the easy use of a pickup truck hoist, or tripod to lower and then lift the drums from the hole.
Now, a shovel width all the way around a bucket is adequate. You will need somewhat more to be able to dig all the way around the drum and get deep enough to recover it. Either that, or you will need to make a scoop device specifically to get the sand from around the drum without having to get down into the hole with it, with would be the preferred method for me.
Now, to anchor the drums from floating/vibrating out of the ground, I would use a dead-man type anchor. If you use the method I describe below, you will have plenty of room to put down a circle of sheet goods such as plywood, scrap sheet metal, or even a built up sheet made from a double layer (crossed) of one by twos or whatever. Whatever you use will need to be round, as large as the hole, minus just a little to make it easy to get down there.
And similar to the sling bridle for the drums, put down two ropes, crossed in the middle of the hole, before you put down the dead-man. Install the drum on the center of the dead-man, place a pair of crossed two by twos on top of the drum and tie off the ropes to them. This way, for the barrel to come out of the ground, and it is likely due to the slick surface, not only the weight of the drum, but the entire weight and mass of the backfill will also have to come up, which is highly unlikely because of the additional weight and the friction of the sand against the sides of the hole.
Some things you might not want to cache. Anything you really cannot afford to lose, for sure. Cache can be and are found from time to time by accident. Things that could get you in trouble if found should not be cached in open areas. Neither should anything that can be used against you. Such as guns or certain documents. Some of those things can be cached, but the locations must be where they would be extremely unlikely to be found.
As to protecting firearms and other important metallic objects, if you chose to risk caching them, I would grease them up, and then slip them into silicon impregnated sleeves before putting them into Mylar or plastic sealed bag, with either an O2 absorbent or desiccant pack.
A few words about alternative locations. Caches do not necessarily have to be buried in the ground. Using the proper containers, properly sealed, caches can be anchored under the water in ponds or lakes. I would not try it in rivers, as they can be washed away quite easily.
Caches around the home, on the property are a good idea. Just so you can have some equipment and supplies in case you home is damaged or destroyed and you cannot retrieve things immediately. They still need to be secure and hidden, but as you can generally control access to the property, perhaps quite as secure or hidden as off-property caches. (Some good places for home caches: under the sandbox, along the fence row, under the birdbath, the middle of the garden. The possibilities are endless.)
Caches can be placed next to steep hills or bluffs and material brought down around them. In rocky terrain, you can build a cairn to hide a cache. If there are some structures around that are not frequently used, caches can be secreted in, under, around, or on them.
That can include trees. Especially in swampy areas or areas prone to floods that are likely to have all sorts of junk lying around, or caught up in trees and abandoned structures. Unless you are careless and do not make it look like it has been there since the last flood, that old ice cream bucket stuck up in the tree, filled with filth would not bring any attention to it. And could have a zip-lock bag with some necessities hidden in that filth.
Which brings me to the point that not all caches need be bucket sized or bigger. You might just need to have a few things available. A gallon zip-lock, or even a quart one might hold just what you need. They can be secreted in some very small places that would escape notice unless someone was doing a very detailed search for some reason.
And the opposite is true. You might need to cache quite a bit of stuff. If you do, do not make one large cache. Spread smaller caches out within an area. You do not want to lose everything at once.
Here are some specific and general alternatives to buried and open caches in wilderness areas. These are more for urban areas when burial is not a very good option in some cases.
Depending on the actual types of construction in the area, from type of roads, sanitary drains and storm drains, housing construction, business construction, public works, play grounds, parks, and pretty much everything else, a person will probably be able to find several spots where a container can be placed that will either be well hidden, or blend in well enough to not draw any attention, unless the place is disturbed for some other reason.
Which that chance will be a major part of the location selection process. For instance, if the roof of your building is a flat roof, and there are several plumbing stacks on it, or air conditioning units and/or ducts, or antenna poles, or drains for rain water, or gutters and downspouts, or fire escapes, or roof access hatches, or… on and on and on.
Look around carefully, but with an out of the box and pushing the envelope mindset. You do not have to use PVC pipe. Work okay for a dummy plumbing vent if it matches the others, and has internal plugs (with the top one recessed a few inches so at just a glance it will look like an open pipe), and there are not any people that actively use the roof, or can see it. If a maintenance person is up there regularly, he/she would spot a new fake plumbing vent. But not necessarily something inside and around a corner of an air conditioning unit. Or some bracing on antenna poles, or an extra down spout in an area not looked at often, or a piece of gutter somewhere that does not necessarily have to have one, and with a screen over it to keep out leaves, could hide a few things.
If there is anywhere close that has a sandbox, such as a park, the building playground (I would stay off school grounds), large planter boxes, or pretty much anything else that has much sand in it, you can possibly volunteer to help refurbish, fix, or even simply install one, so you can make sure the sand is really deep, and you can plant a cash there, also deep, so playing children, or gardeners will not dig down anywhere near enough to hit it.
If there are storm drains that are too small to enter, but have road side or street side grates, covers, or openings, you can rig a container that you can push back down the line, on a stand of some type to keep it up out of the water (so it does not get carried down, as it should be waterproof to the point it can stay under the water for days), with a way to hook it and pull it out when needed.
Many things can be done if you volunteer, such as the sand boxes or planters mentions. If you help repair public works such as other things in parks, or common areas of housing units, there is a good chance you can install caches during the process of doing the work, when no one else is around, or you cannot be seen. Again, buried, or added to above ground structures and things like light poles, cross over supports, sign posts, the bases for those poles, etc.
If you are helping build a storage shed for the property, or the park, or for a neighbor, or for anyone close, work in some reinforcing beams vertically and/or horizontally. One or more can have a hollow where you can stash some things. Even a short section of decorative beam made of foam that can be matched to real beams in an out of the way, non structural spot, so a couple of hammer blows will break it open and you can retrieve your cache.
You can even do some of the things at your own place, even in an apartment. Build some fancy, free standing shelves, and trim them out with hollow beams. Hidden compartments. Display cases with hidden compartments or under shelf hiding spots that are hidden by a shelf front piece that projects down a couple or three inches.
Curtain valences that are hollow, or have space on top hidden by a raised front.
There are hundreds of ways to hide things. Sometimes in plain sight. Do you know anyone in high school taking metal shop? Maybe have them make a couple of aluminum castings of old pirate flintlocks, with hollow backs. Hide a gun in a gun kind of thing.
Those are just some of the possibilities. Looking over an area with caches in mind will reveal many more specific to the location.
A word on using decoy caches:
If you suspect that people know you are a prepper, and have any inclination that you might be using caches, you might want to use some decoy or dummy caches to divert them from looking for and finding your serious caches. Unless the person(s) are experienced preppers themselves, or have caching experience, including geo-caching, they are unlikely to be very skilled at finding them. But in a situation where they might be desperate enough to force you to tell them where your caches are, or simply are willing to put in a great deal of effort to find them without letting you know, people might just be seriously looking for them.
As with many other prepper situations, having some decoy, dummy, and sacrificial caches can be just one more tool to protect your supplies. And, possibly, your safety, if you are detained and force is used to try to get information from you.
Either way, if you can install some caches that you will not mind being found and losing in some instances, it might just be enough to get the people from looking further, or using greater force to get you to give up some of your real caches.
Decoy and dummy caches usually do not have to be nearly as well placed, concealed, or as much work done to emplace them. While you might not want them to be completely obvious, making them fairly easy to find without it being clear that you want them found (most people think everyone else is a lot dumber than they themselves are, and will usually believe their vastly superior intellect allowed them to find something you thought you had hidden so well), if they are decoy or dummies, with no actual cache there in the case of dummies, or one set up to be useless to them in the case of decoy caches, and you are not around for them to take vengeance upon, it might discourage them. Again, the mindset that you are not smart enough to actually have real caches when you used a decoy to try and fool them might come into play and cause them to quit wasting resources and time to look for more.
Decoy caches can also be used to simply take the heat off, if they have some items in them, but not of a type that can be used against you, or will provide the person with much in the way of help or more than very short term sustenance, again convincing the person that you do not have anything that will actually be of great value to them, as they were hoping.
The other situation is to have a cache a bit better positioned and ostensibly concealed, but that you can give up or they can find, that has the appearance of having been accessed and everything, or everything of importance taken already. If forced to give up the location, if you have it set up so it is believable that someone else simply found it, and you were unaware of that fact, they are less likely to take retribution for having been sent to a useless cache.
There is a risk that these actions will create a situation where you are at more risk due to their anger, but I believe the advantages of using decoy, dummy, and sacrificial caches will be worth the slight risk.
I am not going to get into full structure caches, such as buried tanks and such. They are a different subject in my opinion, with their own special procedures.
A note on sealing PVC pipe caches: While everything in the tube should be itself in water proof/water resistant packaging, the PVC does need to be sealed, too. The main options have been the regular solvent weld caps (‘glue on’ caps, which is a misnomer as it is actually a solvent weld), or a female adapter with a screw in plug well sealed with silicone or a water proof grease.
For the few PVC pipe caches I have helped set up recently I am now recommending using the appropriate sized cast iron, stainless steel banded rubber cap. The quality ones seal very well to PVC, and the stainless steel band and screw clamps hold up well in most places. To improve the corrosion resistance of the stainless steel (and even the rubber, as some things in the soil can cause rubber to deteriorate) is to coat the whole cap with a layer of silicone. (Or with hot gun glue if assembly is done where one can be used.)
Using the screw clamp stainless steel banded rubber caps makes it much easier to quickly access the contents of a PVC pipe cache. Scrape away any coating, if used, and use you pocket screwdriver (or better yet, your pocket socket driver) to loosen the screw clamps and band, and then work the rubber cap off the pipe.
As I mentioned, the rubber does seal very well to the PVC, so it does take a bit of effort to remove it. But not nearly as much as it does to cut the pipe if a solvent weld cap has been used, nor the effort to unscrew a well sealed screw plug in an adapter, which usually takes a fairly bulky tool (strap wrench) to hold the pipe, and large slip joint pliers to grip the plug nut to unscrew it. Easier with two people, and alternatives for the regular tools can be used, but all things considered, I believe the rubber caps for cast iron pipe is a better alternative.
Just my opinion
List of some types of caches:
01) Base camp cache: provides the materials and supplies to set up a base camp
02) Bulk trade goods cache: holds larger quantities of trade goods
03) Financial cache: financial and monetary assets
04) Food preservation cache: the items needed to preserve foods short and long term
05) Fuel/Automotive trade goods cache: trade goods relating to transportation
06) Packaged trade goods cache: small pre-packaged or home packaged trade goods
07) Reequip cache: items to replace those lost, damaged, seized, etc.
08) Resupply cache: fairly comprehensive cache of consumables
09) Simple supply cache: basic human needs cache for short term needs
10) Tradesman’s tools cache: items to set up shop for various activities
11) Travel route cache: materials to keep a vehicle going, as well as the humans
12) Arms and ammunition cache: pretty self-explanatory
13) Small to large multipurpose caches: group of caches with a wide variety of items
14) Retreat cache: items needed to set up a retreat and/or equipment/supplies for one
15) GOOD cache: items needed to leave an area and get one somewhere else
16) Mission(s) cache: caches of items needed to carry out various critical missions
17) Role camouflage cache: items to change appearance for a variety of situations
18) Short term stash cache: usually expedient to hide things temporarily
19) Intermediate term stash cache: same as above, but for later recovery
20) MT cache: prepared, but empty caches for use as needed
21) Decoy cache: cache(s) that can be found either with sacrificial items or that appear to have been emptied and poorly rehidden
Just my opinion.
Please write an article on how to store foods on the high desert when the home is not available.
if the United States was attacked by foreign military and all of our major cities was destroyed with nuclear weapons and then an invading military come into this country to conquer it where is the safest place to go