


We citizens will very likely be on our own during the initial stages of most types of a catastrophic disaster.
The first few hours of such disaster are also when most lives are saved. By the time professional first responders are requested, mustered, and transported from outside the disaster area, many patients with severe bleeding, shock, or blocked airways will have expired and many lesser injuries will have become life-threatening without treatment.
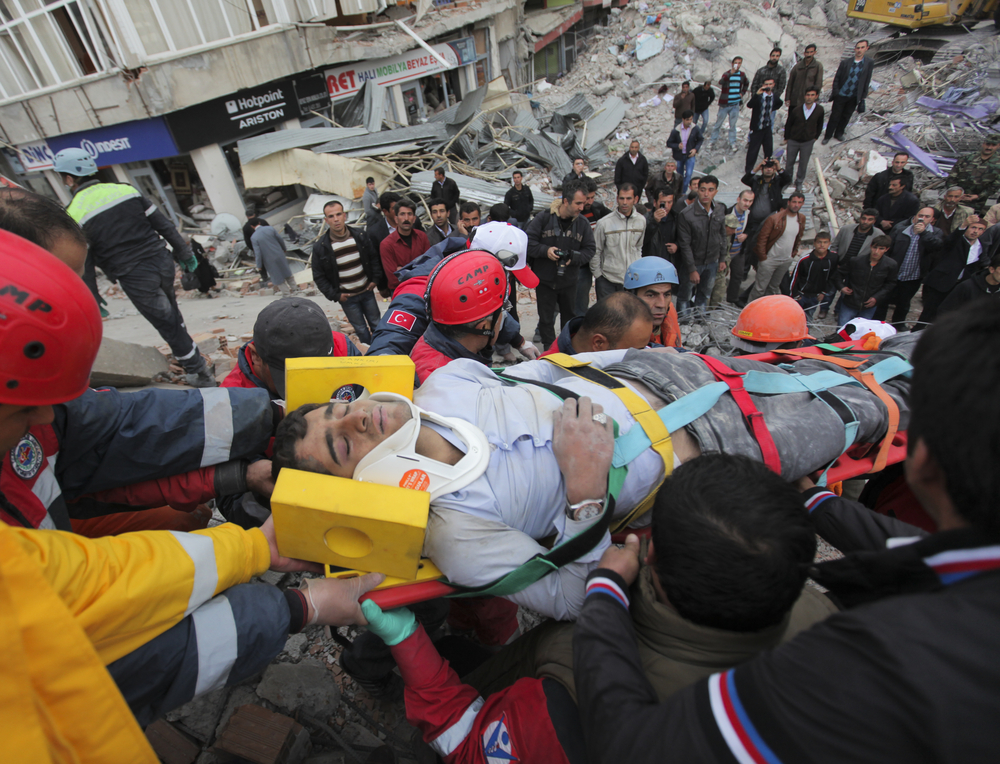
The earthquake that occurred in Mexico City in 1985 killed as many as 10,000 people. People spontaneously mobilized to help each other. These untrained volunteers saved about 700 lives, but they did so at a cost of 100 volunteer fatalities. That’s one dead volunteer for every 7 lives saved and even more injuries.

For every rescuer that is injured or killed, the number of victims increases by one, requiring anywhere from two to six additional rescuers. Anytime people who normally fly a desk for a living head into a disaster zone to run chainsaws, move debris and expose themselves to pathogens extricating victims, injuries are bound to happen. Fortunately, much can be done to prevent additional injury and to do the greatest good for the greatest number of people.
Training & Leadership
Fortunately, citizens don’t need to learn how to conduct LSAR operations on their own and join one of the many community-based or faith-based volunteer programs out there. Such programs are called VOADS (Volunteer Organization Active in Disasters) and there are many benefits to joining one:
- Legal Protections – Volunteers are generally protected by the Volunteer Protection Act of 1997, “Good Samaritan” Laws, and state law, but deploying as part of a VOAD and acting in accordance with your training makes it harder for a lawyer to challenge your status as a volunteer under the law.
- Insurance – Since most VOADs carry insurance for their volunteers, you are less likely to get crushed by medical bills if you are injured helping others.
- Training – Training is offered by city, county, state, and federal levels of government and the VOADs themselves. Depending on which organization you join, you may be eligible for tons of free or subsidized training. I couldn’t have afforded much of the training I have received on my own.
- Incident Command System – In the USA, VOADs, fire departments, police departments, and all other emergency responders all use the same Incident Command System (ICS) which is a standardized approach to emergency response that can be scaled up or down based on the level of response required. ICS was developed in response to difficulties encountered in the response to 9-11 and now provides a common command structure for neighbors to help neighbors more effectively.
- Equipment – In most cases, volunteers must purchase their own equipment, but some VOADS do provide it.
- ID – If your VOAD has been activated, your ID & uniform will enable you to pass checkpoints established at the disaster perimeter. Sometimes first responders are unable to establish an effective perimeter in the early stages of a disaster, but once they do, I have heard many horror stories of homeowners being unable to return home. How would you fare in a disaster if you were separated from the gear and supplies stored in your home? I suggest that survivalists store some supplies in off-site caches because ID won’t get 100% of people past checkpoints 100% of the time, but an ID and modest social engineering skills have prevented many a worried homeowner from getting arrested trying to sneak past a disaster perimeter.
Basics of Volunteer Rescue Procedure:
- Don Personal Protective Equipment.
- Assemble at a Staging Area and sign in
- Choose an Incident Commander and establish the ICS (Incident Command System). The Incident Commander is typically the first volunteer to arrive on the scene, however, he or she may transfer this responsibility if someone arrives that they feel will be more effective. Once professional first responders arrive, they may assume incident command, but this may not happen for hours or days or they may decide to leave it in place and proceed to an area where the need is greater.
- The Incident Commander should then establish an Incident Command Post. This is typically established upwind and uphill from the disaster area.
- Create and equip LSAR teams.
- Establish Casualty Collection Points with Triage and Treatment Areas for the LSAR teams to bring the victims to and a Transportation Area where ambulances or trucks can pull in, to transport victims to hospitals according to the urgency of their injuries.
Personal Protective Equipment
Before volunteer rescuers set out to help others, they should don personal protective equipment that provides a line of defense against accidental injury and exposure to pathogens.
- ID – If you have it, an ID issued by a volunteer agency will reassure some folks that are a trained and vetted volunteer and not just an opportunistic predator seeking to take advantage of the disaster for his own gain or pleasure. ID panels designating the organization you are with can also help prevent law enforcement from mistaking you for a looter.
- Hard Hat or Bump Helmet – Things may not be where they should be in the wake of a disaster. Lights, pipes, tree limbs, splintered lumber, and twisted metal may be hanging over walkways or from ceilings.
- Eye Protection – It doesn’t take much debris in an eye to make a rescuer ineffective and HIV and hepatitis B and C can all be transmitted across any mucous membrane, including the eyes. Wear eye protection and carry a little saline eyewash.
- Headlamp – You can’t avoid what you can’t see.
- Reflective Vest – Disasters don’t always occur in the daytime and may knock out streetlights so it’s important that others can see you working alongside roadways or find you if you are injured.
- N95 Dust Mask – Disaster can put asbestos dust, silica, fumes, smoke, and other harmful particles into the air. If the air is dangerous, light search and rescue volunteers remove themselves to an area that’s safe, but a dust mask is a sensible precaution. The seal of the mask is important and big beards can prevent an effective seal.
- Gloves – You’ll need nitrile gloves to protect you from exposure to pathogens worn underneath work gloves to protect your hands from cuts and splinters.
- Appropriate Footwear – Think solid workbooks with ankle support, a shank to protect against nails and other sharp objects from puncturing the sole, and a rigid toe cap to protect your toes from being crushed by heavy objects. Leave the flip flops home.
Search & Rescue Size-up
A size-up assesses the situation and determines a safe plan of action.
Decide whether to attempt LSAR based on answers to the following questions:
- What are the risks to rescuers? Are they acceptable?
- Will this do the greatest good for the greatest number of people?
- Do we have the resources and manpower to safely conduct LSAR operations?
LSAR Size-up
- Gather Facts
- Assess Damage
- Consider Probabilities
- Assess Your Situation
- Establish Priorities
- Make Decisions
- Develop a Plan of Action
- Take Action
- Evaluate Progress
Search Operations
Search operations involve systematically searching for disaster survivors and documenting their locations.
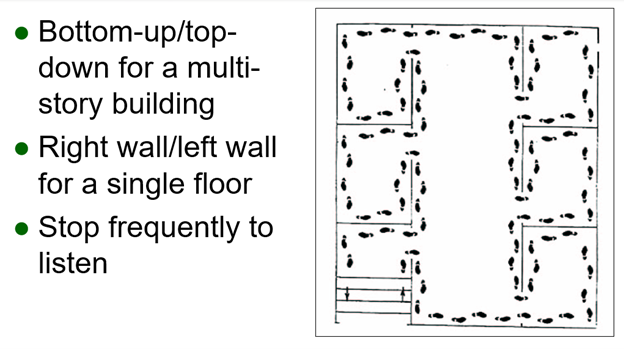
Interior Searches
Before entering a building, assess the damage to determine if it’s safe to enter. If the building is lightly damaged, you can stay and play. If it’s moderately damaged, enter only to save lives and get people out. Heavily damaged buildings should not be entered by LSAR volunteers under any circumstances.
See my article on marking homes for instructions on marking buildings before you enter and once thestructure has been cleared.
Use a systematic search pattern, stopping frequently to listen.
Conducting Rescue Operations
Rescue involves the procedures and techniques required to safely extricate victims.
Equipment for LSAR Operations
We have already examined PPE, but here are some tools that will make an LSAR team much more effective. If you’re able, gather them and keep them staged in case of an emergency.
- Triage Tape – To triage victims according to urgency.
- Hazard Tape – To mark dangers such as downed powerlines, damaged or unstable structures, gas leaks, etc. You may also carry placards to but on buildings once a damage assessment has been made, but this article is more concerned with saving lives.
- Lever – Typically a pinch point digging/prying bar 60” in length, but any heavy-duty steel lever of sufficient length can be used.
- Cribbing – Sections of 4” x 4” or 6” x 6” softwood dimensional lumber, shims and wedges used to build box platforms to support debris trapping victims so they can be safely extricated.
- Stretchers – Used to transport victims to the CCP (Casualty Collection Point). Put six people on a stretcher where possible. I carry a fabric stretcher in my pack and can insert poles when necessary. Some fabric stretchers can also double as body bags.
- First Aid Kit – LSAR personnel treat the three killers, triage victims, stabilize them for transport and get them to a Casualty Collection Point for further treatment and transport to a hospital, so this first aid kit should be very basic. All you really need is a stopwatch, splints, triangle bandages and bandage materials to stop severe bleeding and there is no sense taking too much time bandaging because your pretty bandage will get cut off at the CCP or when a paramedic or doctor checks the patient.
- Blankets – Blankets are useful to treat shock and insulate patients from hold or hot ground. They can also be used to drag victims.
- Lighting – You must be able to see find victims and work, the power may be out, and you may be working at night.
- Marking Tools – Lumber Crayons or chalk are used to mark structures to the side of doors.
- Notepad & Pen – To keep track of victims and note symptoms. Forms and clipboards can also be used. If you join a VOAD, they will probably have their own.
- Radio – Without a radio, each team needs a responder to act as a runner.
- Water – Carry bottles for drinking and unopened bottles for flushing wounds.
- Extra Batteries – For radios and lights.
Cribbing
Cribbing involves safely lifting, leveraging and supporting debris pinning victims and then removing the survivors. Ideally, a cribbing team should include at least five members.
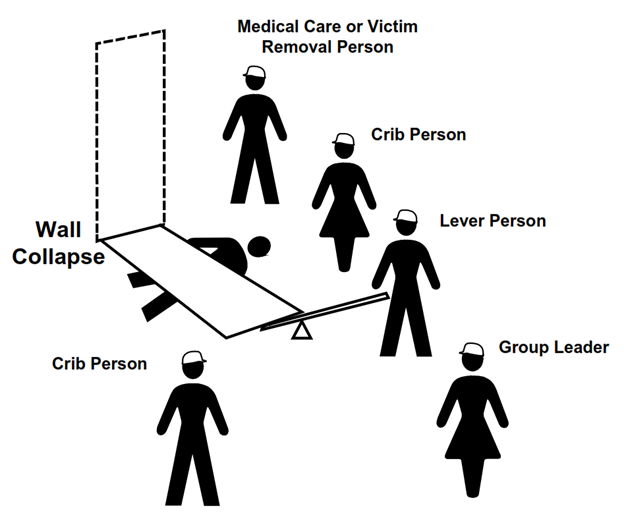
The object pinning the victim may also be controlling bleeding so the patient must be treated and transported quickly once the object is removed. The team must be prepared to do control bleeding and move the victim once the object has been lifted and supported.
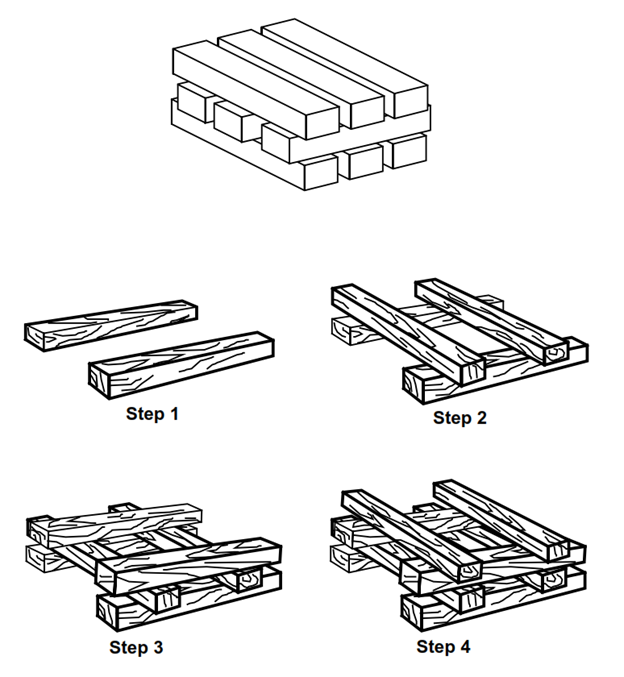
4 Steps to 2×2 Building Box Cribbing
- Step 1: Lay two pieces of lumber parallel to each other on either side of the object pinning the victim.
- Step 2: Position two additional pieces of lumber perpendicularly across the two base pieces.
- Steps 3 & 4: Add additional layers of lumber, each perpendicular to the underlying layer as in building a log cabin fire lay.
2 x 2 box cribbing uses two pieces of cribbing per layer. 3 x 3 box cribbing uses three pieces per layer. Cribbing pieces should be #1 grade 4” x 4” or 6” x 6” softwood lumber. Wooden cribbing should be left unfinished and unpainted. Plastic SAR cribbing is also available. The height of a box crib should not exceed three times the length of the lumber used, so a crib built with 2’ long lumber shouldn’t exceed 6’ in height.
| Timber Size | Construction Method | Weight Capacity | Cribbing Height |
| 4” x 4” | 2 x 2 | 24,000 LBs | 3x Width |
| 4” x 4” | 3 x 3 | 55,000 LBs | 3x Width |
| 6” x 6” | 2 x 2 | 60,000 LBs | 3x Width |
| 6” x 6” | 3 x 3 | 136,000 LBs | 3x Width |
The victim can be dragged clear of a hazard by either the feet or the shoulders.
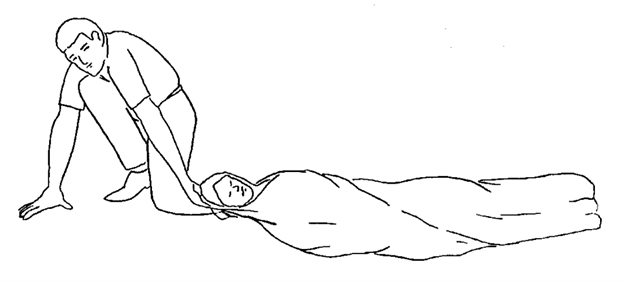
In the blanket drag, the rescuer squats at the survivor’s head, grasps the blanket just behind the survivor’s head and drags the patient clear.
Applying these principles will help you help your neighbors in an emergency.


Wow, what great information and facts! There is so much to learn when doing any type of a rescue. It almost makes you afraid of taking on such intensive training. Can I even remember half of what I was taught? Can I even perform half of what I already know? You can see why most people sit back and wait for someone else to arrive!
God Bless the first responders!
On the contrary, I encourage further and more specialized rescue training than what is covered here. Don’t get me wrong, information here is very good and accurate, but you can only impart so much information in 1 article. Getting more training will reinforce what you DO know and add to it.