


Plants are expensive. Even if you start them from seeds and you don’t have much money invested in them, you’re going to be investing time in getting them to grow. It would be incredibly easy if all plants needed the same amount of sunlight, and if all areas of your garden got the same amount of sun on a daily basis, but it just doesn’t work that way!
Some plants need full sun, which usually means that they need at least 6 hours or so of direct sunlight daily in order to grow properly. Partial sun or partial shade means that the plant needs between 3 and 6 hours of direct sun daily.
Dappled sun or indirect sun means that your plant needs 3-5 hours of sun, but that it shouldn’t be direct – in other words, plant it somewhere that the sun trickles through leaves or screen. Finally, some plants thrive in full shade, which means that they don’t do well with more than 3 hours of direct sun daily.
Now that we’ve gotten the definitions out of the way, let’s talk about how you can figure out where your plants would thrive the best before you plant them. It’s called sun mapping and will save you a ton of time and plants that don’t thrive.
How to Do It
Sun mapping will require that you be around the house for a full day, daylight to whenever the sun leaves your garden area, but then you’ll know exactly where you should put each plant.
You can actually buy kits that monitor your yard’s exposure for about twenty bucks but you only know how long the sun is shining in those particular spots. If this is good enough for what you need to do, go ahead and pick it up. All you have to do is put it in your garden, turn it on, and come back to it 24 hours later. It will give you all the information you need for that area.
Since, as preppers and homesteaders, we’re not particularly into depending upon a store-bought kit, you may be interested to know that there is a way for you to do it yourself with just some graphing paper, some colored pencils, and your time.
First, in order to sun map your yard, you’ll need to draw a fairly accurate depiction of your yard. Be sure to include any structures, including your house or garage, and trees that are going to shed shade over the area at any point because that’s going to be important. You don’t have to be dead accurate, but you want to be as close as possible.
Before you begin to sun map, there are a few things that you need to keep in mind.
- Deciduous trees are going to lose their leaves in the fall and grow them back in the spring so if you’re in a relatively mild climate, this is important. Also, if you’re mapping in the spring, you may want to wait until the trees have all of their leaves on before you map.
- The sun rises in the east and sets in the west, which means that your sun and shade are going to be moving from east to west.
- Pump houses and other structures are going to cast shadows, as will trees.
- Shade moves clockwise
- It’s best to do this twice per year; once in the summer when the days are long, and once in the early spring or late fall when the days are shorter so that you have a more accurate depiction of when every part of your yard gets sun.
Now that you have your yard all drawn out, get ready to get up early tomorrow!
As soon as the sun comes up and starts shining even a little bit on your yard, draw a line on your map that shows where the sun starts and record the time on your map.
Now here is where your method may vary a bit.
Some people like to sun map the garden every hour, which is no doubt the most accurate, and some only do it a few times throughout the day.
Since the process is basically the same, there’s not really any difference in how you map your yard; just how many colored pencils you’ll need!
The next time you go out, (no more than a couple of hours later), use a different color pencil to draw another sun line, and also shade any areas that are now shaded. Repeat this process throughout the day. By the end of the day, you’ll have a pretty good depiction of what parts of your yard get how much sun. Be sure to mark the time that your garden or yard is completely shaded.
It’s important that you are as detailed as possible in your notations while you’re sun mapping your garden. Record where the sun is dappling through, and record where the house or barn starts to shade the garden and when. After you have your sun map complete, you’ll be able to take the next step: planning your garden!
Sun mapping can be a bit confusing but once you actually start doing it, you’ll see that the process is much simpler to do than it is to read about. This may seem like a lot of work, but it will pay off in the end when your shady plants are enjoying the shade and your full-sun plants are basking in the rays all day!
If you’ve ever sun mapped and have any suggestions, or if you’d like to give it a try but still have some questions, please feel free to comment in the designated section below.

This article has been written by Theresa Crouse for Survivopedia.


Also important for solar power generating.
Love this article. Also consider having or teaching your children to do this. Great activity for homeschoolers. Tons of skills involved. Measuring to make the yard diagram. Reading and watching a clock to go outside regularly. Filling in the sun/shade movements on the diagram. Determining the max number of sun hours for each place in the yard and matching the plants to their best location.
great post I no longer buy The Sun paper at work
A few corrections: sun does move from east to west during the day, but shade therefore moves west to east, not east to west as stated in the article. (though the article correctly notes that it moves clockwise).
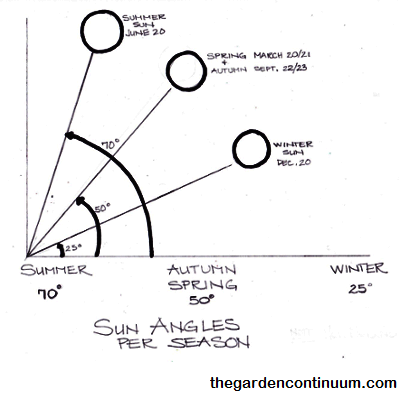
The diagram of the sun’s angles are only correct for a specific latitude. YMMV.