
Foods have been fermented for centuries. It was used originally for preservation but modern knowledge about nutrition has revealed that fermentation provides several nutrients including probiotics, or good bacteria, that helps keep your GI tract healthy.
For survival purposes, this makes it a no-brainer but there are some things that you need to know to safely and effectively ferment foods at home.
What is Fermenting?
Fermenting is actually fairly similar to wine making, except it’s easier and you don’t need as much specialized equipment. Fermentation takes place during a process called lacto-fermentation, in which natural bacteria feed off of the sugar and other carbohydrates in the food to create lactic acid. All you need is the produce, the starter, water, and an anaerobic (air-free) environment.
Some foods are fermented using sugar as a starter, and some are preserved using salt, whey, or even seaweed. Obviously, sauerkraut is salty, but wine is sweet. In a pinch, most foods don’t need the starter because they will eventually create the starter themselves. It’s already on the skin of the produce. Salt does, however, speed up the process and help keep the food crunchy.
Fermentation preserves the nutrients in the food. It also creates other nutrients including essential Omega-3 fatty acids that your body needs but can’t produce, B vitamins, and enzymes that help with digestion. The probiotics created during the process help keep the bacteria in your GI tract in balance.
Fermentation creates a unique, pungent flavor that you may initially find overwhelming (think sauerkraut) but once you get past that, you’ll find that the flavors are actually quite delicious.
What’s the Difference between Fermenting and Pickling?
This gets bit confusing, especially when you think about the fact that salt is used in the fermentation process. So, simply put, the difference between pickling and fermenting is that pickled foods are preserved in an acidic medium such as vinegar. Fermented foods create their own acidic liquid during the fermentation process.
This process is why fermented foods have the wonderful probiotics and other enzymes that pickled foods don’t.
Also, there is no heating or canning process necessary for fermentation. In fact, heating fermented foods in order to can them will likely kill the enzymes.

What Foods Can Be Fermented?
When you think of fermenting, foods such as yogurt, sauerkraut, ginger, and kimchi probably pop into mind. You may be surprised to learn that cheese, salami, bread, vinegar, and olives are other examples of fermented foods. Wine is included in there, too. Just about any vegetable or fruit can be fermented, but not all of them, such as leafy greens, taste good.
Today, we’re concentrating on fermenting vegetables. Here are some examples of foods that ferment well:
- Cabbage
- Cucumbers
- Okra
- String beans
- Green tomatoes
- Turnips
- Parsnips
- Carrots
- Garlic
- Beets
- Peppers
- Sweet potatoes/yams
- Ketchup
You don’t have to use just one vegetable at a time; you can combine them to create chutneys and vegetable blends.
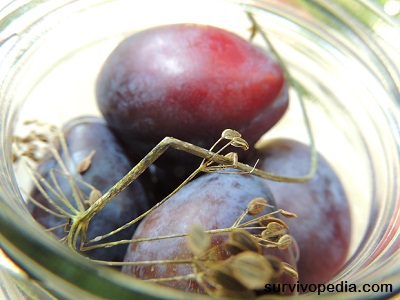
When it comes to fruit, you can most certainly ferment them, but they need to be consumed quickly before the fermentation process turns the sugar to alcohol. You probably don’t want the kids to get drunk off the strawberries.
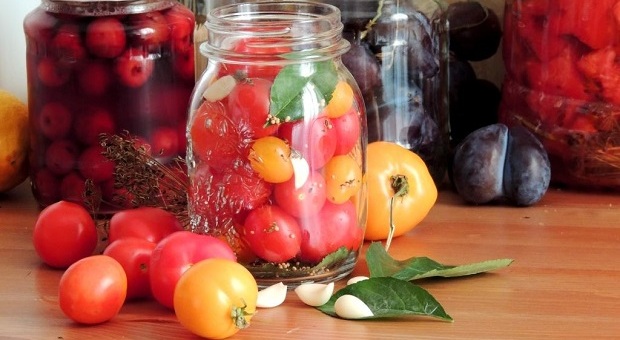
What Vessels Are Good for Fermentation?
Two of the best vessels to allow your food to ferment in are glass canning jars and stone crocks. You absolutely do not want to use plastic because chemicals can leach into you foods. Metal aren’t good either because the salt corrodes them.
If you choose to use canning jars, use the wide-mouthed variety. You need to use your hand or a tool to pack the veggies tightly. Self-sealing jars are ideal because they lock the air out.
If you use stone crocks, use ones that are glazed inside and, preferably, have airlocks with a release system. You can buy these online and they help you control the fermentation process by making the environment anaerobic. That being said, you can use a standard stone crock. Just make sure that the vegetables are weighted so that they stay submerged so that they ferment, and covered so that bugs can’t get into the brine.
Tips for Fermenting Food at Home
Though fermenting food is almost bulletproof, there are some steps that you can take to make the process more successful and ensure that the food is properly preserved.
- How you slice, dice, or cube your veggies doesn’t really matter as long as you keep the pieces fairly uniform so that they ferment at the same pace. Dense vegetables such as turnips, carrots, and beets should be sliced, diced or chopped so that the lactic acid can reach the center.
- Keep food submerged in the brine. This is important because food left above the brine will spoil instead of ferment and will ruin the batch.
- Fermented foods are acidic and need to have a pH of at least 4.6 or lower.
- Though botulism found in home-fermented tofu and other bean products is one of the top causes of food-borne illnesses in china, there’s only been one reported case in the US. Still, follow refrigeration and preservation protocols to avoid this. Botulism is not your friend!
- If your food has slime, mold (yeah, some people say it’s fine, but experts say don’t risk it for home fermenting), a creamy white film, a yeasty smell, or your cabbage is brown or pink, it didn’t ferment correctly and isn’t safe to eat. A white film on top is OK as long as there’s no slime.
- Be careful if using sealed containers because the fermentation process releases gases that can cause your container or seal to blow. Using airlock devices helps with this.
- A film of olive oil across the top of your brine lets gas out while keeping oxygen from getting in.
- Though many recipes may call for a starter, you may not want to buy one, or you may not have access to a retailer in a SHTF situation. You don’t really need one – it just hastens the process that will occur anyway.
- Don’t forget to sterilize everything that comes into contact with your food, including the jars, utensils, table top and weight. Wash your hands well, too.
How to Ferment Your Food
 Now we’re getting down to the good stuff.
There is no blanket recipe for fermenting foods because some veggies obviously already have a lower pH than others.
These foods won’t need as much salt. You’ll also see recipes that call for whey or a starter.
Both of these are to add extra bacteria to get the fermentation process started.
The veggies will do this on their own if you ferment them correctly, so you don’t necessarily need them. Salt is used for preservation.
There are a couple of different ways to begin the fermentation process: You can make salt water brine, or you can salt the produce and use the natural juices from the produce to make the brine.
If using salt brine, simply add 1-3 tablespoons of salt per quart of water. Pack veggies tightly into container, cover with brine, weight the veggies with a heavy plate (you can add a freezer bag full of water to the plate to help weight it if you need to, or a sterilized rock), then let it ferment as follows.
Here are the steps for using the natural juices.
- Choose your vegetables. Use only organic produce to ensure that there are no chemicals and the good bacteria can flourish.
- Begin by chopping or slicing your food in whatever manner suits you, as long as the brine can penetrate. Are you going to eat it as a relish or in the form of slices on a sandwich? Prepare you food according to what you’re going to use it for.
- If you’re using whole vegetables, pack them into your jars or crock. If not, salt your vegetables in layers as you slice them to draw out the moisture, then squeeze, knead, or mash the juice out of your produce and place it into your fermentation container. This will be your brine.
- The amount of salt you use depends on the product, but a good rule of thumb is to use 1-3 tablespoons per quart of food or brine. Any type of course sea salt (gray, black, pink, or red), or Himalayan Salt is a good choice if you don’t want the food to taste super salty.
You can use whatever salt you like as long as you make sure that it’s pure salt – no anti-caking agents or any additives. As long as you reach the proper pH, the level of salt is a matter of personal taste. Salty sauerkraut may be fine, but you don’t want your chutney to be so overpowering. Experiment to find what you like.
- Tightly pack the food into a fermenting crock or jar and cover completely with the brine.
- Add the airlock lids or, if you’re using another type of container, weight the food with a plate or whatever you want to use (not plastic) so that the food stays under the brine. The liquid, and even the veggies, will likely expand during the process, so prepare for that.
- Let the veggies ferment and ripen for 7-30 days in a dark place at room temperature. When they process is complete, refrigerate, vacuum can, or store in a cool, dark place. Fermented foods can keep for months.
The Three Fermentation Stages
As I said above, the fermentation process can take anywhere from 3-30 days. This varies depending upon room temperatures and vegetables. During the first stage of fermentation, you’ll notice bubbles. Next, you’ll notice a pleasant, sour aroma. It shouldn’t be yeasty, exactly.
Finally, you’ll notice a sour, tangy flavor. Smell and taste your fermenting veggies daily if you can so that you know when they’re to a stage that you like. If you smell anything rotten, the process has failed. Throw it out.
After your fermented veggies are finished, store them in the fridge, or at least in a cool, dark cellar.
Now you know how to ferment foods at home! But wait, there are more survival secrets to learn from our ancestors! Click on the banner below to discover them!

This article has been written by Theresa Crouse for Survivopedia.


mike | August 15, 2016
|
got good healthy kefir grains, want some?
Pingback:The Forgotten Wisdom Of Preserving Food Without Canning | Survivopedia | June 22, 2018
|