


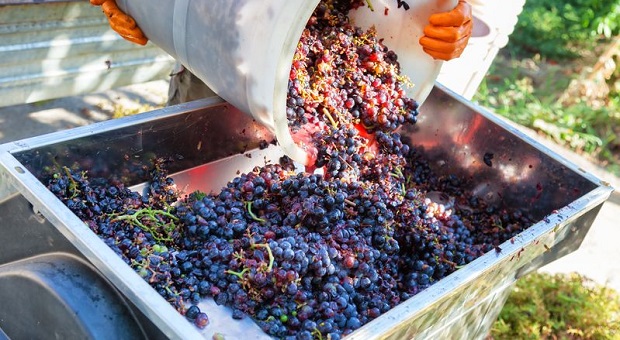
When you think of wine you probably think of grapes, and rightly so.
Most commercial wine is made with grapes and the flavors are determined by the variety of grape, the region in which they are grown, and the spices and methods used to ferment them into wine. However, you can make wine from just about anything that will ferment.
Fruits, vegetables and even some flowers make wonderful wine and you can use any of them to make wine at home as long as you follow the basic rules of wine making. Once you get the hang of the fermentation process, you’ll be golden.
Wine making isn’t exactly a piece of cake for a beginner, but it isn’t brain surgery either. By the end of this article, you’ll be ready to get started using whatever produce suits your fancy and as you get used to the process, you’ll definitely want to get creative!
{adinserter survivalmd}Tip: Homemade wine can taste absolutely hideous or it can taste better than anything that you buy in the store. The difference between the two is how well you follow the directions. There’s also a bit of luck involved too, especially in the beginning.
One huge benefit is that what you make at home is 100 percent natural, without the additives and preservatives that are present in most store-bought wines. As business people, wine producers have to push out as much product in as little time as possible – time is money.
Unfortunately, really good wine takes time to make. That’s typically the difference between a $5 bottle of wine and a $50 bottle of wine. When you make it yourself, you can take the time to do it right without taking shortcuts such as pushing it through asbestos filters to rush the process. (Yuck, right?)
Two Critical Components of Winemaking
There are only two rules to making REALLY good wine. Know all the steps to the process and keep your wine-making area and equipment meticulously clean. Germs and bacteria can spoil a batch of wine in no time flat and all of your hard work will have been for nothing. Follow these rules and you’ll be making fabulous wine in no time!
Using the Right Yeast
Fermentation is actually just a chemical reaction between the water, sugar, juice and fruit and the wine yeast that you add. This concoction is called the “must”. We’ll get into the technicalities of how to ferment your wine properly in a minute, but first I wanted to explain why you need to use wine yeast instead of baker’s yeast.
First, baker’s yeast has been developed over the centuries to add that deliciously yeasty flavor to breads and baked goods while wine yeast has been developed to have no flavor at all. It’s simply a functional component that aids in fermentation. You just want to taste the wine, not the yeast!
Second, baker’s yeast is top-fermenting yeast which means that if you use it to make wine, most of the fermentation will take place in the top few inches of the must. Wine yeast is bottom fermenting so the process will occur from the bottom up through the wine.
Finally, baker’s yeast can’t tolerate alcohol the way that wine yeast can. Sometimes the first few points of alcohol will kill the baker’s yeast and ruin your batch but wine yeast can survive in up to a 16 percent alcohol solution.
A note about sugar: it’s critical that you have enough sugar in your must to make it ferment. Sugar is what the yeast feeds off of and if there’s not enough sugar, the yeast can’t do its job and ferment the juice.
A note about acidity: Having the correct acidity in the must is important for two reasons. First, it can slow the fermentation rate if it’s too high. Most importantly though, it affects the flavor. For tarter, dryer wines, you want to pH to be around 3.3. For dessert wines, you want to keep the pH under 3.6. For anything in between, go around 3.4.
The three acids used if you need to increase the acidity (lower the pH) are citric, tartaric and malic acids or you can just buy them all together in what’s called an acid blend.
Equipment That You’ll Need
Regardless of what type of wine you’ll be making, the same equipment will be necessary. I know a woman who made wine in stone crocks in her cellar but the problem with that is that quality was tough to guarantee.
Sometimes she’d get great wine, sometimes it would taste awful and sometimes she had berry shine instead of berry wine. Of course, that was always a pleasantly delicious result, unless you had to get out of your chair after drinking a pint glass of it!
My point is that if you want to make consistently good wine, you’re going to need to proper equipment. This is what you’ll need to make one batch of wine.
- One 4-5 gallon food-grade plastic bucket with a lid. This will be your primary fermentation bucket or vat.
- Three gallon-sized glass jugs. These will be your secondary fermentation containers.
- Three airlocks, also known as fermentation locks. You can pick these up off of Amazon, eBay or from a brewer’s supply store. You can also make your own, but honestly the ones that you buy are so cheap (~$2) that there’s really no reason to make one that may not work.
- A funnel that fits into the mouth of the jug.
- Rubber corks (called bungs) that fit into the jugs.
- Large nylon mesh straining bag. Some people use cheesecloth. You’re going to put the fruit pulp in it.
- Approximately 6 feet of half-inch clear plastic tubing.
- 5 wine bottles for each gallon of wine that you make. For a standard batch, figure 5 gallons or 20 bottles.
- Pre-sanitized corks (number 9 sized)
- Litmus paper (pH strips) to test the acidity of the wine.
- Hydrometer to measure the specific gravity (or sugar level) of the must, to estimate the potential alcohol content of the wine at the time of yeast pitching and to monitor fermentation.)
- A hand corker. This is going to cost about $35 new. You could always pick up a used on or rent one from a wine supply store. If you’re going to be making wine frequently, I’d suggest buying one.
- Lots of whatever produce you’re using to make your wine.
- Granulated sugar, brown sugar or honey
- Filtered water
- Wine Yeast
You’ll find recipes for several different wines that call for spices or seasonings that enhance the flavor of your wine and there are also commercial enzymes, tannins and acids that help you control your production. Campden tablets help prevent oxidation so they’re popular, too. Really though, all you need is what we listed if you want to keep it simple. Your wine will be delicious, though the addition of some spices is especially nice with some fruits, such as apples or pears.
Making Wine
There are 3 primary phases to making your wine. The first occurs in the primary vat, the second occurs in the secondary vats and the third and final phase occurs in the bottle. Oh, and there is another, most important step: drinking your wine!
Before we go any further, you need to know that sugar, in whatever form you choose, is critical to the fermentation process. Some fruits, such as grapes and blackberries, have quite a bit of sugar so you won’t need to add much. Others, such as dandelions or apples, don’t have as much and you’ll need to add more in order to get the alcohol content right.
Also, it’s best to keep the temperature of your wine relatively stable and slightly warm so store it somewhere where it will stay between 69-79 degrees F. If you want to get really fancy, you can buy warming bands for your primary vat but it’s really not necessary.
Phase 1
Remember that the first step to each phase is to make everything, including the fruit, clean! Wash the primary vat well and then wash the fruit, removing any bad spots, stems or leaves. The best fruits to use are fully ripe because that’s when they produce the most juice and flavor.
Though many wines, such as grape or apple wine, are made using straight juice with very little water added, some fruits are just too strong-flavored to use straight up. A few examples here are elderberries, blueberries and peaches.
If you’re using these strong-flavored fruits, you need less fruit and more water. Of course, it’s your wine, so if you want to use mostly juice and have a heavy, fruity wine then go for it. You can also add more water than is recommended if you’d prefer a lighter-bodied wine. Do your own thing, but here’s a guide to get you started that will result in a medium to full-bodied wine for some more popular fruits.
- Apples – 50-55lbs or you can use pure unpasteurized organic apple juice
- Apricots – 18 lbs.
- Blackberries – 15-20 lbs.
- Blueberries – 13 lbs.
- Currents – 12 lbs.
- Dandelions – 4-5 quarts of petals, no leaves or stems. This is a special recipe that requires other ingredients than just the flowers. We will talk more about this in a future article, so stay tuned!
- Elderberries – 10 lbs.
- Gooseberries – 11 lbs.
- Grapes – 80 lbs. or you can just use unpasteurized organic grape juice
- Peaches – 15 lbs.
- Pears – 22 lbs.
- Persimmons – 15 lbs.
- Pineapple – 14 lbs.
- Plums – 16 lbs.
- Raspberries – 15 lbs.
- Strawberries – 16 lbs.
- Watermelon (insides, not the rind) – 18 lbs.
Now that you’ve got your equipment and your produce squeaky clean, it’s time to get busy. This entire process won’t take you more than a couple of hours, depending on the type of fruit you’re using.
- Pare your fruit if necessary, such as with apples, peaches or apricots.
- Crush the fruit into a fine mash. Don’t use a food processor because this makes it too pulpy.
- Apples can be a bit tricky but just smoosh them as well as you can, or use a press to get the juice.
- Add your fruit pulp to the straining bag and place it and your juice in your primary vat.
- Add water to nearly fill the bucket, leaving room in case you need to add sugar.
- Test the specific gravity of your must by drawing a sample out into a small jar. For 12% alcohol, which is a good number for preservation purposes, you want it to be SG 1.090. If it isn’t, add sugar. You can dissolve it in some purified water or just add it straight in and stir until it dissolves. Measure the SG until you have it right. If you get it too sweet, just add more juice or water.
- Test the acidity levels as we discussed above and, if necessary, add some acid.
- If you’re using Campden tablets, add them now, but let the must set for 24 hours before you add the yeast or it will destroy the yeast.
- Add the wine yeast.
- Cover the primary vat with cloth or the lid, but don’t seal it. Just set the lid lightly on top of it to keep critters out.
- Let it ferment for 7-10 days, stirring a couple of times per day. As it ferments, froth will form on top and the sediment will settle on the bottom.
Phase 2
You’re getting closer! Now it’s time to move the almost-wine to the secondary jugs.
- As we already know, step 1 is to sanitize all of your equipment before you start!
- Remove the pulp bag and squeeze the extra juice out of it. Discard.
- Either strain the liquid to remove the sediment and froth or carefully siphon the liquid into your secondary jugs, being careful to leave the sediment on the bottom.
- If you strained it, use the funnel to pour the liquid into your secondary vats. Either way, fill the jugs nearly to the top, leaving only an inch or less at the top to reduce air in the wine that can cause spoilage.
- Put your airlocks on your jugs.
- Store in a slightly warm, preferably dark place where the temperature isn’t going to fluctuate much.
- Ferment for 4-6 weeks, then test with your hydrometer to make sure that it’s fermented to SG 0.99-0.998. If it hasn’t reached that point, let it ferment for a bit longer.
Phase 3
- Siphon the wine from the secondary jugs into bottles leaving room for the cork and about ½ inch of air space. Make sure that you leave ALL of the sediment behind, even if you lose a little wine.
- If you’d like, taste your wine and if you’d like to add more sugar or spices to it, now is the time to do it, before you bottle it. Siphon off the wine into a large, CLEAN container and add the sugar/spices to taste, then bottle it. You may want to use a stabilizer such as Potassium Sorbate if you add sugar to prevent it from re-fermenting after you bottle it. Hint: you may want to experiment with a small bit of the wine first so that if you don’t like the result, you don’t ruin the whole batch.
- Insert corks and store the wine upright for three days, storing at about 55 degrees F.
- Turn the bottle on its side and let it finish doing its thing.
In theory, you can drink it now, but it’s best to let it age for at least a month before enjoying it. You can let them age up to a year if you’d like. Reds benefit more than whites from aging.
As with all things, the best way to learn and to get better is to be creative. Once you get the process down, try blending your fruits, or even your finished wines. For example, elderberry wine adds a lovely fruity flavor to other berry or grape wines. Spices are fabulous to experiment with too. And while you are at it you can learn how to make your own beer here and your own organic vinegar here.
Now that you know where to start, go have fun. We do recommend, however, that you don’t get excited and drink your first batch all at once!

This article has been written by Theresa Crouse for Survivopedia.


Some out there will want liquor and tobacco more than they want food when things get bad
Wow, this is a really great guide on wine-making.
Hi, Jordan 🙂
We are glad you liked our article.
Alex, from Survivopedia.
Great read. Makes me want to give a try.
Let us know how it went please.
Alex, from Survivopedia.