


Even if you’re fully knowledgeable in regard to survival basics, including the fine art of suturing a wound, the cold truth is this: regardless of how skilled one may be in this art, if you don’t have the proper gear, you won’t be able to do it.
Logistics
What do I mean with proper gear? Well, suturing supplies, of course.
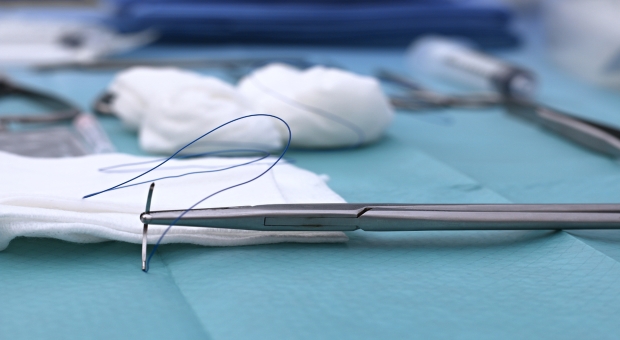
At a bare minimum, we’re talking about a suturing kit, stuff you won’t be capable of DIY-ing on the fly, hence you should never leave home without a first aid kit in your bag. So, everything else aside, if you’re going to save your friend’s life, you’ll require a needle driver (an object required to hold the needle as you’re pushing it through the tissue), tissue forceps (you’ll need that thing to work the tissue around as you’re doing the suturing process), scissors (you’ll have to cut out excess thread), and, very important, a sterile needle and thread. Sterilization is very important when it comes to putting foreign objects inside one’s body.

You can buy sterilized threads and suture at survival stores or online, or, worst case scenario, you can sterilize a regular thread and needle and whatever you require by boiling them for at least 45 minutes.
Now, with the logistics taken care of, let’s concentrate on the topic at large:
How to Suture a Wound in the Wild
To begin with, suppose you’re outdoors hiking and having fun and what not with your friends, somewhere as far away from civilization as possible. Life’s good, everything looks awesome, the beauty of nature is breathtaking and everything’s nice and dandy. Quiet. Pristine. Perfect.
Out of nowhere, reality strikes back with a vengeance: as one of your friends is splitting wood to make a fire, somehow he manages to put the maul through his leg, ending up with a particularly nasty wound, considering the circumstances, i.e. 300 miles away from the nearest hospital, in the middle of nowhere, you know the drill, you’ve seen it in B category movies.
So, you rush to the scene of the crime, admire the large and deep wound, then you congratulate your buddy for ruining your vacation. But, you’ll have to take care of him, right? Fortunately, he did not manage to cut a major artery, so a life-threatening hemorrhage is out of the picture. However, even if the bleeding has been stopped for now, you’ll still have to mitigate the problem of a huge gaping wound staring at you from your buddy’s leg.
The point being, that open wound will never heal by itself, hence you’ll have to close it up, thus reducing the probability of getting infected and helping it to start healing nice and proper. A butterfly bandage won’t work, as such device is not capable of keeping the wound tight. The writing on the wall is clear: your friend needs stitches. The good news is that you have a suturing kit available, and you also have some knowledge regarding DIY wound suturing. How nice is that?
Find NOW The 3 Most Powerful Remedies That We Lost to History
So, if you don’t know how to suture a wound just yet, keep reading: after all, what’s up with suturing a wound? Suturing is just a fancy word for stitches in medical lingo, i.e. the process of using sterilized thread and needle in order to sew together a nasty wound, allowing the tissue to heal properly and to keep infection away in the process. Stitches are required when a wound is gaping and deep, such is the case with self-inflicted cuts while chopping wood. Note to self: never send a boy to do a man’s job, especially in the wild.
Moving along with the suturing story, if you’re dealing with a nasty cut and you can see fat in there, it’s pretty clear that wound will require suturing. Suturing makes sure all the layers of the tissue are kept close together, as any gap in that area would make for the perfect place for an infection to pop-up. When it comes to deep/wide wounds, a regular bandage would only keep the top-part of the tissue together, while the stuff beneath will still be separated. And that’s a no-no procedure.
Now, remember that you should perform DIY suturing only in real emergencies. The thing about stitches is that they require an insane amount of practice for getting it right. An incorrectly sutured wound may become infected, and that’s a life-threatening condition in some cases, not to mention that you might leave a hideous scar on your buddy’s leg due to an improperly healed wound due to a faulty suturing technique.
A suture performed by a trained medic in an emergency room (a controlled/sterile environment) is pretty much routine, medicine 101. DIY-ing this in the wild is quite another story, not to mention you’ll probably have to perform this procedure without having your buddy injected with a numbing agent, hence the operation will be extremely painful for the victim.
You’ll Have to Practice First.
There’s no way around that. And I bet you’re not ready to do it on your kids. But rest assured, there are a few ways around this problem, and I don’t mean your neighbor’s kids either. So, how can you practice putting stitches on a wound sans a wound?
Well, that’s an easy one: use a pig belly instead. A lot of medics learned how to suture wounds back in the day by practicing on a flap of pig belly. This is not a new concept. Pigs are pretty similar to humans genetically speaking, and that includes the skin and the fat underneath. The only caveat is that pig skin is thicker than human skin.
If you want something more human-like, I’ve heard that a chicken breast with the skin left on is very much alike human skin. If you’re already disgusted by these ideas, you can always buy yourself a suture pad. Those bad boys are available on Amazon, and they come with pre-cut wounds on their flesh-like latex material. You can use these suture pads multiple times (unlike pig bellies), and they’re really affordable (around 20 bucks).
Now, It’s Practice Time.
That about sums it up for today. I hope you enjoyed reading the article. If you have questions or comments, don’t hesitate to use the dedicated section below. Good luck, have fun folks!


 SVP POP UP Desktop (931 x 476 px)")
This is a Tough One, Chris. I got to Practice on Livestock – Cows, Horses, etc. – Shots and Sutures – Really takes some Mental Conditioning.
Your articles are always helpful. Thanks.
Perhaps I missed it, but I do not recall you mentioning gloves. A person suturing a wound should wear them.
Cleaning the wound is more important than suturing.
There are some wounds that should not be sutured because they are too dirty. Local anesthetic like lidocaine is cheap and should be used, even if the wound is cleaned and not sutured. Scrubbing the wound with soap and water can greatly limit infection.
A pressure cooker may be used to sterilize bandages, needle, thread. A colander can be used to keep objects out of the water.
I certainly appreciate your comments. Never thought of putting some Lidocaine in my day pack. I do have some surgical gloves though. Mostly because I use them for gutting/skinning game. It’s hard enough to stay clean in the field without going for hours with dried blood on your hands? Hours and perhaps days before you can get to a hospital makes a huge difference.
Best Regards
IDK how well it would translate, but they teach diabetics how to give themselve injections on oranges.
As a type 2 diabetic diagnosed 8 years ago, I was taught to give injections on myself, no practice.
I have suture kits.. 100 of them and 100 new scale blades in my BOB med kit. I’ve sewed up a BOB torn up by Coyotes. I’ve also sewed up my foot. But I’ll admit the first time or two it’s not real easy to do.
I was in our main hunting camp in the back country in the Idaho Wilderness circa 1970. Now known as the Frank Church Wilderness. A 15 mile walk to the nearest airstrip and a further one hour plane ride to the nearest hospital not to mention the time it took to get on the radio and get someone to fly in if weather permitted. Now we’re talking several hours?
We were changing camps and my clients had already left earlier with the wrangler and cook. Someone had tied a knot in one of the lead ropes and I had to cut it off as the rope was frozen. Well, my razor sharp knife took a slip and cut my finger to the bone. I looked at it and thought, “Hmmm this is going to hurt when it thaws out.” I had already started to pack the animals and couldn’t mess around or they’d just lay down and roll which only meant I’d have to repack them. Didn’t have time or mood for that. I went into the cook tent, grabbed a sewing kit and sewed up the cut finger. Wrapped it with a bandage, pulled on a glove and went back to packing.
It was a two hour pull to the next camp and the bleeding had stopped but when I began to unload the pack string, my hand was slipping and I saw it was blood leaking from my glove. Would not stop. When all was said and done, the cut on my finger had so swollen that I had to cut off the crude stitching I had done. I rinsed the finger with warm water to get off the blood, and then bathed it in some Vodka. What a waste of Vodka but it worked. By the time we got back out to the airstrip a couple weeks later, the cut had pretty much healed and I have a neat 1″ scar to remind me of that day.
It made me even more aware of the need to have both the proper equipment, and skill to take care of my clients in the event of injury.
Licensed hunting guide in ID, MT, WY. All these states require doing a 1st Aid class every two years but it is mostly real basic stuff like band-aids and CPR. I took time to visit the local ER and see how the pros did it. I was happy to see them treat me the way they did when they knew what I was doing in the back country.
I have copied this article for my Digital Survival Book, but I was unable to copy the Suture Skills Course-Learn Basic Suture Techniques that I found very useful and interesting.
I purchased a DVD, “Survival Suturing: Wound Care When There Is No Doctor” from the Prepper Project, however it does not have the detail on the various suture techniques. Additionally, I would like to find a source for the applications of the various suture techniques for my library.
I have an extensive Trauma & Triage First Aid kit and am accumulating digital and written information and guides to provide the knowledge to use the contents of the kit. I have taken several First Aid courses, but they do not go into the detail needed, particularly for triage and wound management & closing.
I have ordered a silicone suture practice pad and training kit to further enhance my skills.
Can you direct me to a way to copy the Video Suture Skills Techniques in the article, or point me to another similar source for additional information ?
Thanks,
Mike
For most situations, doctors and nurses have told me that the best first aid treatment for an open wound (one that would be sutured by a medical professional) would be to use butterfly closures and not try to suture the wound. That is what an EMT or paramedic would do if there were a delayed transport to a hospital. The article does mention a “butterfly bandage,” but says that it can’t be tight enough. That is incorrect. Butterfly closures close together can usually apply sufficient tension to close the surface of a wound.
I have personal experinece with this – closing a 4″ gash on the back of my forearm from a fall with butterfly closures on a remote backpacking trip. The doctor who I eventually saw several days later said that this was the correct procedure, and that proper suturing is very difficult for the untrained, and can cause a worse situtation due to infection if the wound cannot be completely cleaned and no oral antibiotics are available. Another obvioius problem is that suturing is painful; without some sort of topical anesthetic to numb the area it is going to cause the patient (or you) to flinch, pull-away, cry-out, etc.
Butterfly closures, rather than suturing allows also allow antibiotic ointment to be periodically applied to the small gaps between the closures. The individual closures can also be replaced, one at a time, every few days after cleaning the surface of the wound again. With suturing, you are likely going to be enclosing some bacteria deep in the wound, unless it has been cleaned spotlessly to remove all debris and cleansed with a medical-grade solution like Hibiclens, etc. In the emergency room they have lots of techniques they use to get a wound very clean before closing it. Your first aid kit should have the necessary items to clean a wound and obviously also antibioitc ointment (non-prescription Neosporin, etc.)
I’d suggest studying a good first aid book on how to first clean first slow/stop the bleeding and then clean the wound and apply antiseptic ointment. Butterfly closures can be purchased on-line, or Walmart sometimes has them in the first aid section. Most are couple of inches long. For larger ones, you can just cut them out of Johnson & Johnson Water Block first aid tape – the waterproof tape you can find in most stores. You just make a dog-bone shape – which concentrates the tension in the thin area. Or in a hurry where bleeding is continuing, just use strips of tape. The point is to pull the skin together securely, and the closures or tape can do it. You’ll will need to clean and dry the skin as best you can for the tape to stick well. Then cover the wound with sterile gauze (or whatever clean cloth you have) and wrap loosely with more tape to keep it in place, and cover with the cleanest cloth you have (or boiled and dried cloth) to keep out dirt.