


Disclaimer: As with all articles involving medical and or legal issues, please do not misconstrue anything in this article as medical or legal advice. Neither the publisher nor the author accepts any liability for the use or misuse of any information in this article.
Tip #1: Build Your Own Medical Kit
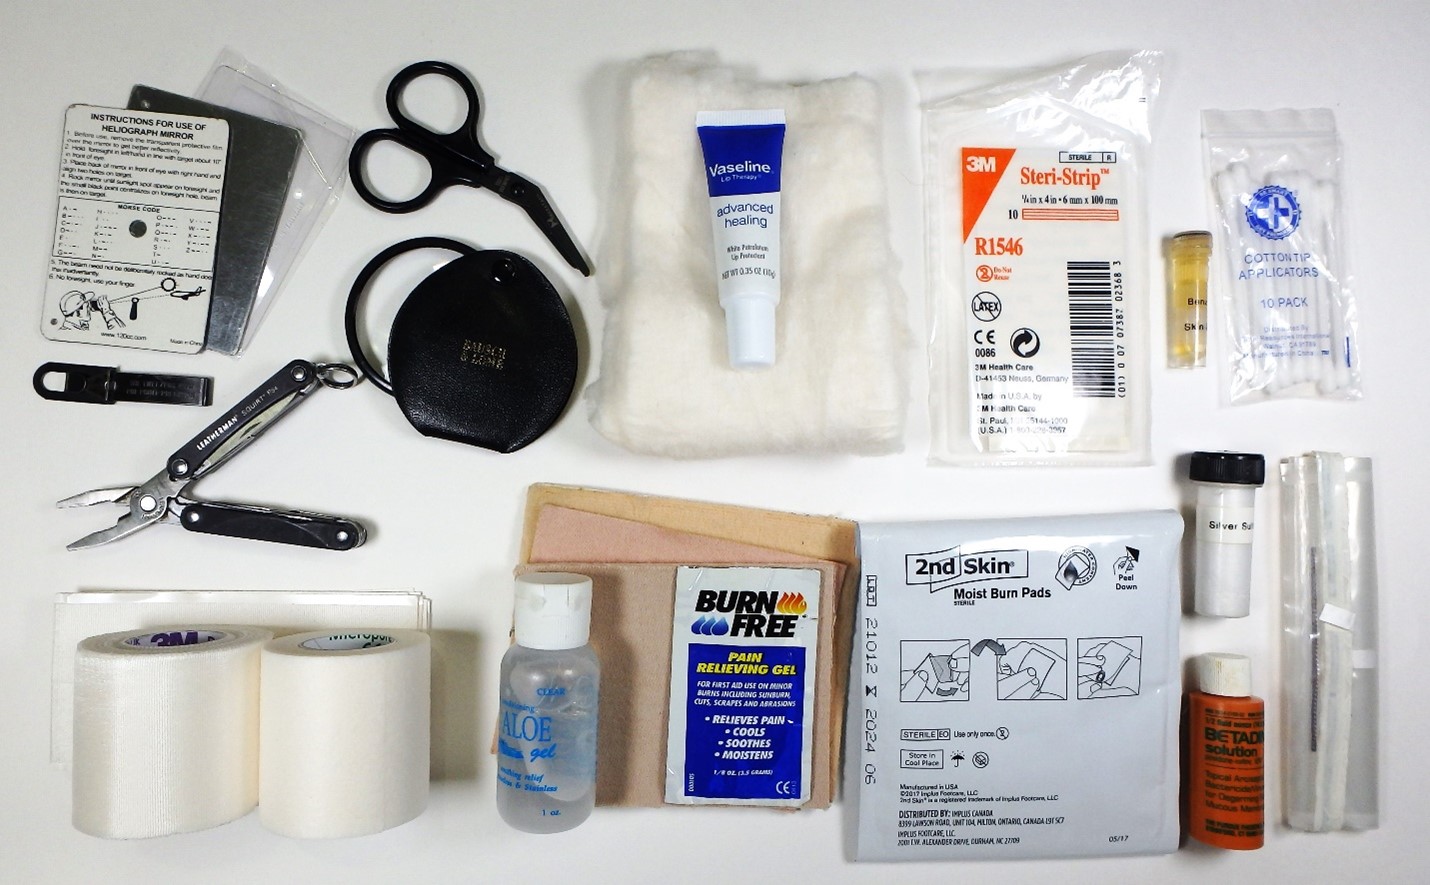
There are several important differences between a survival medical kit and the typical first aid kit on the shelf in a supermarket or even the commercial kits for sale in sporting goods stores. This article will touch on some of the differences, why you should customize off the shelf kits and some tips and tricks I have learned over more decades of customizing survival medical kits than I’d care to admit.
Like all other aspects of survival, building an effective survival medical kit is a DIY prospect. Buying a quality commercial first aid kit is a good starting point and may get you a decent container and save you some money on some of the components, but it is only a starting point.
The first thing a company considers when designing a first aid kit is the sale price, so they end up leaving things out or sacrificing quality to stay under their price point and still turn a profit. When survivalists build our own kits, we toss the filler items we don’t need, replace everything that is not up to our standards, and add everything we feel the kit is missing.
Another reason to build your own kit is so that you are intimately familiar with every component it contains. You might be surprised how often survivors make it through a survival ordeal and they realize that they were carrying some first aid item or other equipment that they really needed but failed to use because their cognitive capacity and memory was degraded by fear, pain, blood loss, exhaustion, exposure, dehydration, hunger, sleep deprivation, or other factors that are part and parcel of survival ordeals. A survivalist reaching for any given piece medical gear carried in one’s medical kit should be more muscle memory happening the cerebellum and brain stem than complex cognitive process carried out in the cerebral cortex.
Ideally, a first aid kit should have everything you need but nothing you don’t. Realistically, that’s a fine needle to thread. To accomplish this, replace tools and supplies that only have one or two uses with tools and supplies that have a multitude of uses.
Commercial first aid kits provide first aid, which is initial treatment to stabilize the patient in preparation for transport to a hospital or healthcare facility, where whatever beautiful bandaging was done will immediately be cut off and unceremoniously thrown in the biohazard bin and the patient will be re-evaluated.
By contrast, the survival medical kit is for use in austere environments where hospitals are often hours, days, or weeks away, if they are available or reachable at all. In these cases, treatment must be more definitive and requires knowledge, skill, and the ability to make use of whatever limited resources are at hand to treat the patient.
Tip #2: Add a Mirror
You can’t see to diagnose and treat many areas of your body without a mirror, so use your signal mirror or affix a small round mirror glued into a U.S.-issue match case cap to a stick for use as a dental mirror.
Tip #3: Add a Small Headlamp
Just as you cannot see to treat much of you body without a mirror, you cannot see to treat anyone in the dark without a light source and that light source should be hands free. Green is a desirable color for a tactical low-light LED because the human can detect more shades of green than any other color and red light makes blood nearly impossible to see which hampers triage and patient assessments.
Tip #4: Add a Pair of High-Quality Tweezers, a Magnifying Lens, and a Small Pair of Pliers
Most tweezers leave a lot to be desired. I like the Silver Grippers® by Uncle Bill’s™ for compact tweezers. They are important for removing slivers, splinters, glochids, pieces of toenails and fingernails, and debriding wounds.
A magnifying lens is a must have for finding and removing glochids, small splinters and eye particles. Eye particles can often be removed with a loop of monofilament fishing line or a rounded magnet, both of which are included in an eye particle remover.
For heavy duty jobs, pliers are necessary. I like the Leatherman® Squirt PS4 for this purpose, but many similar products will adequately fill this need. The wire cutters can be used to snip the barb off a fishhook.
Some doctors with wilderness medical experience recommend including a small pair of wire cutters as they can also be used to cut a ring off a swollen finger or destroy a zipper if you have a “Something About Mary” situation. A zipper can ruin your whole day whether it catches the frank or the beans.
Decent basic life support kits for EMS include a ring cutter or you can buy one separately.
Tip #5: Add a Pair of High-Quality Scissors
A good pair of scissors such as Maratac® Mini Utility Scissors can be used to cut off clothing, cut moleskin, Molefoam®, and 2nd Skin® to the needed sizes and shapes.
Scissors, 2” tape and non-stick dressings enable the survivalist to quickly create adhesive dressings of nearly any size and shape as needed, reducing the number of supplies needed, and adding adaptability to the medical kit and decreasing bulk.
Tip # 6: Add White Petrolatum and Medical Cotton
White Petrolatum, Vaseline® or Aquaphor® will do, but add one of them. It protects skin, keeps wounds moist, and promotes healing. It can also be used to make petrolatum gauze. Gauze is the most available and cheapest dressing for most wounds, but it damages delicate growth tissues and pain when changed.
Adding petrolatum solves these problems, especially when layers of the skin are damaged or missing such as with burns and ruptured blisters. Just do not apply petrolatum to a burn until it has stopping giving off heat or it can trap heat, making the burn worse.
White petrolatum is also used as a skin protectant against windburn, chapped lips and chafing and makes an excellent fire starter when combined with medical cotton. Just don’t combine them until you need them because then the mess is only good for starting fires. Medical cotton can also be braided or woven into a wick and the white petrolatum used to fuel an oil candle or oil lamp.
Medical cotton is used to apply topical medicine, can be rolled onto wooden, paper, or plastic handles to make cotton-tipped applicators, is used for padding and to add absorbency to dressings. It also absorbs water and keeps kit components from rattling.
Tip # 7: Add Benzoin Tincture & 3M® Steri-Strips®
I have used Steri-Strips® in situations I thought would need to be sutured for sure and have had wounds heal up just fine. Wound closure strips don’t puncture the skin, causing additional trauma and increasing the risk of infection, especially in austere settings. Infection is more likely in the field and so it often better to leave wounds open so they can drain and removing butterfly closures or wound closure strips is a simple matter, as is reapplying them.
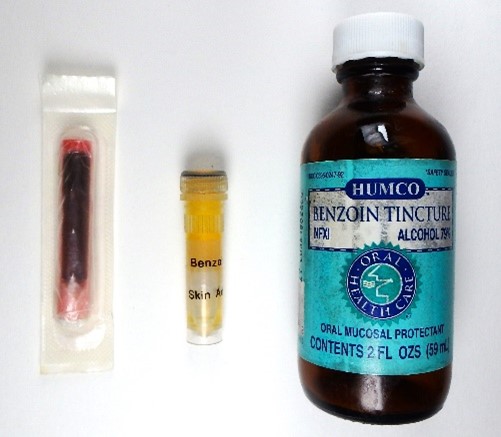
Benzoin tincture is a skin protectant that has the added benefit of increasing the holding power of adhesives manyfold. The importance of benzoin can hardly be overstated in outdoor settings where patients sweat off adhesive tape and dressings at alarm rates. When the area around the wound is properly cleaned, shaved and benzoin is applied before the dressing, dressings can last 24-72 hours even when the patient is hiking and working, so a little bit of benzoin helps conserve all manner of adhesive dressings and tape.
I fill a small vial up with benzoin tincture and use a cotton swab to apply it. A 3ml vial of benzoin occupies the same space in my kit as one swab but I can use it a half dozen or even a dozen times, whereas the single-use swab is just that. You use it once and then must throw it away because the small amount of benzoin it contains will dry up before you use it again.
Tip # 8: Add High Quality 2” Surgical Tape
Surgical tape should be at least 2” wide. In a survival ordeal, patients are often sweaty, wet, muddy, and/or bloody and cold weather inhibits the ability of adhesives. Some small commercial first aid kits include tape as narrow as ½” or even ¼”. Plenty of contact surface is needed for both the dressing or bandage material and the skin.
Surgical tape should also be hypoallergenic and should be made from quality medical materials and adhesives designed for use on human skin. 3M Durapore™ 2” cloth tape and Micropore™ 2” paper tape are examples of quality medical tapes worthy of consideration. 2” Durapore™ tape has been issued in the U.S. Army IFAK and adheres aggressively. Paper tape is less damaging to tender parts of the body and the fragile skin of some elderly, infant and toddler patients.
If narrower tape or special shapes are needed, the tape can be cut into the needed width or shape using scissors. Flat-packed tape that comes with a non-stick backing is worth consideration in a small medical kit because it stores more compactly in small kits.
Tip #9: Add Supplies for Foot Care, Blisters, & Burns
The importance of foot travel to survival and foot care to survival medicine cannot be overstated. Without proper socks and footwear and extra socks, and with feet and bodies conditioned to walking long distances, foot care issues are common in survival medicine.
Adding moleskin, Molefoam®, foot powder, extra socks, Spenco® 2nd Skin® dressing and Spenco® knit dressing, and a pair of straight toenail clippers will handle most common footcare problems.

Minor burns are also common injuries for survivalists and outdoorsmen. Adding burn gel or aloe vera gel to Spenco® 2nd Skin® dressings, Spenco® knit dressing, and cold packs and most minor burns can be treated. Hydrogel dressings (not to be confused with hydrocolloid dressings sometimes even called hydrogel) were a breakthrough in treating blisters and burns. In addition to these, I also carry prescription silver sulfadiazine burn cream.
Ice should not be applied to burns. Instead, cool or cold water should be used to apply cold therapy to halt burn damage for 5-20 minutes immediately following a burn. Ice and ice-cold water, restrict blood flow, slowing healing and/or causing additional damage that the patient may not be able to feel.
Tip #10: PVP-Iodine and Graduated Plastic Bag
Povidone-iodine is also known as PVP-I, Povidone-iodine, and Iodopovidone and is less damaging to tissues than 2% tincture of iodine. Like 2% tincture of iodine, it can be used for water treatment by adding 8 drops (as opposed to half that for 2% tincture of iodine), mixing and letting stand for 30 minutes. For cloudy water, the dose is doubled to 16 drops. For cold or cloudy and cold (<5 °C or 40 °F) water, 16 drops should be added, and exposure time should be increased to 1 hour. (Tod Schimelphenig, 1991) If desired, powdered ascorbic acid (vitamin C) can be added to titrate the iodine, causing it to fall out of suspension, eliminating the unpleasant iodine aftertaste, but only after the exposure time has passed.
Povidone-iodine 10% can be diluted 10/1 to 20/1 with potable water for use in wound irrigation. An irrigation syringe, a syringe without a needle or a plastic bag with a small hole punctured in it can be used to develop the pressure necessary to wash out the wound. (Eric Weiss, 2005)
Plastic bags are also useful for cold therapy, to create impermeable barriers, to keep materials dry, to keep injuries dry while bathing, to isolate biohazardous medical waste, mix salves, and more.
References
Eric Weiss, M. (2005). How to Irrigate a Wound. In M. Eric Weiss, A Comprehensive Guide to Wilderness & Travel Medicine (pp. 87, 88). Oakland, CA: Adventure Medical Kits.
Tod Schimelphenig, L. L. (1991). Halogen Doses and Techniques Per Liter of Water. In L. L. Tod Schimelphenig, NOLS Wilderness First Aid (p. 293). Lander, WY: NOLS Publications.


Your medical kit can literally mean the difference between life and death in a crisis. These tips are spot-on, especially the emphasis on personalization. You need to tailor your kit to your environment, personal needs, and skill level. No generic store-bought kit will do that for you.
Good info, but let’s be real, these kits are just the beginning. When they unleash something that truly tests us, it won’t be just about band-aids and antiseptics. We need to be prepared for when the pharmacies and hospitals are no-go zones, and ‘official’ aid is just a way to control us.
Survival medical kits? More like overpriced placebos. If you need serious medical help, no amount of pre-packed gauze is going to save you. Trust in our healthcare system and the professionals trained to use it, not some tin foil hat first aid tricks.
So, We should carry a doctor in our go bags?
I couldn’t agree more…if they’re available before you go sepsis or bleed out before you can get to/find them. YMMV
Do you carry a doctor in your go bag? Normal humans work with what they have, not what they hope/wish they had.