


You’ve got a ton of vegetables canned. Your jellies look beautiful in their jars and you have a good variety of fruits. That was all a ton of work but it wasn’t hard to figure out.
The question now is how do you stockpile the hard stuff like meat, butter or even eggs? There are plenty of necessary foods that you need to stockpile that may prove to be a challenge if you don’t have access to a freezer and refrigerator.
Don’t worry though. You can do it, and we’re going to tell you how.
Meats
Meats are actually pretty easy to stockpile and there are several methods of preservation that you can use. Because it’s a low-acid food, you may can it but if you do, you need to use a pressure canner and make double sure that your jars are intact and your seals are good. There are two ways that you may can meat. You can dry can it or you can pack it in water.
Dry canning is great for meats such as hamburgers, crumbled hamburger, sausage links or patties and even bacon. The best way to determine what meats you want to dry can is to decide whether or not you want them to be wet when you take them out of the jar.
For instance, stew meat or chicken gets tender when it sits in water and goes through the wet canning process. You don’t want that for hamburgers or bacon.
To dry can burgers, crumbled burger or sausage, it’s best to use large-mouth jars. You can fit about four hamburger patties in a pint jar and eight in a quart jar. The only time you really need large-mouth jars is when you need to fit burger or sausage patties without mushing the patty into the jar. For everything else, standard-mouth jars are fine.
To determine the right size of the patty, use a seal as a guide. Pat them out so that they’re the same size as the seal then brown them on each side. You don’t have to cook them all the way; just brown them.
Pack them in the jars, add a half-inch or so of water to act as steam to keep the meat moist, clean the rims and put the prepared seals on them, along with the rings. This method even works with balls of sausage that you can later use to make sausage gravy.
To dry-can bacon, simply put the bacon strips in a row on wax paper, lay another piece of wax paper over the bacon, then roll up the paper in the direction of the strips. In other words, the strips stay straight instead of being curled up. If necessary, trim the ends of the wax paper to match the length of the bacon. Pack it into jars, put the seals and rings on, and pressure can.
Wet canning means that you cover the meat in water. This is good for canning chicken, stew meat that you want to be extremely tender. You can season it before you put it in the jars.
For wet canning, standard-mouth jars will be fine. Don’t pack the meat in too tightly because you want the water to be able to get into the middle of the meat and cook it at the proper temperature for the length of time necessary to kill all the bacteria in the meat.
For meats such as beef, pork, venison, and other red meats, pressure can for 90 minutes with 10 pounds of pressure. For chicken, turkey, fish and other similar meats, pressure can for 70 minutes with 10 pounds of pressure.
You can also dehydrate your meat beforehand if you’d like, then dry-can them to extend the preservation period.
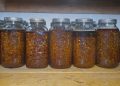
Canning Butter
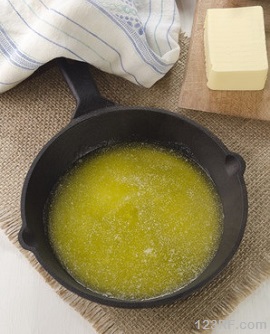
This is a process that I only learned about a year or so ago but I’m glad that I did! Canning butter is extremely simple; the hardest part is making sure that the rims are completely clean. I use large-mouth half-pint jars to make it easier to get the butter out and to can a small enough amount that it won’t go rancid before I use it.
Make sure that your jars are clean then preheat your oven to 275 degrees F. Put your jars in a cake pan and place them in the oven for 20 minutes. While your jars are heating, put your butter in a saucepan or pot, depending upon how much you’re canning, and melt it. Bring it to a simmer for 10 minutes or so in order to cook some of the water out of it.
Remove the jars from the oven and ladle the butter into it. I like to use a funnel to keep the rims of the jars as clean as possible. Fill to within a half-inch of the top of the jar and clean the rims well. I use a wet cloth dipped in vinegar to help clear all the grease off.
Put the seals and rings on your jars. Put about 4 inches of water in your pressure canner then place your jars in the canner. Process at 10 pounds for an hour after the canner reaches pressure.
Easy peasy.
This process works for just about any fat, including bacon grease, which would be a great thing to have an adequate supply of! For that, skip the simmering process because it’s already cooked. Just melt it before you put it in the jars.
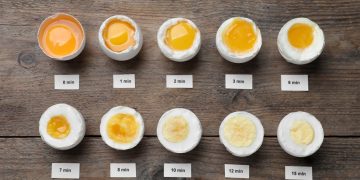
Eggs
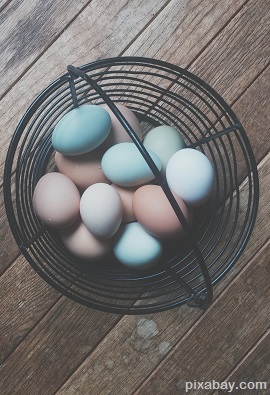
Eggs are tough. I have some powdered eggs in my stockpile but I also have pickled eggs canned. Personally, I like to pickle mine with beets, vinegar, water and pickling spices, but you can also just use vinegar water. Eggs can also be stored at temperatures lower than 55 degrees F without doing anything at all to them.
There’s also a process called oiling that extends that time even further because it makes the shell air-tight so that the egg doesn’t dry out. You need to use mineral oil because vegetable or seed-based oils will go rancid.
Oiled eggs will last for several months in a dry container in a cool place as described above. There’s a catch though – the eggs have to be oiled within 24 hours of being laid and they need to be free of cracks.
Heat your oil to 180 degrees and keep it at that temp for about 20 minutes in order to kill the bacteria in it. Using a ladle, spoon or tongs, dip each egg in the oil and place on a rack. Let the eggs drain for 30 minutes then put them in the carton and put them in the cool, dry place described above.
Now that you have some ideas to get started, what are you waiting for? Get to preserving! If you know of a way to store “difficult” foods, please share with us in the comments section below. We all benefit from sharing info!
Interested in becoming food-independent? CLICK HERE to find out more!


There is a better way to preserve eggs.
https://www.youtube.com/watch?v=yUYgguMz1qI
Goes over several different ways to preserve eggs, with one proven method to preserve eggs up to 2 years using slake lime and water.
I am not affiliated with this company in any way shape or form, nor am I receiving compensating or payment of any kind. I am just doing this to help others.
Wilson, thank you for sharing the info!
A question about canning the bacon. How long do you pressure can the bacon after it is rolled in the wax paper? Do you also add 1/2″ of water to these jars? Does the pressure canning melt the wax paper? Can parchment paper be used instead? I am worried about the wax paper melting.