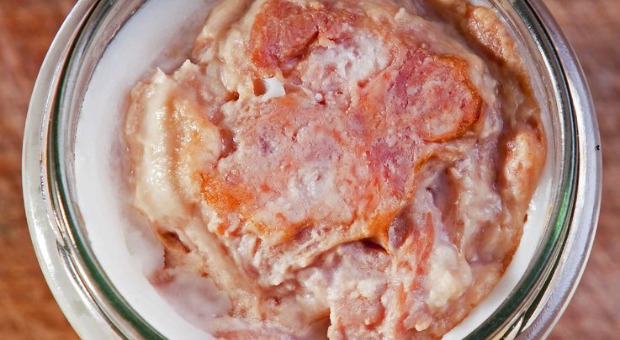
It’s bacon. Who doesn’t love it? Bacon for breakfast, bacon bits, bacon grease, bacon for your beans … bacon is awesome.
But it’s one of those foods that, unless you have a pig and a smokehouse, you may have given up on for survival because it needs refrigeration.
We’ve had some questions about canning bacon, and we’re going to address them now.
“A question about canning the bacon. How long do you pressure can the bacon? Do you also add 1/2″ of water to these jars? Does the pressure canning melt wax paper? Can parchment paper be used instead?”
Though you can purchase canned bacon, it’s extremely expensive – the cheapest I found was about $15 USD for a 9-ounce can. That’s out of the range for many of us, but don’t throw in the towel yet! You can home can bacon so that it will be there to comfort you no matter how bad things get.
Until recently, the only way that I’ve ever heard of home canning bacon was raw and dry; in other words, you don’t cook it, and you don’t add anything to the jar. However, I recently watched a video that documented how to can cooked bacon.
There’s some merit to this because cooking it before you can it may reduce the chance of botulism. Some people believe that the meat doesn’t get hot enough in the middle to kill the toxin. However, I’ve spoken to many people who swear that they’ve canned bacon raw forever with no problems whatsoever.
My suggestion would be to roll it a bit looser if you’re canning it raw than if you’re canning it cooked so that the heat can circulate better through the roll. The key is to pressure can that bacon regardless of whether you can it raw or cooked.
I’m going to outline three different methods of canning bacon. Let us know which ones work for you.
But before we begin, let’s go ahead and get the ever-present government warnings out of the way. None of these methods have been approved by the USDA as safe. As a matter of fact, the USDA hasn’t approved ANY methods of canning bacon.
Now, let’s can bacon.
Ingredients and Tools for Canning Bacon
There are only a few tools and 1 ingredient that you’ll need. Of course, you need bacon! The thick-cut cans better than the thinner slices because they don’t tend to stick to the paper as much if you’re going to use the rolling method.
You can also home-can bacon ends and pieces (the cheaper kind of bacon that you can often buy in 3-pound packs for just about the same price as 1 pound of strips. That requires a different method, though.
Next, you’re going to need wide-mouth quart canning jars, rings, seals, and jar tongs, a pressure canner, and the divider for the bottom of the canner. Finally, if you’re using the rolling methods described below, you’ll need parchment paper or masking paper, which you can buy at your hardware store for less than ten bucks for a decent-sized roll. Do not use waxed paper because the wax will melt.
Before you start any of these processes, prepare your jars by sterilizing them, and get your seals in hot water if you’re using standard seals.
1. Canning Raw Strips of Bacon
Each quart jar will hold about a pound and a half of bacon, or maybe a bit less. Lay out an 18-inch piece of parchment paper. Lay out the strips of bacon side by side as close as you can get them without touching. Cover with another layer of paper.
Fold each end of the paper over the first and last strips of bacon. Next – and this is a little tricky – fold the paper in half lengthwise. Just to be clear, fold it so that each strip of bacon is folded in half. It may help to use a yardstick or something else to help you flip it.
Now it’s time to roll the bacon so that it will fit in the jar. Start at one end and roll the bacon strips into a log. Remember, if you’d like, you can roll it a bit loosely if you’re worried about raw packing, but you won’t get as much bacon per jar. Stuff the log into a quart jar. If you can’t get it in, remove a few strips of bacon until you can.
Clean the mouths of the jar well so that there’s no grease on them or else you won’t get a good seal.
We’re dry canning the bacon, so you don’t need to add water.
Once you have the seals on, screw the rings on finger-tight. Place your jars in your canner, making sure you have the divider in the bottom. Add 2-3 inches of water to the bottom. Put on the lid, but leave the weight off so that you can allow the air to escape. Bring the water to a simmer and let it simmer so that all the air is out. Place the weight on and cook at ten pounds pressure for 90 minutes.
Allow it to cool on its own. It’s fine to leave it in for a couple of hours to cool after you’ve turned off the heat source.
Remove the jars from your canner and set them on a towel on the counter. Let them cool for 48 hours so that you can make sure that they seal properly before you store them. It’s not uncommon for some of it to “unseal” a few hours after the seal because of a bit of grease or some other problem.
You’ll have some juice in the bottom, then the grease will be on top, so you’ll have the bonus of having bacon grease, too! Date your jars and store.
Video first seen on BexarPrepper.
2. Pressure-Canning Cooked Bacon
This method is absolutely identical to the one above, except you cook the bacon before you put it on the paper to roll it. You can bake it at 375 degrees for 10-15 minutes. Baking is a bit better because the bacon cooks more consistently. Don’t add the grease from the pan to the jars.
Cook the bacon until it’s done but still pliable before you wrap it, then pressure can it for 90 minutes. You’ll have less juice and grease but there will still be some.
One advantage here is that your bacon is ready to eat straight from the jar.
3. Pressure-Canning Bacon Ends and Pieces
Packs of bacon ends and pieces are something that I stumbled upon several years ago at Wal Mart. They’re kind of a pain because the bacon is all lumped together and there are some pieces that are just fat. However, the 3-pound pack is often just about the same price as one pack of sliced bacon.
Since I use bacon fat in my beans and to cook potatoes, and even in some of my sauces, I don’t mind having the extra fat. I look at it this way – I’m getting a pack that has slices of bacon to fry for breakfast or a BLT, I have pieces of bacon fat to add to my beans, and I have crumblies of meat to fry up for bacon bits or to add to a salad or something.
Considering the cost, it’s a win, especially if you’re canning (or living) on a budget. Each 3-pound pack is going to yield about 3 quarts of meat and fat. Simply take the meat out of the pack and stuff as much into the jar as you can because it’s going to shrink up. Leave a half-inch or so headspace. There’s no reason why you couldn’t do this with regular packs of strips, too.
This is a raw packing process, so don’t add any liquid to the jars. When you have your jars stuffed, clean the rims thoroughly because they’re going to be greasy. If you don’t get that grease off, the jars won’t seal.
When they’re clean, add your seals and rings, finger-tight, and put them in the canner. Process as described above. 90 minutes for quarts, 75 minutes for pints.
Tip: If you have hard water, add a tablespoon of vinegar to your water to keep that white film off your jars.
If you’re in a survival situation, don’t throw away the paper because it’s an excellent fire starter with all of that grease!
Raw-packed bacon stores well for up to five years. After that, the fat starts to break down and the bacon won’t be the same. This is one good reason to rotate your canned goods, so that you don’t have meat going bad.
Video first seen on BexarPrepper.
Nobody has really shared any information on the shelf life of cooked bacon, but I would imagine that it’s about the same. It would be interesting to hear from any of you that have done it.
When you open your cans of bacon, don’t just rely on the seal to tell you if it’s good. Just in case, give it the sniff test. If it smells off, throw it away. If it’s got a greenish tint, throw it away.
Now you have three different ways to can bacon so that you don’t have to go without that deliciousness even if things go south.
Click the banner below to discover how to make the ultimate survival food plus other survival secrets that helped our ancestors survive hunger and deprivation!
This article has been written by Theresa Crouse for Survivopedia.


Mike | October 20, 2016
|
What about vaccumn sealing cooked bacon?
Thanks
Mike
Ted | October 21, 2016
|
Refrigerate or freeze, it won’t last on the shelf in a vacuum sealed bag, I tried and it was dead in less than a month!
Ted | October 21, 2016
|
A tip for the rims of your jars, use a paper towel with a little Vodka, not rubbing alcohol to clean the grease from jar rims. It cuts the grease instantly and is food safe.
Mike | October 22, 2016
|
Why waste time using the paper method (I’ve done that one) when I can use the 3rd method shown, and just shove the Bacon into the jar and vacuum seal it? By the way, using parchment paper sucks. When I take the Bacon out of the jar, unroll the paper, the Bacon sticks to the paper. The Bacon doesn’t look like it’s cooked, although it is if it’s been through 90 minutes of pressure canning. It has a “raw” look to it, but still smells like Bacon. The texture of the pressure canned paper wrapped method shows the Bacon texture as almost a raw texture also. I believe that no matter how you preserve the Bacon, you’ll get a raw texture to it. What’s important tho, is that the Bacon is cooked and available from your shelf when you want to use it. It seems to me that it would be best suited for Ham and Beans, or maybe thrown into Chili if you like.
Mike | October 22, 2016
|
In my last reply, I meant to say “pressure can” it and I did not mean to say “vacuum seal” it.
N wiegand | November 12, 2016
|
I do ends and pieces also but I fry them in my Dutch oven first, then drain and pressure can. When I need it the bacon is ready to go for salads, casseroles, dips, stir into eggs ect. I can the grease separately. It’s delicious. I may have eaten some directly out of the jar. It saves shelf space too because cooked bacon fits in smaller jars, I use 8 oz & 4 oz sizes
Amanda Stryker | December 28, 2019
|
Have you canned bacon Jam?
judith knight | February 13, 2023
|
how long did you pressure can the cooked bacon…smile.
dave | August 16, 2019
|
Hello good people.
I have a dozen half pints in the pressure canner now.
Oh yeah, I just roll my bacon up as tight as I can get it, and stuff it into the jar squeezing down and removing all the air. I leave a bout an inch head space. Te bacon shrinks and allows plenty of room for the heat to penetrate, ..
I hard trim my pork and beef that I “put up”, and render down the lard and tallow from the trimmed fat. You’ve never eaten french fries until you’ve eaten a home made french fries fried in Beef tallow.
IMHO.
Have a great one.