


Bread, beer, and wine are all foods that have been part of history for eons, but they all require yeast to make.
What if SHTF? Packaged yeasts are great, but they have a shelf-life and in order to make your own bread daily, you’d have to stockpile way too much to get you through. Isn’t it better to know how to make your own?
Read on, and you’ll have the yeast to make bread, alcoholic beverages and other goodies no matter what happens!
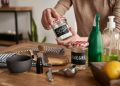
What is Yeast?
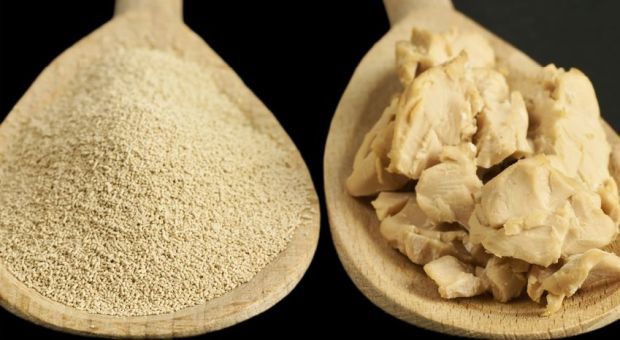
First, you need to know what yeast is. Essentially, it’s a leavening agent that made with “good” fungus during a separation and fermentation process. Yeast spores live on most plants so vegetables, fruits and grains can be used to obtain yeast for a variety of uses. Different yeasts are used for bread and alcoholic beverages – baker’s yeast and brewer’s yeast – and they’re not interchangeable.
Brewer’s yeast is and inactive (dead) yeast used to encourage the fermentation of fruits or vegetables into alcoholic beverages. Baker’s yeast is an active (live) yeast used for leavening. It’s what makes bread rise and gives it that fluffy lightness.
Salt and sugar are both necessary to make yeast but too much of either is a bad thing. The salt acts as a preservative. The sugar is actually the food that feeds the yeast. Once it’s consumed, the byproducts are carbon dioxide and alcohol in different proportions depending upon the strain of the yeast.
Baker’s yeast is made from yeast strains that make more carbon dioxide so that the bread rises. Brewer’s yeast is made from strains that make more alcohol.
 Making Baker’s Yeast

There are a few different ways that you can make baker’s yeast. If you have a pack of dry yeast, you can use it to make a starter that you can keep going. To me, that seems to defeat the purpose of learning to making yeast from scratch, so we’ll concentrate on other methods.
I’ll include a recipe for using yeast, just so you have it if you want it, but let’s concentrate on doing it without the crutch! Finally, you may want to check out my article about making bread once you’ve got your yeast made.
How to Make Yeast from Potato Water
This is probably the easiest kind of yeast to make, because potatoes are always around. The yeast is great for making a nice loaf of bread, hot rolls, or even cinnamon rolls. Plus, it’s easy to keep as a starter so you don’t have to start from scratch every time you want to make bread. There are a couple of ways to do this.
Potato Yeast Method 1
All you need is potato water, flour, and sugar.
Cook your potatoes as you usually would, except save 3 cups of the water. Divide the water in half. Stir a tablespoon of sugar and about a cup of flour into a cup and a half of the water, or until the mixture is sort of stiff. Cover and leave overnight in a warm place and it should be bubbly and yeasty-smelling the next morning. If not, you’ll need to start over. This is why you should save some of the water back.
Potato Sourdough Yeast – cheater method
- 1 pkg. (1 tbsp.) dried yeast
- 1 cup warm (110-115 degrees F)
- 1/2 cup sugar
- 3 tbsp. instant potato flakes
Mix ingredients in a jar and cover loosely, then let it out at room temp for 24 hours. If you close it too tightly, you’re making a yeast bomb. OK, maybe not that bad, but the jar can crack or blow the lid off because of all the carbon dioxide that’s going to be released.
Refrigerate for 3 or 4 days. On the fourth day, stir in 1/2 cup sugar and 3 tbsp. instant potato flakes and a cup of water. Leave it at room temp for another 24 hours and take out a cup of it to make your bread. Feed it with another 1/2 cup sugar, 3 tbsp. potato flakes and a cup of water. You need to remove a cup of starter and feed it once a day if you leave it out or every 4 days if you refrigerate it. It just comes down to how often you want to bake.
Potato Starter 3
This is another take on the first starter but it uses the whole potato instead of flour.
- One medium potato, peel on
- 4 cups water
- 1 tsp sugar
- 1 tsp salt
Boil the potato in the water until it’s soft. Mash it well then add the sugar and salt.
Cool til it’s just barely warm, then add to the water.
Cover and put it in a warm place so that it can ferment. If it doesn’t ferment, you can cheat and add a packet of dried yeast. If you don’t want to do that, give it a day or two and if you still don’t get fermentation, you’ll have to start over. This makes enough starter to make a few loaves of bread.
Video first sen on North Carolina Prepper.
Grain Starter
Yeast is present in all grains and this starter was used for centuries by people who couldn’t run to the grocery store and buy a packet of yeast. Fresh ground grain is, of course, the best to use but regular unbleached all-purpose flour will work, too.
- 1 1/4 cup all-purpose flour (white or wheat)
- 1 cup warm (not hot) water
Mix the flour and water then pour it into the jar. Cover and let stand in a warm place until it starts to bubble and rise. Depending on the temperature and humidity, this may take anywhere from 1-7 days. Take out a cup of starter for each loaf of bread, then add back in equal amounts of water and flour. You can toss dough scraps back in, too.
Grape Starter
Grapes are a great fruit to use to make yeast but you can use just about any fruit or peels to do it as long as it’s unwashed and organic. You can also use organic unpasteurized juice.
- 3-4 cups grapes
- 2 cup unbleached wheat flour
- 1 cup water
Crush the grapes well and put the juice, pulp, and peels in a jar and cover with cheesecloth or a coffee filter. Put it in a warm place and leave it alone for 3 days. It’s kind of fun to check it every day because you’ll see the bubbles start to form. That means that the yeast is growing.
On the 4th or 5th day, strain the mixture and discard the peels and pulp. Don’t put them on your compost pile. Stir 1 cup of whole wheat flour into the juice. Let the starter set for 24 hours. Take out one cup and add another cup of flour and a cup of water. Leave it in a warm place for a couple of days. By this time, you should have a bubbly starter.
Remove up to 2 cups (enough to make 2 loaves of bread) and leave at least 1 cup as a starter. Feed it with another cup of water and cup of flour. Let is sit for at least 24 hours before removing more, and as long as you always leave a cup behind and add the feed, you’ll always have bread starter!
Just a side note: according to my sources, you can use fruit juice to make yeast starters for making alcoholic beverages, too. Yum…wine! Read my article to learn how to make wine.
9 Tips to Successful Yeast Making and Drying
- Don’t use too much salt or sugar when working with baker’s yeast. Both are necessary but too much of either, especially salt, will dry out the yeast.
- Make sure that all of your equipment is clean to the point of sterility. Any stray bacteria will ruin your yeast.
- To dry your yeast, simply spread your starter in a thin layer on baking sheet and dry either in the sun, in a warm (NOT HOT!) oven – about 100 degrees will do, or use your dehydrator. Don’t let it get too hot or you will kill the yeast.
- Store the dried yeast in an airtight container.
- To substitute your yeast for store-bought yeast, use 1 cup of wet starter for 1 pack of yeast, or twice the amount of homemade dried yeast as what’s recommended in the recipe.
- Do not put yeast or starter in your compost pile because the bacteria can grow out of control and upset the delicate balance of your pile.
- When you feed your starter, which we will explain in a bit, you need to throw away one cup of the original starter to keep the ratios even. That is, unless you feel like making a delicious loaf of bread or some cinnamon rolls instead of wasting it!
- Don’t wash your fruits or vegetables because you’ll wash off the yeast spores. Just take off any stems or leaves.
- Use homegrown or wild fruits or veggies because the store-bought ones will likely have chemicals. At the very least, they’ll have gone through a washing process which will have washed off the yeast. The exception here is a potato. Still, use organic to avoid the chemicals.
So you have one more recipe to add to your survival TO DO list, next to pemmican, lard, and other basic survival foods that our ancestors used to cook. Click on the banner below to find these secrets that our grandfathers were probably the last generation to practice for survival!


Brewer’s yeast and Baker’s are in fact interchangeable. As a professional
baker we got our yeast from Budweiser. Yeast is present in the air and is
also a byproduct of fermentation. It is a living one cell animal, that reproduces
very quickly.
I use baking yeast to make wine. It always works.
This is unrelated but unsure where to ask a question. If u were to have a child 100 miles away at college, what is the best method (old car, motorcycle etc) to try to get them home after emp?
I have told my family they may have to walk and it will take quite some time so they better be prepared with food and shelter for the journey. We will welcome them when they get here.
when emp hits make sure you have your car computer, starter, alternator in a emp bag and tools in car. Also might need a weapon that might help you incase you get overwhelmed with people who might want to take your car away.
Old 2 cycle dirtbike, mechanical very simple, the magneto circuitry is opposite to conventional circuits. in order to run the circuits has to be open so if the wires are fried in the magneto, it is still functional and does not need a battery.
The plug wires should be fine, if any capacitors or coils in the circuits, buy some replacements (before the SHTF) ground wires together and bury them in ground 2 and half to 3 feet down should protect against an EMP. If need dig them up. get 2 cycle oil
i always keep a COLLAPSIBLE scooter in my vehicle. i look at it like this – even if you can only ride it downhill, it is a huge energy and time saver….unless you live on top of walton’s mountain. they fold up nice and compact and can easily be carried when terrain does not permit their use.
Theresa, where did you get the idea that Brewer’s yeast is a “dead” yeast? As an avid home brewer, I can assure you that the little beasties are most assuredly ALIVE! What an awesome gift of nature!
Yes, it’s called Dry Activated Yeast (for both baker’s & brewer’s) in the granular form. Some brew stores also have glass tubes of yeast that have to be made into a starter. They are all quite alive. I always proof the yeast before use to ensure that it is in fact alive.
I have some starter in the refrigerator, from .. I hate to say it.. 5 months ago. Can I bring it out and refresh and use it? What do I look for, to tell if it is good? Thanks.
I am keeping mine in the refrigerator too. Sometimes some liquid appear on top, but I stir and bring it back to the room temperature for a few hours, ad flour (one cup) and water (half cup), then stir again and let it bubble, then use. If it is not red, pink or molded and the smell is fine, I would use it. Usually, starter is too acidic to get spoiled.
Put some in a coffee cup (or similar container), add 1 tsp sugar and about an ounce of water at 95-105F. Cover with plastic wrap. Within 5 minutes it will product bubbles if alive.
I’m confused, at 2:18 in your video clip you said to use 3 tablespoons then 3 quarter tablespoons while showing a 1/4 teaspoon measuring spoon. Which is it?
Hello; Can you elaborate on point #7 – on feeding the starter? Thanks for a great article!
Boiling that potato will kill any yeast that is on the skin. The yeast that you are growing comes from your flour.
Does it have to be kept in the fridge or freezer. If were talking apocalypse we may not have that options
If you have a dehydrator poor it in one of those fruit roll up sheets and dry it so you can store it in a jar. I still put mine in the fridge but a root cellar would work as well.
Mabey not “EONS” but certainly several hundred years…chech out the youtube from James Townsend and son..John Townsend gives a good historical account of using yeast for brewing and baking…several good reciepts (recipies) also
Does the “Baker’s yeast” made by the methods here make sourdough bread or sweet bread?
Baker’s yeast can throw undesirable flavors into brews (beer, wine).. It will make a fermentation.
Unless you autoclave or pressure cook your utensils, you won’t achieve “sterility. ” “Sanitation” is good enough here. Beer makers use a bleach solution; winemakers use a solution of (sodium or potassium) metabisulfate. (You don’t want bleach anywhere near winemaking materials..
Brewers Yeast sold in health food stores are usually “dead”. A left over “law” or regulation from the days of Prohabition requier brewing yeast to be dead befoe selling to the public. You don’t want just any old citizen to make liquor do you?!?!
Anyway the commercial yeast used in bakeries is not the same as used in breweries … not that they CAN’T be used, they react somewhat differently so the rising times are different. Also Bakers Yeast does not make alcohol as well as brewers yeast. Though I’ve used bakers yeast to make a mash for a still before … it works, if its the only yeast you’ve access to.
Something to remember: if you leave your sourdough uncovered to much, you will least get a new strain of yeast taking over your old sourdough. And it may not tasted the same as your old sourdough. It may also be less active, requiring more time for rising in bread making. Or it may be MORE active, requiring much less time for rising! And if you move the loca wild yeast is very likely to be a different strain than your sourdough container has. I used to have a two hundred year old starter I’d kept for several decades until I moved … I lost that very unique starter.
Anyway, just a cautionary tale of some problems that can arise with sourdough starters.