


What are you going to do if someday you lose your home in a large-scale disaster of some sort and you have to build a shelter from scrap? Imagine that there will be thousands of people in the same situation as you and the building materials will be scarce or not available at all.
Or, what if you’re stranded somewhere in the wilderness for a long time and you have to build a strong shelter for you and your family, in order to survive cold winter months and prevent wild animals from attacking your premises and food supply?
What Would a Prepper Do?
Well, humanity already solved this problem thousands of years ago by using “survival cement”, i.e. good old cob. Cob is the old-school name for the modern-day, overly hyped “survival cement” thing.
But the real question is this: is cob strong enough for you and your family in a survival situation?
The short answer is yes. You should be aware of a recent discovery in Utah, specifically the Anasazi ruins, which are thousands of years old and they were built from…yes, you guessed it right: survival cement or cob.
They’re in pretty good shape even today, so that’s all there is to know about cob-made structures: if properly executed and designed, they will last for a long, long time.
This mixture is not a technological breakthrough by a long shot. Romans built amazing stuff 2000 years ago using a secret recipe of cement, superior to what we’re using today in industry. It was called opus caementicium and it was as strong as…well, concrete, but that’s another story.
Obviously, I’m not going to bore you to death with stuff which is pretty laborious and complicated to DIY, especially in a survival situation. I am talking here about things like limestone made cement, which is fabricated using limestone or oyster or sea shells burned in ovens at high temperature in order to remove carbon dioxide. Homemade survival-cement is basically pulverized limestone, seashells or oysters treated at high temperatures and mixed with sand, gravel and water to build concrete. That’s a bit too complicated to do at home.
Cob is today’s topic; cob, or survival cement, is made using just plain old mud mixed with straw or dry grass and water. I mean readily available materials in almost any climate in any part of the world, and with minimal effort, skills and tools.
Why survival cement or cob, you asked? The simple answer is that it’s way more durable than a tent, it stands up pretty well against elements and, most importantly, it’s very easy to make by anybody, even a child. The next question is how to make it, but that’s why you’re reading this article, isn’t it?
What Can You Use Cob For?
Well, you can use cob or survival cement for building a multitude of structures, ranging from primitive shelters to walls or even a house (and an oven inside the house, made from the same stuff) or just about anything you want to build. Basically, if you’re out of options and you require a structure to protect you from the elements or wild animals that’s more permanent than wood, cob, aka survival cement, is the answer.
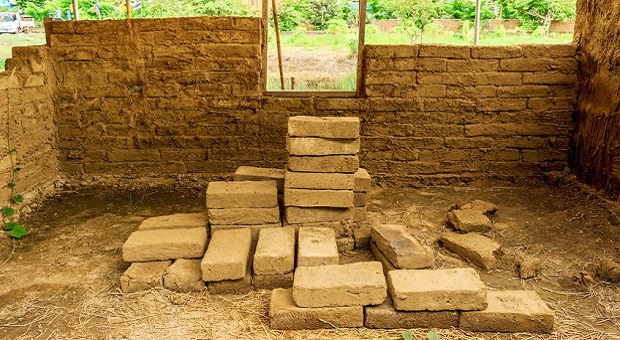
Using well-made cob and a little bit of skill, you can actually make bricks from the respective mixture, and with bricks you can build an empire, right? Or at least a bunch of pyramids. So, let’s take a deeper look about the ancient art of making your own survival cement.
Step 1: The first element in the cob equation is mud. High quality mud is essential if you want to make the good stuff, and the best mud has a high concentration of clay. How to determine the good mud from the bad and the ugly you ask? Well, that’s relatively easy: if you make a ball from the potential dirt which retains its initial shape, that’s the droid you’re looking for (yes, I am a big Star Wars fan). You’ve struck gold, and you can go fill a bucket (or more if you’re planning something big) with this mud.
Step 2: You must harvest/gather a respectable armload of straw or dry grasses and cut them into lengths of six to twelve inches.
Step 3: Next, you must add water to your clay in order to hydrate it enough to a point/density where it will squish relatively easily through your fingers. Don’t hydrate it too much though; the ideal consistency is if you can mold it and it still hold its shape.
The stuff must not be so watery that it will run through your fingers. You just have to homogenize it pretty well. If you want to use the survival cement as a mortar for a stone-made construction, you should strive for a wetter mix; if you’re looking for building bricks or a solid structure made of cob, go for a firmer mixture.
Step 4: You should spread something like a tarp on the ground and put the bucket of homogenized mud and the cut grass/straw at the edges.
Step 5: In the next phase, you must dump the mud from the bucket in the middle of the tarp and put about half of the straw/grass on the top (step five, but who’s counting anyway?).
Step 6: In the next step you must fold a corner of the tarp over the top and stomp it pretty well if you’re barefoot or begin to directly stomp the straws into the mud if you don’t have a problem with getting dirty.
Step 7: Next, after you’ve danced around a bit and the mixture isflattened and spread out, step off the tarp then fold it in half, thus turning the mixture back onto itself. You should repeat the procedure at least 2-3 times until you form something in the shape of a ball. Then, you must add the remaining strawor grass progressively and start stomping again, until the remaining grass homogenizes with the mud thoroughly. As a general rule of thumb, the optimum grass/mud ratio is somewhere between forty and sixty percent grass, depending on the type of the structure you want to build.
Step 8: The last step is to start your survival cement project as soon as possible. Don’t let the cob sit to dry out because the mud will harden and it’s going to be very difficult to get it into your desired shape or form. Basically, you can start building bricks with the cob/survival cement and you can repeat the aforementioned procedure until you have enough (bricks or whatever you’re doing).
If you have to add water to help with the re-hydration of the mud, keep in mind to add a little at a time, to avoid making the cob soupy and thus unusable. It’s way simpler to make the cob a little wetter than to regain its original consistency by adding mud/straw.
If you want to build tougher cob, remember to place the grasses or straw parallel to each other for creating a re-bar like effect, making for a stronger building material.
Since a picture is worth a thousand words, below’s a video-tutorial in high-definition about how to make survival cement/cob using natural building materials, step by step. The most important thing in the process is to learn how to disseminate good mud/clay from bad, since mud is the main building block in the recipe of high quality survival cement. If you got that part figured out, the rest is easy as pie.
Video first seen on Brennan Bird
Building survival cement is an immensely fun outdoor activity and the best part is that you can teach your kids how to do it. I mean, it’s educational and it will help them someday. Also, it’s so easy that even 7-8 year olds can be taught to do it, and learning how to build a shelter is vital for a future prepper, don’t you think?
Here’s another video-tutorial about building structures using survival cement or cob, i.e. a post collapse solution for housing.
Video first seen on Cob House Channel
And last, yet another video about how to make bricks from cob/survival cement. With bricks available in virtually unlimited quantities, anything is possible, right?
Video first seen on Musanze Inc
If you have other ideas/methods about how to DIY survival cement, feel free to share them in the comment section below.

This article has been written by Chris Black for Survivopedia.


Great article, southwest injuns called it adobe. Question; how do you make it waterproof so your shelter doesn’t dissolve in the rain???
If you can find a lode of clay, dig it up. Make a slurry with clay and water, to the consistency of chocolate frosting on a birthday cake. Apply it to your cob walls, just to the top of the foundation stones, about 1 in. thick. Smooth it out as you go with wet hands, or a dense wet sponge, or a trowel if you like. Do this at a steady rate so it doesn’t dry out on you. (It helps to have an assistant, who can use a wet sponge to moisten the drier patches.)
Let it dry abit
Oops! Hit the wrong button.
Let the clay dry a bit, to what’s called “leather hard” by ceramics potters. When the clay is at this stage, you can still fill and repair cracks that will form.
When the clay firms up, it can be burnished by hand with a smooth stone, or a piece of leather, et cetera. This will give the clay a shinier appearance, fill in fine cracks, and cause the clay particles to compress onto the structure. When done, the surface should be highly water resistant. It’s also able to sealed, if you have access to a sealant. But in a SHTF situation, Home Depot won’t be open!
The sun will eventually bake the surface, so it should be durable for years. In a high rain/snow sort of an area, a different sort of material should be used for roofing (like shingles, thatch, whatever) and it should have wide eaves, to prevent water from washing the coating away from the top on down.
If an area needs repair, you’ll have to chip away the loose part, and soak the edges before patching with slurry. Wet clay won’t stick to dry! Apply slurry, level it with the existing coat, smooth it, let it dry, then polish it! Most cracks can be spaced with clay slurry if you moisten the crack 1st. No chipping required!
That works just fine, but for a more permanent solution after things “normalize” a bit, is to get some Portland Cement to make a plaster to cover the walls and help prevent erosion. You will need to roughen-up the walls to give the plaster something to adhere to.
If that isn’t available, just a good coat of paint will help as well. Latex paint I think would be preferred, due it being more flexible and more likely to bond with the wall materials.
As an alternative to “store-bought” latex paint, using milk mixed with powered lime is good for a white paint. Using animal blood, mixed with milk gives a serviceable reddish brown paint. YUCK!! you say? Why do you think early American homes and barns were generally white or red? They used what they had available at hand.
For a more long-lasting paint they’d boil-up animal hooves, etc. to make a kind of glue to mix in with the afore-mentioned home-made paint mixture. That paint would sometimes dry to an almost varnished type finish.
You add a overhanging roof made of a waterproof material
Cob is probably more commonly known as Adobe, at least in the southwest, where there are many old, old buildings made from it
I think the first step should be make a form for all the mud to fit into to make the brick. Thinking 2×4 s cut into 12 to 14 inch square boxes. Also how bout using a wheel barrow to mix the ingredients. Like one would do for cement. Seems a little less back breaking ( especially for old bones like mine).
What are the basic building codes that could affect this type of construction? I mean normal bricks/blocks are pressure tested to meet certain standards and if these blocks are not pretty exact in formula they cold break easily, I would think.
Thats a good point, but I think this article is more focussed on using this type of construction to make a more permanent, solid structure in a survival or emergency type of situation. But Building codes differ from city to city or state to state so if you’re looking to make a more cottage or cabin type of building, check your local building office. I know in my province there are a few alternate building material homes that have passed building codes, so it would be good to check out. Be well.
If you can get hold of some linseed oil, people have been getting very good waterproofing results by painting it over the burnised clay that Macy described. I would use it inside too, particularly if you use clay tiles for the floor.
People living in “mud huts” (adobe-type construction homes) often don’t bother with clay tiles for the floor. The so-called “dirt floor” is a lot more hygienic than you might think, once it is pounded hard by peoples’ feet and sealed.
The floor can be fairly effectively sealed using milk or blood if you’ve got it. You dilute these protein-based materials into a wash after the floor is leveled and pounded a little to compact it. The wash materials bond with the dirt and forms a material that is hard to tell from tinted concrete. It’s hard and sealed against spills (as long as you mop ’em up reasonably quickly). Pioneers settling the American West often did this, rather than using hard-to-get wood for floors. The Masai people in Africa do this as a matter of course in home-building.
In the early 1900’s, my grandfather literally built a church in Friona, Texas out of adobe bricks. It is still standing today and as a matter of fact, is listed on the National Historic Record. So they really can stand the test of time.
You can take a pair of 2×4 with 6″ or 8″ blocks nailed on either end. Loosely pack the form with grass. In a trash can full of mud add water until the mud is like yogurt or slightly wetter. Pour the form full and wait. When it is solid, but still moist, pull off the form and use wire to cut to length. When dry, stack into an oven shape and make a fire inside. When done you can flip the brick and do it again. This is optional. Elastomeric roof coating will make it permanently water proof. After firing they are pretty good without the coating.
Have fun!
“Elastomeric roof coating “? Jeez Louise! Don’t you mean just good old TAR?
I enjoy your site. You put on much need information I like very much. Keep it up! Thanks Millie
Another way to add a water resistant plaster is with prickly pear cactus. Cut the prickly pear into pieces about the size of a dollar bill or smaller and fill a 55-gallon drum half way. Cover with water. Stir daily. In about a week or ten days, you will get a gelatin-like goo that can be lifted out with a fork-like tool. Leave the spines and skins behind. Mix the cactus gelatin in a wheel barrow with earth you made the blocks or cob with. You will have to experiment with how much gelatin to add because success depends on the kind of soil you have and what kind of clay/sand ratio you are working with. It will likely be a pint or quart or so with a half wheelbarrow full of earthen material. Experiment until you have a plaster that can be applied with a trowel and not crack while drying. This plaster will likely be about twice as resistant to rainfall than un-stabilized block/cob exposed to the weather . Replastering every six years beats having to replaster every other year or so. Best defense however, is to provide a very wide overhang so that your walls are not exposed at all by wind-driven rain. Also, not discussed in the main article above, it’s VERY important to keep your blocks/cob 8-12 inches above the finished grade. Always slope finished grade away from your building and do not locate your building where it might flood. If you can, build a short perimeter wall (top of your foundation) with standard reinforced concrete and add tar paper or another moisture barrier to prevent ground moisture from penetrating the bottom face of your blocks/cob and dissolving the walls slowly from below.
Not everyone has some prickly pears like in the michigan UP where we have tons of limestone but guess what NO prickly pear still good idea if avaible
I use some ground charcoal and ash with water and clay. It molds to fit whatever you need . Use 3 parts ground charcoal to 1 part ash to 1 part clay and add water to fit the discription as in the article
Alright so I’m sure this is an old article so I don’t really expect a reply but if I did get a response that would be much appreciate 🙂 . Okay so anyways my question is wouldn’t the cob just turn back into soupy mud the first time there’s a heavy rain.
Would it be possible to make or line a Koi pond this way. I have tons of Alabama Red Clay to work with. Pond liners are very costly if you want one that will last.
To line your pond add a bit of sand to the clay and leave out the straw. Make a wood frame and form your cob into blocks. Let the blocks dry completely; about two weeks. Use the driest blocks and build a hive shaped kiln, using thinner clay as mortar, let dry. Build a slow gentle fire gradually add more wood until after a few hours it’s an inferno, the blocks should be glowing a bit. Add less and less wood so the kiln cools slowly. Once cool use the kiln to fire your remaining blocks, as each run of blocks cools off start building your pond. Or, check eBay for a liner to an above ground pool.
The kiln can be converted into an awesome BBQ!!! There’s a vid on YouTube where a guy builds a cabin this way including the kiln.