


I love potatoes. Boiled, mashed, fried, baked – it doesn’t matter how they’re served, I’ll eat them. They help stretch your food supply and provide energy when you need it the most.
Unless you have a place to grow a traditional garden, you may have discarded the idea of growing them, but you can make a potato pot and grow them wherever you want – and you can even take them with you if you need to bug out.
If you’re shooting for the “potato” that offers the most health benefits, shoot for yams or sweet potatoes. Though the names are often used interchangeably, they are not the same vegetable, nor do they have the same nutrients, though they’re both high in vitamins, particularly vitamin A. Technically, neither one are even potatoes but that’s outside the scope of this article.
How to Store Your Potatoes
If you were raised in the country, you likely remember the root cellars. Ever wonder why they’re called that? Me too, and the best explanation I can come up with is that they were used to store root vegetables – traditional white, yellow, or red potatoes, onions, garlic, carrots, etc. All of these will store all winter if kept at the right temperature. The important thing is to not wash them because the dirt extends their shelf lives.
Unlike other potatoes, sweet potatoes love the warmth – unlike traditional spuds, room temperature is great for them. They’ll keep up to a year! Again, don’t wash them. And if you’re growing them yourself, as you’re going to be after you make your pots, do your best to leave them somewhere warm – 80 degrees is great – for 10 days or so after you harvest them. This promotes the growth of a chemical on the skin that protects them from rot and also “cures” them to make them sweet.
Another advantage to growing sweet potatoes is that you have a tremendous yield. Believe it or not, you can yield as much as 130 pounds of sweet potatoes from just 3 potatoes.
You can grow both sweet potatoes and “regular” potatoes in pots, but the process is different. We’ll take about the easiest and fastest way first, then tell you how to grow sweet potatoes.
Now, are you ready to get your hands dirty and make a potato pot that will produce a great crop of potatoes? Good. Let’s get started.
These lessons of yesterday will teach you the basic skills for survival cooking!
Making a Standard Potato Pot
First off, I have to say that this is the perfect idea for a prepper because once you get it going, you’ll have potatoes literally forever without even needing to add dirt or fertilizer. It’s absolutely brilliant, but so simple that anybody with 1 potato, soil, water, and access to clover can do it.
Of course, any potato crop is self-perpetuating, but with this one, you don’t need fertilizer and you won’t have to dig in the garden.
Expect to yield about 10x (perhaps just a bit less) the weight of potatoes that you plant; that’s ten pounds for every pound, so you don’t have to do math.
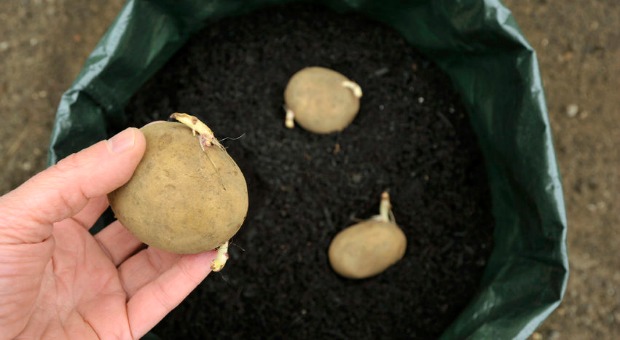
- First, choose your container. You can grow them in anything from a 5-gallon bucket up. Use a bucket or container that has never been used to store any type of chemical or poison. A great place to get food-grade buckets is local restaurants and bakeries. They usually buy in bulk, and items such as pickles, lard, sugar, flour, and frosting often come in 5-gallon buckets.
- Fill your container with a mixture of potting soil and compost. I’ve even heard of people using sand and sawdust, but for this method, use the potting soil and compost.
- Let your potato sit long enough to start growing eyes. That way you know that it will grow because some are treated with chemicals that keep them from sprouting in order to extend shelf life. While you’re waiting, prepare your bucket and get your clover growing.
- Drill holes in the bottom of your bucket for drainage and make sure that you have a place to put the bucket so that it’s not in direct contact with something such as dirt that can clog the holes and prevent drainage.
- Put a few inches of gravel (and sand if you’d like) in the bottom of the bucket and fill it with soil to within several inches of the top.
- Sprinkle white clover seeds across the top of the soil and just run your hand over them to get a bit of soil over them.
- Once your potato sprouts eyes and you know it’s good to grow, your clover should be starting to grow, too. Dig a hole 12 inches deep or so in the center of the bucket. Don’t worry if you have to dig through the clover – it will grow back.
- Plant your potato at the bottom and cover back up with dirt.
- You’ll see a plant within just a couple of weeks, then all you have to do is water it once or twice a week and let it grow. After 3 months or so, the plant will die back. When it does that, your potatoes are ready to harvest.
Video first seen on Hollis & Nancy’s Homestead.
Making a Sweet Potato Pot
This has several steps and takes quite a bit of advance wait time, but your yield will be awesome. Plus, sweet potatoes are delicious and nutritious just as they are. Not to say that a good old regular potato isn’t delicious, too!
Because the yield is so high, you may want to use 20 gallon buckets for this. That’s what was used here – if you’re only using 5-gallon buckets, just put one slip per bucket. You’ll know what that means in a minute.
- Start with a single sweet potato. Unless you want to be overrun with them, or intend to sell them or trade them, you don’t need more than a couple because one potato seriously can yield forty pounds or so.
- Find cups, jars, or containers that are wide enough and deep enough to accommodate one half of the potato, lengthwise.
- Stick 3 toothpicks into the potato at equal distances around the middle so that you can dangle one end of the potato (half of it or so) into the glass or jar and have one end sticking out. You want to have at least a half-inch or so all around the potato between it and the inside of the container.
- Put the potato into the container so that it’s suspended by the toothpicks.
- Now it’s time to wait for the slips to grow. Slips are basically shoots that grow into individual plants, and one potato can yield up to 50.
- The slips will begin to grow off of the bottom and up around the potato and will be ready to separate after a couple of months.
- Once they are, separate them out into different jars, and you can even cut and root new slips off the first ones as they grow. Once you have the slips that you want and they’re at least 12 inches tall, it’s time to plant them.
- You’ll want a trellis behind them because sweet potatoes vine, and they root where they touch the ground, so if you’re using containers, you don’t want them vining all over your yard.
- Fill the buckets with equal parts potting soil, peat moss, and compost to about 6 inches of the top.
- Ramp the dirt so that one side of the container (the one furthest away from the trellis) is 8 inches or so more shallow than the side closest to the trellis and soak it with water.
- Place 3-6 slips in each bucket so that the tops are facing the trellis and the roots are at the side of the bucket that’s furthest away from the trellis.
- Add soil mixture to cover the roots and make the dirt level. It’s OK if you cover up some of the leaves and only just the tops are sticking out.
- Water it again a bit and cover with straw or mulch to keep weeds from growing.
Video first seen on OFF GRID with DOUG and STACY.
They love hot weather and take about three months to mature. They’ll get super bushy, so try to encourage any long vines to grow up the trellis. The plants will also grow really pretty flowers, which makes them great for ornamentals. Since the good stuff isn’t visible, if people don’t know what they are, they’ll just think they’re bushes – hiding your garden in plain sight.
The leaves will start to turn yellow. After that, leave them for another week or so and test a part of the bucket by digging down to see if they’re ready. Or, you can just dump a bucket and see how they are. Though remember – you only get one shot if you do it that way.
Now you know how make a potato pot.
Potatoes are the ultimate survival crop and they were included almost in every meal during the Great Depression.
Discover more about how our forefathers handled their survival food.
Click the banner below and uncover their secrets!

This article has been written by Theresa Crouse for Survivopedia.


Hi, just wanted to add that the sweet potato vine is edible and nutritious as well. Cook as you would any green. Sauteed with garlic, onion and soy sauce is how I like them.
Thanks for your video on how to grow potatoes
Rod
Loved the video, how long does it take potatoes to grow?
Hi, just for clarity…do we plant one potato per 5-Gallon bucket?…thank you.
Hi, why encourage your readers to comment or ask questions if there will be no answers?
Thanks for your tips and information