


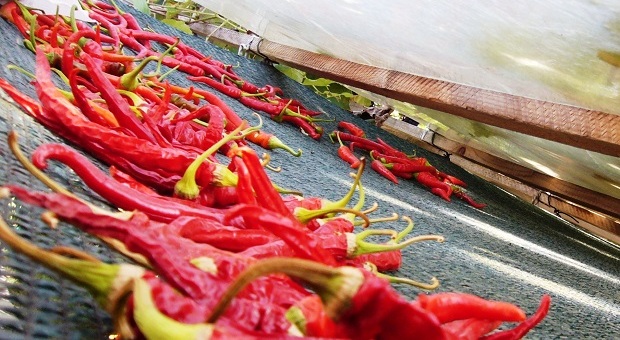
Peppers are one of Nature’s most versatile foods; there are many different kinds and you can eat them raw or use them to add flavor to many types of dishes.
Nearly all cuisines include peppers as staple foods because they’re easy to grow and they don’t take up much space. It’s this last feature that makes peppers such a great prepper’s plant; you can grow them literally anywhere that has some sun.
Peppers are incredibly nutritious. Regardless of the type, they’re all rich in fiber and extremely low in calories, making them great for everybody. Green peppers are typically extremely rich in vitamin C and offer respectable amounts of vitamins B6 and A.
Though most people don’t realize it, green bell peppers, yellow bell peppers and red bell peppers are the same pepper picked at different stages of ripening.
Green peppers aren’t ripe yet and red peppers are completely ripe. Yellow peppers fall somewhere in the middle. The riper a pepper is, the more vitamin A it has. Red sweet peppers have 93% of your daily recommended dose of vitamin A per serving. This applies to most, if not all, red peppers regardless of how sweet or hot they are.
Types of Peppers
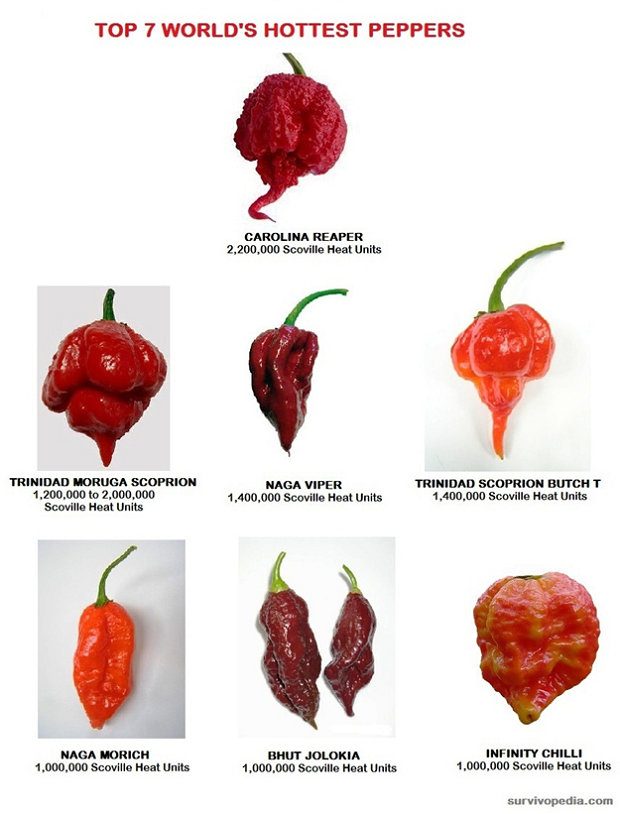
Whether you like your peppers hot or sweet, you have a vast variety to choose from. The level of heat ranges from the sweet bell pepper that has absolutely no spice whatsoever to the Carolina Reaper, which can come in at a whopping 2 million+ Scoville Units.
Peppers come in just about every shape and heat level that you can imagine.
{adinserter usf}Most commonly grown in the US are the sweet bell pepper, the banana pepper and the jalapeno pepper. This is probably just because they’re the best known and seeds are easy to come by. The habanero pepper is also an option if you like them really hot!
Though you can buy seeds at your local hardware store or superstore, you can also order them online. That way, you can research what you want and buy specialty seeds.
The most expensive pepper in the world seems to be the Chiltepin, which grows in the Mexican desert – Texas, Arizona, Florida, and also the Bahamas, and a few other regions in Central America. It is also known as “the mother of all peppers”, because is the closest thing to the original species that all modern chilli peppers descend from.
They are usually picked from wild plants (a perennial shrub that usually grows to a height of around 1 meter), and their flesh is very thin. They are extremely hot (between 50,000 and 100,000 Scoville heat units). The price for whole dried ones varies from $280 to $700 per kilogram.
Cultivating Peppers
When to Plant Peppers
Each plant type requires different temperatures. Depending on where you live, most crops can be started in early spring. Peppers are a tender, warm-season crop, which can be grown in 1 to 11 USDA Hardiness Zones (click here to check your zone).
You should start seeds indoor 8-10 weeks before transplanting, which means 2-3 weeks after the expected last frost. Only the gardeners in the Deep South should plant the seeds directly in the garden.
Ideal Soil for Growing Peppers
Peppers prefer a rich, sandy, loamy soil that has lots of nutrients. The soil needs to hold some water but drain well because the roots like to be moist but not flooded. This isn’t as complicated as it sounds; if you have super sandy soil, work in some compost. If you have extremely rich, dense soil, work in some sand.
Since we’re growing inside, shoot for a mix of about half sand and half soil/organic compost. If you want to get particular, go with 1/3 garden soil, 1/3 vermiculite and 1/3 sand. For example, if you use seed starter mix in containers with poor drainage, the plants will develop large, weak stems, and then die.
Choosing and Germinating the Seeds
First, don’t go with any seed that has genetically modified organisms (GMO) or is hybrid. The problems with GMO foods are just now starting to be researched and there is considerable cause for concern so it’s best to avoid them. Look for a reliable provider for your seeds.
You don’t want to plant anything hybrid because historically, hybrids aren’t stable in the second generation. Hybrid seeds have been modified to combine the positive aspects of two different types of plants. Though your first crop will grow gangbuster, your second crop grown from your 1st generation seeds will be unpredictable.
Hybrids are often unstable in the second and third generation. Yield may be extremely low or the fruit may be inferior to either parent. You’re better off sticking with heirlooms because then you know exactly what you’ll get from every seed.
Once you’ve chosen your seeds, it may be best to start them in individual peat containers. Place a few seeds on top of each little peat disk, add water, and then push the seeds down about 1/4-1/2 inch. If you really want to make sure that your seeds are going to sprout, put them between two damp paper towels and wait for them to sprout before carefully planting them.
You can use just about any type of planter because the seeds don’t need to be deep to take root. Containers that are too small can lead to root-bound plans as well as ones with stunted growth. Today, most gardeners prefer 1.5 inch peat pots or pellets with one seed sown per pot or pellet.
Germination can take anywhere from 7 days to 6 weeks depending upon the variety so be aware of that when you plant them, especially if you’re considering putting them on your veranda for part of the day.
Peppers like warm weather. Also, seeds germinate best between 65 and 85 degrees F. Keep them watered adequately without drowning them and your peppers will thrive with very little maintenance. On the other side of the equation, advancing from seedling to second leaves can be a difficult process.
After your seeds have sprouted and your seedlings are a few inches tall, it’s time to transplant them into bigger containers.
Transplanting Your Plants
Because peppers are a medium-sized plant, it’s a good idea to leave some space between them when you plant them. We recommend leaving at least 12 inches between each pepper plant in your raised garden or planter.
If you’re planting in a round planter with a diameter of 1.5 feet or more, you can probably squeeze in 3-4 plants. They also like to have at least 6 hours of direct sunlight so put them near a window or get them a grow light.
Don’t transplant them into a bigger pot until the seedlings are at least a few inches tall with several branches of healthy leaves. That way you know that you’re transplanting plants that are going to have a decent chance of survival.
Companion Planting
Planting different crops in the proximity of peppers would help pest control, maximize space and increase crop productivity.
Plants that Grow Well with Peppers
There are some plants that do wonderfully when planted with peppers. These include basil, chives, carrots, onions, lettuce, spinach, okra, leeks, radishes, beets, asparagus and garlic.
Actually, just about any herb does extremely well when grown with peppers and some people actually report that they increase the yield of the plants around them.
Plants that Don’t Grow Well with Peppers
Bell peppers are a bit less persnickety than hot peppers and will grow well near just about anything other than fennel or kohlrabi. Hot peppers, on the other hand, are known to share some of their heat with fellow peppers so you may want to consider giving them their own planter.
Also, hot peppers shouldn’t be grown with beans, broccoli, cabbage, cauliflower, Brussels sprouts or fennel. They just don’t do well because of the different soil requirements.
As an aside, chili peppers have root exudates which help prevent root rot. In plants like tomatoes that are prone to root rot, this is a great reason to buddy them up.
Pests and Diseases
Generally, peppers are problem-free. The same pests and diseases that plague tomatoes, potatoes, and eggplants will occasionally attack peppers.
Destructive caterpillars like cutworms, tomato hornworms, and borers are easily controlled with Bacillus thuringensis (BT or Thuricide). Rotenone and pyrethrum will readily handle pepper maggots and weevils, leaf miners, flea beetles, and aphids.
If they appear, disease and insect pests threaten efficient pepper production by lowering yield, reducing fruit quality and making harvests unreliable, but with a few precautions, you can keep your peppers “clean:”
- Select fertile, well drained fields and check annually for pH, nutrients, nematodes, southern stem blight, soil insects and weeds.
- Keep seed and plant lots separate
- Practice sanitation.
- Spray plants for bacterial spot prior to pulling.
- Obtain pest-free plants and transplant on a raised bed after soil temperature exceeds 55°F.
- Spray at first appearance of disease and when insects warrant.
- Use organic pesticides to eliminate common pests.
- Harvest quality fruit, avoid injuries during handling and immediately remove field heat.
Harvesting Your Peppers
Peppers can be eaten at quite literally any phase as soon as they start to grow. However, the vitamin content and sweetness of the flesh aren’t complete until they reach complete ripeness.
For sweet peppers, this takes about 60-90 days after seedlings are transplanted. Hot peppers take a bit longer to reach maturity; up to 150 days after germination.
Be careful not to damage the plant as you do so because each plant will continue to grow for quite a bit after the initial growing period as long as conditions remain good. Tie the plants to stakes using old nylons, so they could keep their fruits. Don’t use wire twist-ties or twine, because they will gradually choke off or snap the stem.
Frequent harvesting increases yields, often at the sacrifice of flavor. If you continually pick the peppers before they mature, the plants will continue to produce fruit in their quest to develop viable seed.
If you have enough garden space, plant at least two of each pepper variety you’ve selected. Allow one plant of each variety to fully ripen to maturity, and harvest the other throughout the season. Also, when picking peppers, refrain from tugging on the fruit, which may break off a branch or even uproot the entire plant. Use a sharp knife or garden shears to cut the tough stem.
Harvesting the Seeds
The best way to have a successful seed harvest is by selecting the right plants, spacing them properly and maintaining control of the pollination process.
Keep in mind that nature is a tricky lady and all of the plants might cross pollinate with others of the same species in the presence of very heavy pollinator activity. For the home gardener, separating blocks of different varieties by 10-15 ft. with an unrelated crop in between is the best defense against unexpected cross pollination.
While hot peppers have perfect self-pollinating flowers, they tend to cross pollinate much more readily than sweet peppers. To avoid cross pollination, hot peppers should be separated from any other type of pepper by at least 20’, or as great a distance as is possible in your garden.

Preserving and Storing Peppers
There are two primary ways that you can prepare your peppers for storage. Typically, there are three, but we’re not touching on freezing because that won’t necessarily be an option if SHTF. You can either dry your peppers or can them.
Either way, you’re going to lose some nutritional value. Water soluble vitamins such as vitamin C are damaged by water, heat and air. Even 5 minutes of boiling can cause up to a 64% loss of vitamin C. Drying has similar effects. The best way to get the vitamin C is to eat it fresh or lightly steamed – another reason to have indoor pepper plants.
On the other hand, beta carotene, which is converted by your body into vitamin A, is actually often more accessible after light cooking. It’s also retained when the peppers are dried.
Air Drying
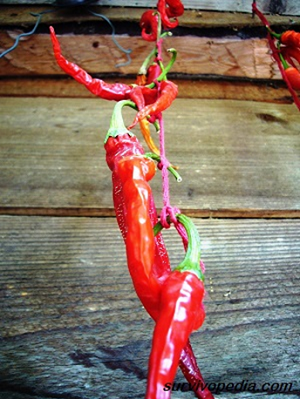 If you live in a relatively dry climate, you can dry your peppers by hanging them up. This will take anywhere from 3-5 weeks depending on the temperature and the amount of humidity in the air.
Before drying, check for softness or bad spots. You want to dry peppers that are firm and healthy because drying doesn’t kill mold or other nasties.
Just run a string through the stem or cap of the peppers, leaving an inch or so between each pepper; you don’t want them to touch. Hang them somewhere dry and leave them alone. When they feel crunchy, they’re done.
Oven Drying
Cut the peppers into ½-1 inch slices and place them on a cookie sheet in a single layer. You want to keep your oven 130-150 degrees. You can do this by keeping the door slightly cracked. It will take anywhere from 4-36 hours for your peppers to completely dry.
Dehydrator
You can dry your peppers whole or cut them in pieces if you’re drying them in the dehydrator. It will take anywhere from 4-24 hours for them to completely dry depending on your dehydrator, the humidity and how big the pieces are. Again, when they’re crunchy they’re done.
Regardless of the method you use, store peppers in a dry jar or vacuum seal them after they’re dry. You can also grind them powder if you’d like. Dried peppers will stay good for a year or more if stored properly.
Canning
Peppers cook quickly so you want to be careful how you can them, especially if you want to preserve the nutrients and enzymes. They’ll turn to mush pretty quickly so pack them into the jars raw for best results.
If you’re cooking them in sauce, barely bring them to a boil before packing them into the jars. They’ll cook more in the water bath and while cooling. Follow standard canning procedures to properly can your peppers. One of the biggest advantages to canning food is that it remains good for up to 10 years if canned and stored properly!

This article has been written by Theresa Crouse for Survivopedia.


Comments 6