


In one of my recent articles I thoroughly discussed the “how to’s” of DIY-ing your own greenhouse.
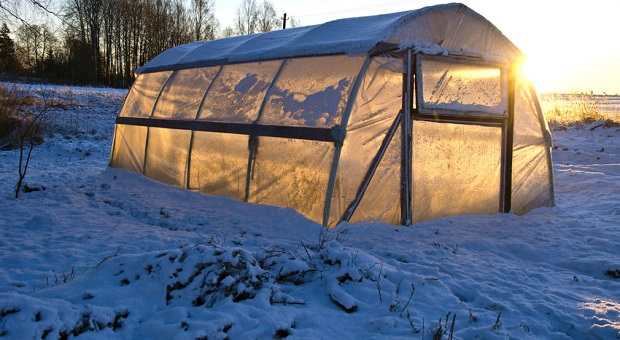
Now, let’s address another issue: how to heat a greenhouse during the harsh winter months, because even if a greenhouse is an excellent environment for growing plants and veggies, stabilizing the temperature inside is of major importance to your crops.
If you’re wondering what I am talking about, consider this: even in October and November, the temperature inside a glass-covered greenhouse can fluctuate considerably, ranging between 30 degrees F lows and 100 degrees F highs.
This massive fluctuation in temperature happens regularly in certain climate conditions. Why? Well, the glazing of a greenhouse does a great job when it comes to letting in the sunlight and therefore the heat, but it’s also very good at letting heat out. That’s because glass or plastic does a relatively poor job in terms of insulation.
Actually, almost all greenhouses tend to overheat during the day if they’re not “temperature controlled”.
During the night when the temperature drops, the greenhouse loses all the heat, causing the plants to freeze. As you can easily imagine, plants (just like people) are not very happy in these circumstances.
So, what can you do to mitigate the problem? In order to control the temperature swings, you must install either a heater or a cooler inside the greenhouse. The cooling job is easier, as it’s basically taken care of by an efficient ventilation system.
Today we’ll take care of the heating thingy; that’s the hardest part of the job.
The smartest and also most sustainable way for mitigating the temperature swings inside a greenhouse is to capture the “extra” solar energy getting in during the day, then store it and use it later during the night when the temperature drops. That’s one solution.
Another solution is to build an efficient heating system that uses renewable or cheap fuels.
When building a greenhouse, remember to design it in such way that it doesn’t require very much cooling or heating in the first place. Good design is key and I discuss that in my article about building a greenhouse.
To revisit that topic briefly, that involves properly insulating the structure, using high-quality materials for roofing, and orienting the greenhouse facing south.
Now, let’s talk about heating solutions, tips and tricks, and the whole nine yards, right after the break!
1. Additional Insulation
Let’s begin with the simplest method: additional insulation. For blocking icy winter droughts and significantly reducing heat loss during the winter, the easiest and cheapest way is to add an insulating layer of bubble wrap, attached with clips to the inside frame of your greenhouse. This trick works very well even when it comes to unheated greenhouses.
For best results, go for horticultural bubble wrap insulation, which is available at garden centers. Unlike regular bubble wrap, this one is tougher and also UV-stabilized. Remember that the bigger the bubbles, the more light they let in.
Besides bubble wrap, you may also use horticultural fleece for further insulating your greenhouse and adding a few extra degrees for your plants during extra-cold winter nights. Just remember to remove the fleece during the day to ensure that your plants and veggies receive proper light and ventilation.
2. Heating System
Now, these are temporary, palliative solutions for heating a greenhouse. A better option is to invest in a heating system. Ideally, you should use electric fan-heaters, which can be easily moved around the greenhouse, thus preventing the apparition of cold spots and reducing the risks of plant disease.
When using an electrical heating system for your greenhouse, remember to save energy and money by investing in a thermostat, which will allow you to start the heaters only when necessary, i.e. when the temperature reaches a specific value. Also, invest in a high quality thermometer and check it daily; in this way you’ll be able to use and adjust your greenhouse heater more efficiently.
Try to avoid wasting money and energy by choosing the optimal temperature inside your greenhouse. Remember that most plants will thrive at temperatures as low as 45 degrees F and some of them even below that. The idea is not to transform your greenhouse into a tropical paradise; that’s not really necessary.
Remember to position your electric heaters carefully. Place them in a central spot, out in the open, or at one end of the greenhouse at a time, and heat only the areas that you need to.
For example, if you have a big greenhouse and only a few delicate plants, you just group them together and try to partition the greenhouse into smaller areas (use bubble wrap insulation curtains for example) which can be heated easily and economically.
But, there’s a problem with electric heaters: they are relatively expensive and they require a power supply. If you don’t have electricity nearby, you can go for paraffin heaters.
3. Heat Sink / Thermal Mass
However, if you’re a die-hard off-the-grid prepper, you should opt for building a heat sink or a thermal mass (they’re the same thing basically). The thermal mass is the smart solution I was talking about in the preamble of the article.
Thermal mass can be defined as any type of material or structure which is able to store thermal energy. And, obviously, almost any type of material is capable of doing that; it’s a basic energy conservation principle, but some materials are better than others at storing heat.
The heat sink or thermal mass works by trapping the extra heat generated by the sun during the day and releasing it slowly when the temperature drops during the night, thus heating your greenhouse free of charge. Basically, it works like a battery, storing energy during the day and releasing it during the night.
Now, how much energy you can store in your “battery” is directly dependent upon the size of the thermal mass and also the heat capacity of its building materials.
Water is excellent at storing heat when compared to concrete or soil, having a twice the specific heat capacity volume of concrete and 4 times the heat capacity volume of soil. Hence, the best and most common method for building thermal mass/heat sinks is to use water barrels, due to the water’s excellent heat storing capacity.
The general idea is to stack 55 gallon barrels filled with water inside the greenhouse. How many you use will depend on the volume and size of your greenhouse. The barrels must be located where they receive the maximum amount of direct sunlight, i.e. near a north-facing wall.
The water inside the barrels will get warm during the day and the energy (heat) stored inside will be slowly released during the night, keeping your crop warm. Easy as pie, right? And cheap as dirt, too. Well, almost.
Remember to place the tender plants (seeding trays or warm-weather crops) near the barrels, which will be the warmest place in the greenhouse, for better results.
4. Heat Exchanger
Now, if the thermal mass idea, aka the water filled barrels, are not enough, you can go to the next level and incorporate a heat exchanger into your DIY project.
The heat exchanger is also called a Climate Battery or a SHCS (subterranean heating and cooling system) and it works by circulating the air through the heating mass.
There are lots of versions and designs for heat exchangers, but they all work using the same principles. The mechanisms of energy transfer and storage are identical: as the greenhouse heats during the day, the warm and humid air from inside the greenhouse is pumped by an electric fan via a network of underground pipes. The temperature drop produces water-vapor condensation; hence energy is released during the process (it’s called phase change).
The released energy is stored in the soil in the form of heat, thus creating a big mass of warm soil under your greenhouse, regardless of the season. During the night, when the outside temperature drops, the electric fan starts over (via a thermostat) and it circulates the air again through the underground pipes, which, this time, extract the heat stored in the soil and warm the greenhouse.
There are additional methods for building a heat exchanger, as the battery material may vary. For example some people choose to dig and backfill with stones or gravel the area underneath the greenhouse, as stone and gravel are better in terms of heat storing capacity than dirt.
It sounds a little bit complicated, but it’s actually pretty straightforward. This air-heat-exchanger system is relatively simple and time-tested for decades in homes and greenhouses all around the world.
Heat-to-air-exchangers are very efficient for two main reasons: first, the size/volume of the battery/thermal mass is huge when compared to a water-filled barrel (generally speaking, two times bigger).
Secondly, because the air is pushed actively through the thermal mass, this significantly increases the rate of heat exchange, making it more efficient when compared to “static” barrels.
Also, this system does three jobs at the same time: during the day, the greenhouse gets cooler, during the night it gets warmer and on top of that, ventilation is taken care of by design, making sure there are no cold pockets inside! Awesome, right?
You can use a thermostat to kick the fan on and off when the desired temperature is reached, offering you total control over the thermal mass, and that means it’s as smart as it gets, right?
Here’s a video which depicts how a heat sink helps with keeping the greenhouse warm during cold nights.
Video first seen on Michael Dibb
Here’s another idea about solving the problem of freezing during the winter when growing inside a greenhouse, called a Zero Energy Thermal Mass Greenhouse, which requires no power and it’s totally off the grid. It will work anywhere and it allows you to grow produce even in the winter.
Video first seen on Ted Pasternack
I hope the article helped and if you have suggestions or comments, feel free to express yourself in the dedicated section below. Also make sure to comeback on Sunday as we continue to talk about our survival gardens!

This article has been written by Chris Black for Survivopedia.


Are the courses offered on this site in print ? My computer was distroied and I lost one I bought so I am scared to purchase anymore, and it is expensive to print it out. besides that if there is no power having to use the computer to obtain the information from stored information would be completely out of the question
Viola, thank you for asking. Most of these courses are also on hard copy, just let us know which one of them are you interested in.
Doesn’t do much good to talk about heating a greenhouse WHEN WINTER IS OVER!
But there is always another one coming. When do you expect to get the info, in the middle of the winter when snow is on the ground and setting all that up is nearly impossible?
Thank you for the good info, it give me time to plan for next winter.
I just had a 6 ft by 8 ft greenhouse built, using glass windows and wood.
Would it be helpful to dig a deep hole down the middle, about 2 ft by 4 ft, insulate it and fill with pea gravel?
Trying to not have to use elec, and it’s too small for water barrels.
I investigated another idea for heating a greenhouse, as laid out in a book titled “Intensive Culture of Vegetables on the French System, 1913”. What the French gardeners did in their greenhouses, circa late 1800’s – early 1900’s, was incorporate horse manure from the various stables located throughout Paris. (Raw compost produces lots and lots of heat) My intention is to place 18″ x 36″ bins throughout our greenhouse, filled with fresh horse manure, mixed with some straw, over the course of the winter. It is not unusual for our overnight Temps to drop well below zero here in eastern Wyoming, and if this method would at least keep us up above zero, and even into the 20 and 30 degree range, I would be ecstatic!