


Some would say that Glock is America’s handgun, since you can find almost everywhere, from Police forces to Hollywood movie makers (do you remember Die Hard?) It’s small, potent and effective, which makes it perfect for a concealed carry.
But only if you clean and maintain it.
This short guide will show you how to do it, if your Glock is a 27 Subcompact.
The Glock 27 is a backup subcompact pistol that was specifically designed for concealed carry, and delivers the same safety and reliability as any full size Glock. As with any other pistol, it must be cleaned and lubricated on a routine basis in order to keep it in good working condition.
Cleaning and lubricating removes bullet and powder residue from the action, slide and barrel, and rails. This process also gives you a chance to spot and Gage mechanical wear as well as make replacements for worn parts in a timely manner.
Click here to get your Green Beret’s Guide to combat shooting mastery & active shooter defense!
Simple Wipe Down
It is to your advantage to clean your firearms immediately after firing them. Wiping down all exterior metal parts of the pistol removes oils deposited by your fingers, as well as powder residue that can cause the metal to start rusting.
Ideally, you should do a simple wipe down before you leave the range, and as soon as you are done firing the gun.
Standard Cleaning for the Glock 27
As with cleaning any other gun, make sure you have all your cleaning supplies on hand. Work in an area where you have good ventilation, and where you will not be disturbed.
WARNING: Make sure the gun is unloaded before you start cleaning!!!
Start by pointing the pistol in a direction where you will not hit a living thing or something of value if the gun fires. Next, remove the magazine and rack the slide back, and look carefully to see if there is a round in the chamber. If you see a round, remove it.
You must always remove the magazine before checking the chamber, otherwise racking the slide will cause a round to go into the chamber.
With the magazine still out of the well, lock the slide back and look to see if the gun is cleared of ammo and safe to work on. Insert your little finger into the chamber to check the bolt face, chamber and the magazine well to make sure the pistol has been cleared and made safe.
To complete this process, dry fire the Glock 27 while pointing in a safe direction. Once again, rack the slide to return it into battery and to close the action. Give one final check to make sure the chamber is clear.
While the slide is still in battery, pull the trigger while pointing the gun in a safe direction. You will feel and hear a click as the firing pin moves forward. To remove the slide, the trigger must be in its rearward position.

How to Disassemble the Pistol
The Glock 27 has 4 main components: the guide rod/recoil spring assembly, barrel, slide, and frame/receiver. The disassembly process will break the gun down into these main units.
After you have determined that the pistol is unloaded and safe, grasp the pistol in your right hand with your thumb under the slide and your fingers over the top of the rear part of the slide.
Pull back approximately 1/4”. Pull down on the slide lock by grasping it on both sides with your thumb and finger.
Pull down on the slide lock while releasing the slide forward. Be careful not to let the slide fall off onto a hard surface that could damage the guide ring.
Remove the slide and take the recoil spring assembly out, then remove the barrel. You now have the Glock 27 pistol in the field stripped condition.
How to Clean the Barrel
- Wet a clean cleaning patch with gun cleaner or solvent. Thread this patch through the slotted tip of the cleaning rod. Insert the cleaning rod (patch end first) into the breech end of the barrel to clean the chamber and bore. Keep pushing the cleaning rod down the barrel until the patch exits the muzzle. Next, pull the cleaning rod back through the barrel until it comes out of the chamber and breech. Work the wet patch 5 or 6 times through the entire barrel.
- Remove the patch from the cleaning rod and attach a brass bore brush. Insert the rod into the barrel, brush end first. Go from the breech or chamber side and scrub the entire bore. Keep scrubbing vigorously until the bore looks clean and appears bright under a strong light.
- Use some more solvent to dampen the larger side of a two ended cleaning brush. Scrub off any carbon deposits that may have built up on the feed ramp and barrel hood.
- Take a rag dampened with solvent and wipe down the outside of the barrel.
- Use some dry patches to dry out the bore. Keep swabbing the bore with dry patches until they come out clean and dry.
- Finish cleaning the barrel by taking an additional dry patch and wipe down the outside of the barrel with it.
How to Clean the Slide
WARNING!! Work carefully and do not allow lubricants or solvents into the firing pin channel. Any lubricant or solvent in this area can cause the weapon to malfunction.
- With the muzzle facing downward, hold the slide vertically. Clean the extractor, the area round the extractor, and breach face with a two sided brush.
- Use a fresh cotton swab clean inside the slide and the slide rail cuts. Keep doing this until a fresh cotton swab comes out clean.
- Use a damp rag, or a patch slightly dampened with solvent to clean the inside and underside of the slide. The wide end of a scrubbing brush will also work for scrubbing inside the slide.
- For the slide rail cuts, use the smaller end of the two sided brush. Be sure it is dampened with solvent. Continue scrubbing until the slide rail cuts are clean.
- Take a clean, dry patch and wipe down the inside of the slide rails and slide.
Cleaning the Receiver
Remove carbon deposits from the locking block on the receiver and metal contact points with the wide end of the cleaning brush. You may or may not need to use solvent, but if you do, remember to wipe off excess solvent with a dry rag.
Brush out any debris or remaining unburned gunpowder that may still be left in the receiver with the wide end of the cleaning brush. Wipe the trigger bar, locking block, cruciform, connector, and the ejector until they are clean.
Inspect the Glock’s main components and function check. With every standard cleaning it is a good idea to take the time to inspect and function check the Glock’s main components. This is best done with the Glock disassembled in its 4 main component parts.
WARNING: If your Glock does not pass the following tests, do not try to put it back together again or fire it. At this point, you need to send it back to Glock, or have it inspected and possibly repaired by a certified Glock armorer.
Here are the components that should be inspected.
Barrel: look for lead deposits, dirt, obstructions, bulges, or cracks.
Firing pin and firing pin safety: (test has 4 parts.)
- Start off by removing the barrel and recoil spring assembly. Hold the slide so that the inside is facing up. Pull the firing pin lug to the rear and ease forward until it stops. Don’t allow the firing pin to snap forward as it hits the firing pin safety. Next, move the firing pin lug forward toward the muzzle. The firing pin lug should not go past the firing pin safety. As you look at the breech face of the slide, the firing pin lug should not extend through the firing pin hole.
- Hold the slide with the muzzle facing down. Press in on the firing pin safety button in the slide’s interior. The firing pin should move down, with the tip slipping through the firing pin hole in the breech face.
- Retract the firing pin so that it is back in the slide. While the muzzle is facing downard, vigorously rack the slide. The firing pin should be stopped from going through the breech face by the firing pin safety.
- Use your fingertips to depress the firing pin safety button while shaking the slide from one end to the other. You should be able to hear the firing pin as it moves freely within the firing pin channel. If you do not feel or hear the firing pin move, it may mean that the firing pin might be broken, or the firing pin and its channel may be blocked or caked with debris. Both these situations require inspection by a certified Glock armorer.
Extractor: Look a the extractor on the breech face of the slide to make sure it is clean. You should also make sure there are no chips or breaks on the extractor claw.
Ejector: You will find the ejector protruding forward from the left rear of the frame or the receiver. The ejector must be clean and free of cracks, breaks, or other signs of damage.
Slide stop and lever test: Start by gripping the receiver with your dominant hand. Pull up on the slide stop lever with the thumb and index finger of your other hand. The slide should snap sharply down into the frame. If it doesn’t, have the pistol check over by a Glock armorer.
How to Lubricate the Pistol
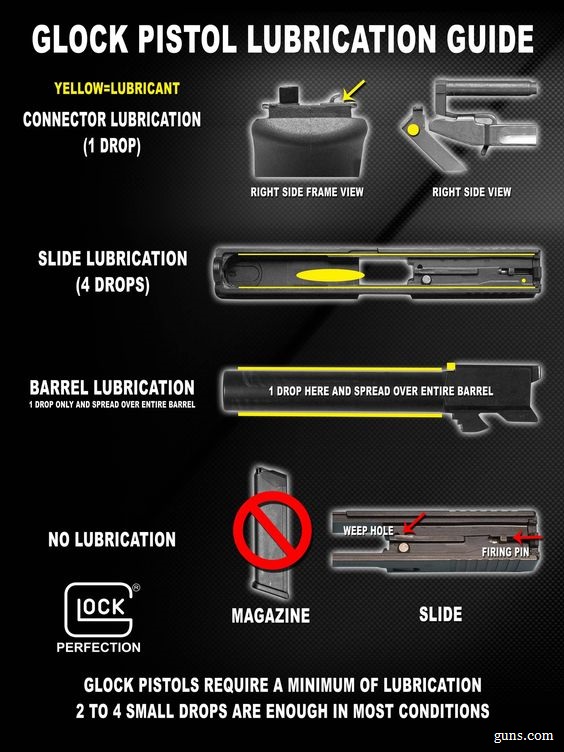
Lubricate the Glock using a good quality rust protective oil or lubricant. To do the job right it should only take six drops of oil. Any more than this will be to much and can cause dirt and other contamination problems.
Slide: Hold the slide so that the slide rail cuts are facing up, and the end of the muzzle is facing a bit down. Take a lubricant applicator and drag one drop of lubricant down the whole length of each rail cut. Use another for the front inside of the slide where it rubs against the upper part of the barrel.
Barrel: Wipe down the exterior of the barrel with an oiled cleaning patch. Put another drop of oil on the outside of the barrel, and the rear side of the barrel lug with a lubricant applicator.
Receiver/Frame: Hold the receiver in your dominant hand so that the left side is facing down. Put one drop of oil on the curved, upper extension of the connector, and another at the right rear corner of the receiver/frame. Look for the area on the connector where it touches the back of the trigger bar.
How to Reassemble the Glock 27 and Do a Function Test
There are a few steps to follow in order to reassemble and test your pistol:
- Reverse the steps you used to disassemble the pistol.
- To function test the pistol, start off by making sure the pistol is unloaded and pointed in a safe direction.
- Slide cycling: Rack the slide back several times. It should move smoothly and freely.
- Trigger function: Pull the trigger to the rear to make sure it works. Don’t forget to keep the gun aimed in a safe direction.
- Trigger reset: Rack the slide, which will return the pistol to battery and also reset the trigger. The trigger should be in its cocked, forward position. Pull the trigger and listen for the sound of the firing pin falling. Pull the slide back as far as it can go and release it. Release the trigger after the slide snaps forward into battery. At this point, the trigger should be cocked forward.
- Trigger Safety: You will find the safety partly within and to the front of the trigger. Make sure the pistol is pointed in a safe direction, and grasp the sides of the trigger. Do not depress or touch the trigger safety. If the trigger safety is working correctly, the trigger will not move to the rear and release the firing pin; and the safety will remain engaged.
- Pistol inspection: The outer parts of the Glock 27 should be free of corrosion, dirt, rust, and any signs of damage. Don’t forget to make sure the sights are aligned properly, clean, and free of damage. https://www.youtube.com/watch?v=oV0wDDFV0NY
- Check over all the magazines to make sure they are working properly. Use the slide open test for this. While the pistol is in battery, insert an empty magazine. Pull the slide back until it locks open. Remove the magazine and repeat with all other magazines that you have. If a magazine is broken or defective, the slide will not lock open.
- After all cleaning, lubricating, and function testing is completed. Wipe down all of the Glock’s exterior surfaces to remove excess lubricant.
Deep Cleaning the Glock 27
Any firearm that is fired a lot will require deep cleaning (total disassembly, thorough cleaning, and lubrication). If you are not sure how to do it, contact a qualified gunsmith to help you out with this and inspecting the parts.
Since the Glock 27 has looser tolerances than several other weapons on the market, it does not require deep cleaning as often. But you should still do a deep cleaning:
- After shooting 1000 plus rounds of cheap dirty ammunition.
- If the pistol has fallen into salt or dirty fresh water.
- If the pistol has not been fired or not given a standard cleaning for over two years.
In addition, if your Glock 27 does any of the following, then it needs a deep cleaning:
- Misfires when trigger is pulled.
- Failure to feed ammunition.
- Failure to eject fired brass.
- Pistol very dirty inside and out.
Insofar as cost, a local gunsmith might charge you from $75.00 and up plus the cost of parts and hand fitting to deep clean and inspect the Glock 27. At this time, Glock customer service is mainly for warranty issues only.
Before starting on any deep cleaning and inspections, always be sure that the Glock 27 pistol is unloaded and safe to be handled.
Disassemble the pistol into its four main component parts: slide, barrel, guide rod/recoil spring assembly, and frame/receiver. The instructions are in the Glock standard cleaning section above. You now have your Glock in the field stripped condition.
Disassembing the Upper
- You will need a Glock armorer’s tool to remove the slide cover plate by pushing the firing pin spacer sleeve down. This will put the spacer sleeve in the unlocked position on the slide cover. Now you can push the slide cover plate off with your thumb.
- Remove the firing pin assembly and extractor depressor plunger.
- Remove the extractor last. The extractor will drop out when you push down on the firing pin safety.
- Now remove the firing pin safety.
Disassembling the Receiver
- Start off by removing the locking pin. You can remove the pin in either direction. Just remember, when you reassemble the pistol, this pin must be reinstalled first.
- Remove the the trigger pin. Move the slide stop lever or jiggle it to the front and rear of the receiver while pushing on the trigger pin with the armorer’s tool from the left to the right.
- After removing the trigger pin, remove the slide stop lever from the receiver.
- Remove the locking block. Place the armorer’s tool under the locking block and pry upward. Upon reassembly, the locking block will only fit back in one way.
- After you push out the trigger mechanism housing pin, which is located on the backstrap, pull the ejector assembly up and lift out the trigger group.
- To remove the slide lock lever. Turn the receiver on its side. Push downward on the slide lock lever spring to release the slide lock lever. The slide lock lever will drop out of the receiver.
Deep Cleaning and Inspection of All Parts of the Glock
- Now that the Glock is totally disassembled, go ahead and clean all the parts of the pistol. The goal of this cleaning is to remove all the dirt and grime, old lubricants, and anything else that does not belong there.
- While you are cleaning the parts, make sure they are all in good condition and within set standard for each part. If a part is worn, broken, or damaged, it should be replaced at this time.
- After the deep cleaning and inspecting, go ahead and reassemble your Glock.
Reassembling Your Glock Upper
To reassemble your Glock upper, reverse the disassembly steps, and be sure not to over lubricate the Glock upper. Follow the testing procedure in the Glock standard cleaning section above dealing with which parts need testing and how to test them properly. When finished set the upper aside.
Reassembling the Receiver
To reassemble your Glock receiver, reverse the disassembly steps, with the exception of the order installing the locking block pin. Remember, the spring on the slide stop lever must always be under the locking block pin. If you get this part confused, the gun will only fire a single shot, and then the slide will lock back after each shot.
The next pin to be installed is the trigger pin, and then, finally, the trigger housing mechanism housing pin located in the backstrap.
How to Reassemble Your Glock
- Lubricate as directed in lubrication points in the standard cleaning section above.
- Set the upper on the receiver, pull the upper backwards all the way back, and release. This locks the upper and the receiver together.
- Function test the Glock, also as noted above in the standard cleaning section.
- After the Glock has passed all of the function tests, it can be fired again.
Keep your Glock 27 pistol clean and functioning correctly. While this handgun does not require quite as much cleaning a some other pistols, it must still be cleaned and lubricated on a routine basis.
If you cannot do this job yourself, do not hesitate to work with a local gunsmith. Your guns will keep you safe when nobody else will. Keep them close and ready, and practice your shooting skills, learning from the best in the branch! Click the banner below for more!

This article has been written by Fred Tyrell for Survivopedia.
Further Reading
https://www.pewpewtactical.com/glock-disassembly-cleaning-assembly (for standard cleaning)


Your instructions are good… Please have the video “Glock Detail Strip And Reassembly ” removed or redone.. He fails to do the most important thing First as you mentioned.
FIRST remove the magazine and rack the slide back, and ………….look……. carefully to see if there is a round in the chamber. If you see a round, remove it.
With the magazine still out of the well, lock the slide back and ……….look ……to see if the gun is cleared of ammo and safe to work on.
Insert your little finger into the chamber to …..feel…….check the bolt face, chamber and the magazine well to ………make sure ……the pistol has been cleared and made safe.
If the ejector was stuck it could have failed to remove a live round from the gun….Then since he did not First visually and physically verify that the gun was unloaded….When he pulled the trigger……Bang!!
Too darned complicated and fragile. It’s certainly no comparison to the old Colt M1911 for simplicity and toughness.
We used to see who could strip one down the fastest and reassemble it the fastest over a bunk in the barracks.
Glock pistols are durable, reliable,and easy to maintain. That is why they are the preferred choice of the majority of law enforcement agencies in the United States.
Bob doesn’t have a clue with regards to pistol mechanics.
As a leo, isoldier,i nstructor and armorer with over 25 years experience, i trust a glock to protect the lives of everyonE i protect and serve.
Everyone has their favorites Louis.
I still say the Glock is too fragile and complicated just from reading the accompanying article on cleaning them.
As for more modern sidearms than the M1911, my current favorite is the Ruger P-85, which functions like the Walther P-38 and is easy to take down and clean. There are several 9 mm rounds on the market that make the caliber very effective for self defense. For shear knockdown power, the Super Blackhawk is my favorite.
Sorry Bob L but I disagree with you. Most firearm manufactures have guns that are easy to clean and ones that are hard to clean. Not sure what you mean by “fragile,” but my guess is that you actually mean critical in cleaning. The finer machined a weapon is the more critical the cleaning. For example, the 1911 was designed to work in dirty environments encountered by military personnel. Consequently it has to be simplistic in breakdown and cleaning. On the other hand, a SIG P338 was not designed for dirty environments and consequently breakdown and cleaning is more involved.
As for knockdown power, again I disagree. The 45ACP was designed to do heavy damage wherever it hit. On the other hand, a 9mm will not necessarily take a person down in a thigh shot, so the shooter must fire more accurately. Time and distance are critical in all shootouts. Usually you don’t have the time and the distance is short. The question you need to ask yourself is given a CQB situation, will the bullet you use do the job.
Simplest is still best and I offer a couple of examples.
I know a security guard who was issued a Glock, trained in shooting it, qualified with a high score, and one day recently called me to show them how to clean it, other than just a wipe down.. In recent times, a lot more women are buying and obtaining CC permits and they need a simple to clean and maintain firearm, not one that is intricate. A Lady Smith fits the bill far better than most compact autos.
I am also a firm believer that accuracy is more important than volume of fire, especially in areas where there are several people. It bothers me to see a police officer rapidly empty their sidearm in a close encounter as I’ve seen on some dash cam videos. That is panic shooting and dangerous to bystanders. I would prefer a well placed first shot so practice at rapid drawing and placing a single, well place shot is important. A 9 MM is sufficient enough but, if you want more punch, a 357 Mag is a good choice.
the accuracy in shooting has nothing to do with the ability to clean a weapon. The number one problem with most , if not all, shooting courses is that the instructor does not take the shooting through cleaning their weapons first.
When I was range officer for my brigade a batch of our members went over to Italy and while there purchased 9mm Berettas. They ALL brought their brand new guns to the range to use instead of their issued weapon. Our of 50 officers only 1 had cleaned his weapon. The rest still had their guns full of cosmolean. What a disaster that would have been had I not had them clean their weapons first. Aside from not cleaning them, they also did not know how to disassemble them and many of these men had expert marksmanship badges.
You are absolutely right about more women buying guns and obtaining CCW permits. But you are wrong in assuming that women need simple to clean and maintain firearms. It does not matter whether it is a man or woman who maintains a firearm. What matters is the ability to deal with whatever complexity a firearm may have in its cleaning.. I’ve seen members of both sexes who can maintain a weapon and those who have no idea how to do it. In my opinion every firearms dealer should have the buyer dismantle and reassemble the weapon that they are going to buy before the weapon leaves the store.
I’m with you on accuracy vs volume shooting, but that was not my point. My point i that in 9 out of 10 altercations you do not have the time to aim so you must point at the target. This is far better than just drawing a gun and start shooting. The failure of people to hit the target in altercations is that they do not train under stress. and that they do not do continual, regular training. I imagine that in the dash cams you have seen that these were LEOs. Most LEO departments require only annual recertification and no range practice between testing. They also get 20 hours or less of training at the ACADEMY. So it is no wonder that they cannot hit the broadside of a barn.
The 357 is a good round as is the 45. But most people do not like the recoil of either round so they knock it down to 9mm, 38 or 380. The larger rounds can cause injury to both the target and the shooter, especially if the shoot does not have a strong wrist or does not hold the gun properly. I’ve seen more accidental discharges on the range with 357 and 45 weapons than with other smaller CALIBER guns.