


Pottery has been an on-and-off passion of mine since I was in high school. I’m a fair hand at it and have made some pieces that I’m pretty proud of. I’ve explained in another article how to make pots using other methods but today we’re going to talk about how to make and use a potter’s wheel.
The benefit of using a potter’s wheel is that you can create more refined, beautiful, functional pieces that you can use for yourself or for trade. The other methods are perfectly acceptable for creating functional and even beautiful pottery but there’s just something about using a wheel.
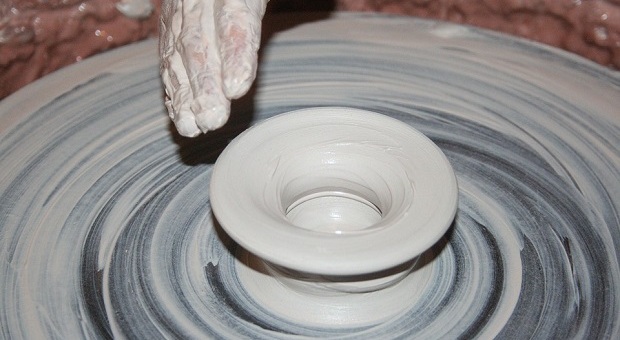
Throwing pottery (what it’s called when you use a wheel), is an art that allows you to make virtually any size or shape of pottery once you get the hang of it. It’s also extremely therapeutic. It takes all of your concentration to throw pottery, so your concerns tend to melt away, and the end result gives you a real sense of accomplishment.
There are two basic types of potter’s wheels: electric and manual wheels. In this article, the focus will be on the manual types because you can use them even if you don’t have power. Plus, I prefer a manual wheel because, at least for me, an electric wheel tends to be more jerky when starting and stopping, and the speed isn’t as easy to control.
There are two primary types of manual potter’s wheels: kick wheels and treadle wheels.
How to Build a Kick Wheel Potter’s Wheel
There are several different ways that you can build a kick wheel but the primary components are a flat plate (bat) to actually work on, and a weighted flywheel attached to the plate so that you can turn it and control the speed. To speed it up, you just kick faster. To slow it down, you just drag your foot on the wheel.
I also highly recommend using a splash pan around the throwing wheel to avoid a tremendous mess on you, the floor, and the walls. This will also save clay waste because you can catch it in the pan and throw the excess back in with your clay or slip.
You can get fancy and build a potter’s wheel with an attached bench, such as the one shown in this instructable, but you can pull up a chair just as easily. The advantage of building one without a bench is that people of different heights can comfortably use it. Of course, if you’re going to be the only one using it, feel free to add a bench!
Another feature that some potters like to have is an arm rest. This helps keep your hands steady as you throw. I found a fabulous, detailed, step-by-step design for a kick wheel that has no bench and an adjustable-height, removable arm rest here. It lists exactly what you’ll need, then it explains with both text and pictures, how to build it.
If you decide to build an arm rest into your potter’s wheel, it should be nearly level with the throwing wheel (called the bat). This is critical because you need to ensure that the clay is perfectly centered on the bat and if your arms aren’t level, it will put unnecessary strain on your shoulders, wrists, and elbows. It will also make it difficult to work the clay properly and get it centered. If it’s not, your piece will end up collapsing on you as you build it up.
I’m currently without a wheel and think that I’m going to build this one myself because the instructions are great and it only costs about $60 total. Just a suggestion though – it’s best to keep this in a garage or a separate craft room because pottery is a super messy endeavor, just like most good projects!
Building a Treadle Wheel
The other type of wheel, a treadle wheel, is still more stable than an electric wheel because you have more control of the speed, stopping, and starting; it’s less jerky. That being said, it’s much more complicated, and probably more expensive, to build that a kick wheel.
You may often see a treadle wheel referred to as a Leach treadle wheel. This is because the most popular treadle design was created by the sons of Bernard Leach, a famous British potter. His grandson, Simon Leach, has posted a series of detailed pictures of each part of the Leach treadle wheel.
I’ve never thrown on one, so I can’t offer an opinion one way or the other on functionality but the design is interesting. I have read that many potters prefer a kick wheel because the bottom wheel is weighted and thus easier to manage because the weight builds momentum and doesn’t need as much energy to keep it going.
Instead of using a pole that directly attaches to the bat, a treadle potter’s wheel operates by adding a reciprocating pedal and a crank for greater control. The bottom isn’t weighted as much as a kick wheel, though potters who use them seem to love them.
The one site that I found with both pictures and plans is great. It actually looks pretty amazing, and the picture is close-up, so those of you who are handy can probably look at it and duplicate it. There’s also a picture of an old set of blueprints that may help. If any of you try this, I’d love to see some pics and a review of how it works.
Video first seen on Nate Cummings.
Regardless of which type of pottery wheel you decide to use, be aware that there’s a learning curve. The first few times that you attempt a pot or a mug, or even a plate, it’s probably going to look like something a kid may bring home from grade school, assuming you actually accomplish and end product.
Don’t worry, though. It doesn’t take long to become proficient using a pottery wheel and I’d honestly recommend learning on a manual wheel instead of an electric one because it doesn’t require the coordination that an electric one does. I’m not saying that you’re going to be a master potter in a week, but you should certainly be able to manage a coffee cup or small pot in that amount of time.
If you do some searching on the internet, you’ll find several different ways to make potter’s wheels from simple household items such as mop buckets. There are also a wide array of instructions for making simple electric pottery wheels out there too, but like I said, I prefer to use the manual wheels. Call me old school, I guess.
Manual devices won’t ever let you down in a case of an EMP, so be prepared and get all the knowledge you can get on off-grid survival. Click on the picture below to find our more about surviving this type of disaster!

If you have any suggestions about how to build a potter’s wheel, please share your thoughts with us in the suggestions box below.
This article has been written by Theresa Crouse for Survivopedia.
Refrences:
http://thepottersplaceblogger.blogspot.ro/2009/08/how-to-build-home-made-pottery-potters.html
http://www.pottery-magic.com/pottery/tools/kick-wheel.htm


")
Comments 1