
In the summer time, when the weather is hot (actually scorching hot in some places), what can be more important than knowing how to build your own irrigation system for your garden?
DIY irrigation systems will save you some of your hard-earned dollars, and they also make for an interesting learning experience. They help you with acquire new skills and that’s a big part of a prepper’s way of life, isn’t it?
Now, irrigation systems are essential whether you’re growing roses in your back yard for winning prizes or what not, or, more importantly, for your survival garden. Hose-watering your plants is quite a chore. You’ll have to move the hose around every 30 minutes or so and then store the hose in your yard afterward etc.; basically it’s a waste of time and resources.
Today’s article is built around a few ideas about DIY drip irrigation systems, as they’re very efficient and simple. As a matter of fact, their beauty is their simplicity, like a Swiss watch. Oh, and they’re also dirt cheap and easy to build using readily-available materials. That’s a huge plus in my book.
Soaker Hose vs. Drip Irrigation System
Taking into account that not all irrigation methods are created equal and obviously, there are quite a few systems of irrigation available, let’s begin with the basics.
While soaker hoses are the most common irrigation method for “amateurs”, i.e. home gardeners, they’re rarely used in commercial gardening for several reasons. One of the reasons is they will end up costing quite a lot. They’ll also cause you more problems than they solve.
The biggest problem with soaker hoses is that they don’t water your garden evenly. Due to their intrinsic design, i.e. they seep water all along the hose’s length, the water delivered at the beginning of the hose will always be considerably more than the quantity delivered at the end of the line; that’s a law of physics folks. Basically, there’s no way of delivering the optimal amount of water for all of your plants using soaker hoses.
Long story short, that’s inconsistent watering and it’s a big no-no for your survival garden, as it leads to rotting in some places (too much water) and your plants dying of thirst in others. Also, soaker hoses don’t function properly on slopes because they’re not pressure-compensating. The maximum length of such a system is less than 200 ft.
Another disadvantage of soaker hoses is that they’re prone to clogging easily and that leads to even more inconsistency over time. When left in the sun, soaker hoses are also prone to damage, as they’ll harden (rubber doesn’t cope too well with UV light) and get brittle in time, breaking over when you’ll need them most.
To make things worse, the soaker hoses are also prone to bursting, making a huge mess and leaking large amounts of water. And yes, a burst soaker hose is pretty hard and expensive to repair if needed, especially if it’s hardened and brittle from sun exposure.
Just check out this cool video about soaker hoses vs drip irrigation; you’ll see with your own eyes what I’m talking about. On the good side, soaker hoses are cheap and fairly easy to install compared to drip irrigation systems.
Video first seen on CaliKim29 Garden & Home DIY.
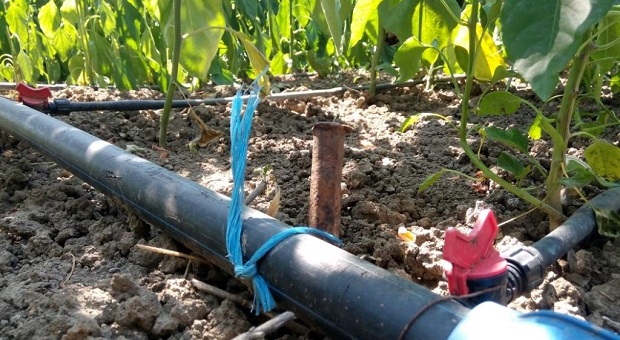
Now, talking about drip irrigation, these babies are built using flexible plastic tubing that features tiny emitters (holes basically) that allow water to drip slowly into the soil.
There are a few advantages of using drip emitters over soaker hoses: they are not wasting as much water as the latter, they’re totally fixable when they break, and even if they require some maintenance, many of the parts are re-usable. They’re one hundred percent repairable, which is very important in my book.
Besides the almost–zero waste of water, a drip emitter puts the water directly where it’s needed, with pinpoint accuracy so to speak. For example, you will be able to space them (the drippers) so the water drips exactly over the root zone of your plant.
How to DIY The Drip Irrigation System
Project #1
Now, let’s see about how to DIY a PVC-made drip irrigation system. Here’s an extremely interesting video depicting the advantages of a homemade drip irrigation system compared to regular flood irrigation.
Video first seen on Utah State University Extension.
This PVC-made drip irrigation system will help you save money, time, and water. A fabulous advantage of using this design is that you’ll be able to reduce water use by up to 75%, and that’s quite a lot, especially in a survival situation. All you’ll have to do is turn it on and forget about it, as it doesn’t require monitoring or supervision.
This system uses water wisely and you’ll end up with a beautiful garden that will provide you with fresh veggies for you and your family all summer long. Also, this project is not expensive: the estimated cost for a 15ftx15ft garden is under $50 and the time to build it is approximately 5 hours. You’ll only need ¾-inch PVC pipe, a drilling machine, and connectors/fittings. These are intuitive to use, user friendly, easy to set up, and lots of fun.
Project #2
The next project is about a small-scale DIY gravity-fed drip irrigation system. The complete plans for the project can be downloaded from here. Here’s a video tutorial depicting the system working and most of the DIY details.
Video first seen on Ross Lukeman.
The materials required for this project are dirt cheap and readily available; you probably already have them lying around your property somewhere. You’ll need a 5 gallon bucket for the reservoir, a drill, garden hose fittings, irrigation tubing, some planks of wood for building the structure that holds the bucket in place (you’ll have to cut them), and that’s about it.
For added precision, you can throw in a digital irrigation timer, which gives you a lot of flexibility because it allows you to do whatever you want. For example, if you want to water your plants every morning at 8 AM with a predetermined amount of water and so on and so forth, you can arrange it; just take a look at the video.
Project #3
Now, let’s talk about the easiest way to DIY a rain-drip watering system for keeping alive a relatively large garden. This DIY project is very efficient. It uses an electronic timer, a back-flow system, and a water filter to prevent clogging. It will help you with your bills and also with conserving water if you’re living in a remote area.
Thanks to the electronic timer, this irrigation system will save you a lot of physical labor, as it will basically automate the whole process and you’ll not have to water every plant by yourself. Also, this system is expandable, adaptable and relatively cheap, and it can be used with basically anything: flowers, veggies or hanging baskets. Take a look at this video and start working.
Video first seen on RedneckResponder.
Project #4
Last but not least, here’s an interesting idea about DIY-ing a self-watering container garden. The main benefit of a container garden is its efficiency, as the plants will draw the exact amount of water required from a reservoir placed below the soil; no more, no less. Also, there’s no loss of water through evaporation.
Video first seen on XoletteLife.
This project will provide you with better-tasting veggies and fruits, as the plants are free to use as much water as needed for optimum growth. The main benefit of a self-watering container garden is its relative self-sufficiency, i.e. you can go on vacation for extended periods of time. As long as you set the hose on a timer, the plants will take care of themselves.
The total cost of this project is about $50, so you’ll not have to break the piggy bank either. Materials required:
- Commander 27-Gallon Tote
- 10′ Orbit Polyethylene Riser Flex Pipe,
- FLEX-Drain Corrugated Pipe with Filter Sock 4″ x 25′
- Apollo 3/4″ Polyethylene Drip Irrigation elbow
- Miracle-Gro 64 qt. Moisture Control Potting Mix
- Apollo 3/4″ PVC Drip Irrigation Female Adapter
The rest is up to you. But remember how important is water for you and your family and do whatever you can to have it!
I hope the article helped. If you have any other ideas or questions, feel free to comment in the dedicated section below. And click on the banner below to discover one amazing tool that any prepper should have for building what he needs for survival!
This article has been written by Chris Black for Survivopedia.


Pingback:How To Build Your Own Irrigation System | NewZSentinel | July 11, 2016
|
Pingback:How To Build Your Own Irrigation System | Survivopedia – deepsouthsurvival22 | July 13, 2016
|