


We, real preppers, tend to be religious about our backpack. At one point or another each of us have fallen victim to every slip-up in the book until we learned our lesson.
Do you remember the mistakes you’ve made when preparing your backpack?
Let’s see what to avoid!
1. Choosing the Wrong Size of the Backpack
Usually, the bigger pack you have, the more tempting it is to fill it up even if you really don’t need those things. What’s next? In case you’re bugging out, you might find yourself leaving behind a part of your pack because it’s to hard to carry it.
That’s why you need to choose the right size of your backpack, and it depends on how much are you able to carry, and also on how long is the trip you are planning.
As a general rule of the thumb, here are some basic weights:
- a 50-60 liter pack is appropriate for 1-2 day trip
- a 60-80 liter pack is appropriate for 3-5 day trip
- a 80-90 liter pack is appropriate for 5-7 day trip
Don’t be mad if you don’t get it from the start, people usually use three or four backpacks till they find the proper size for them.
2. Too Much Weight
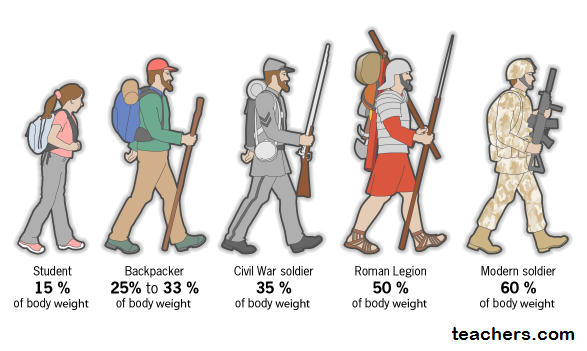
Contrary to conventional wisdom, ideal pack weight for survival scenarios is both relative and subjective: saying that everyone’s pack should be x% of their body weight across the board is somewhat naïve.
That’ why you need to take into account for each of the group member that you belong to:
- the overall fitness level
- lean body mass
- body fat percentage
- physical size
- cardiovascular fitness
- backpacking experience
- level of mental toughness
- determination of the individual.
Taking all of these factors into consideration, target pack weight may range anywhere from 15%-50% of target body weight for your build and height. That’s 15%-50% of what you should weigh.
If you’re overweight, calculating your pack weight based on your body weight will yield a pack that’s too heavy and you will suffer miserably under its weight on top of the extra weight that you are already carrying.
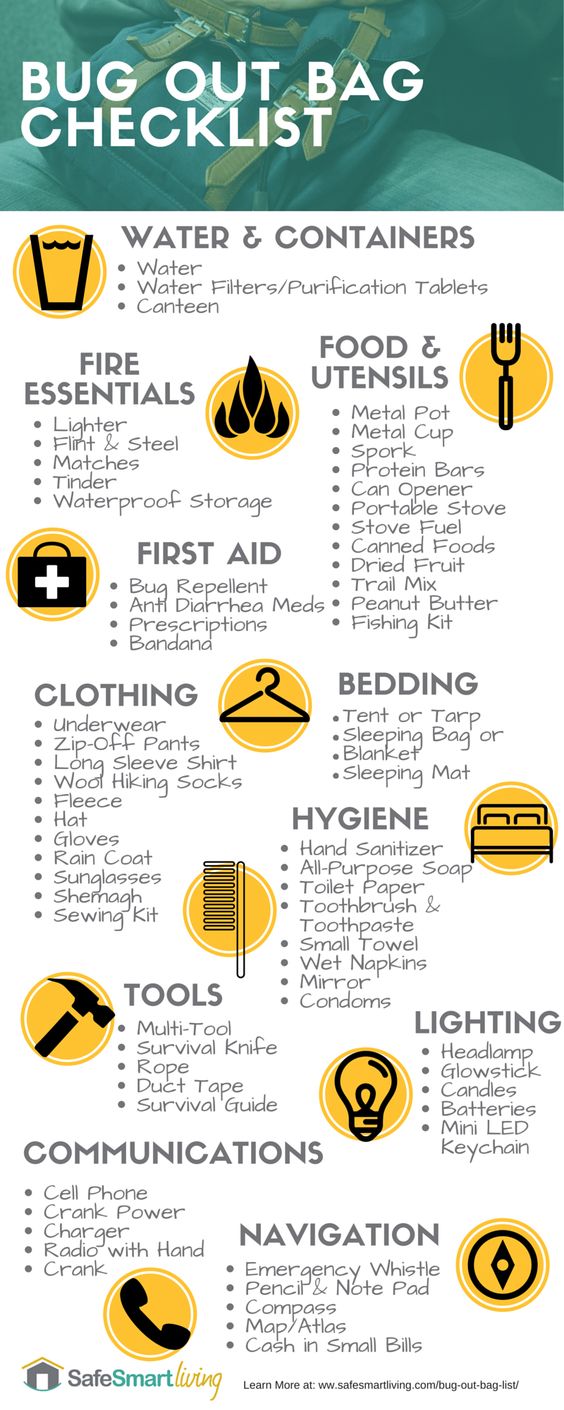
3. Wrong Choices about Items to Carry
There are different lists on what your bug out bag should contain. I will give you one too, but you’re the only one that can decide over how many items should you carry.
And remember: more skills means less to carry.
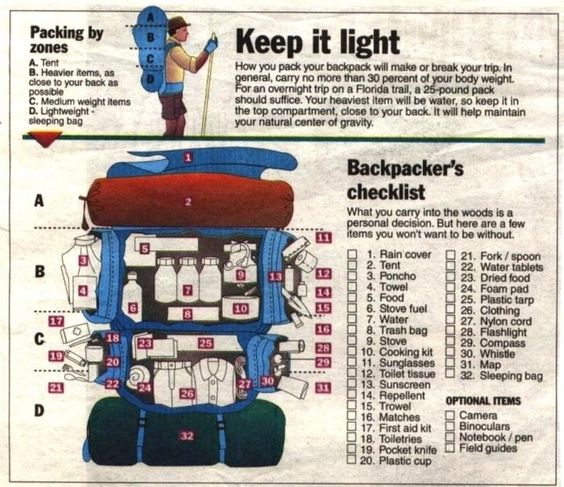
4. Not Having a Balanced Pack
You need to create a balanced pack so you could carry it properly.
Briefly, the core of your backpack is best for heavy objects. If you place them on top, they will make you fall forward, if you have them on the bottom, they will drag you down.
Do you wonder where this mistake comes from? Read the following one!
5. Not Packing Properly
If you have to unpack half of your items to get to the fire starter and prepare your meal on the go, then something is definitely wrong in the way you packed your things. Keep it simple and keep it light!
6. Not Having a Waterproof or at Least a Water Resistant Pack
When you go into the wilderness, things can go wrong and they probably will. For example, you can fall into a water or face a heavy rain for hours. After that, you will definitely need dry clothes and a warm shelter, and you won’t get them if your pack turns into a wet sponge.
Waterproof pack or a water resistant one? Well, let’s see the difference before choosing what’s best for you.
A water resistant pack will keep your items dry when raining because it won’t let the water in. A waterproof one will seal the content inside and will keep it dry even if you fall into a river. And it will be even 30% lighter, as the seams are welded instead of being sewn together.
7. Putting Your Pack On in a Wrong Way
A fully loaded pack sitting on the ground is a load that can harm you if not lifted properly.
Use your legs to lift the load, not your back with straight legs. Get into a lunge position to prepare to hoist your pack, then lift pack and rest it on your bent knee.
Thread an arm through the shoulder strap, swing the pack around and thread your other arm through the other shoulder strap. Lean forward to plane the pack against your back and snug your straps in the same order as you did when fitting your pack.
8. Not Adjusting the Fit of Your Backpack
Start with all straps loos and set the hipbelt on your hipbones, then fully tighten. Pull forward the hipbelt stabilizer straps, and tighten shoulder harness so that it fits over your shoulders with no gaps.
Pull down on the upper load stabilizer straps, and make them snug but don’t tighten too much. Back off a little pressure from the shoulder harness, if needed.
When taking off the backpack, remember to loose all straps in reverse order.
Does it feel better or what?
9. Not Being Physically Fit, but Still Backpaking
Exercises and practice cannot be overrated. How could you carry your backpack on foot if you are not able to walk more than one mile?
All of us get old, but aging is more than just getting a few lines around your eyes; it affects the way you move and the way you think. Being able to move well and think quickly may be two of your greatest tools in a survival situation. Looking young while you’re using those tools is just a bonus!
Exercise doesn’t necessarily have to take place at a gym; you can walk or jog around the neighborhood, do lawn work or housework, or play a sport. Hiking is a great way to get your exercise and to teach your kids survival skills at the same time.
7. Not Caring for Your Backpack Properly
If you don’t care of your pack, it will let you down, which means you need to wash it and store it so you could preserve it for later use.
Wash it by hand and avoid detergent, as it may harm the coating. Waterproof it and use a plastic coat to protect it when walking in the rain, but also to keep the items packed dry.
Keep your backpack in a cool, dry place, and avoid storing it against a concrete wall or floor, because the moisture and the chemicals in the concrete might damage the pack. And avoid storing chemicals in your backpack, for the very same reason.
Did we lose something? Do you have anything to add? Share your thoughts so other people could learn from it!
This article has been written by John Gilmore for Survivopedia.


Hi, thank you for this article. However the two links on water proof back packs did not work, please email me the name of the packs so I may look for them in the internet, Ruben.
I hunted deer in the Ca Sierras for many years. Usually 3-5 miles from the end of road and above 7000 ft. elevation. What went into my pack was as important as what I was wearing and carrying. First thing you did not mention was Polypropylene socks under the regular ones. They prevent blisters/hot spots. Next is a good sleeping bag. I use an old down filled US Military bag with cover. No need for a ground sheet but carry a poncho or plastic sheet in case of rain. Tents are a waste of time and extra weight. Layered clothing is a good idea and in cold weather Gortex will shed rain but it is NOT warm. Goose down even at 5-10 percent fill is light and far warmer. In the bottom of my pack was a section of refrigerator grate. It makes a perfect fireplace level or cooking grill. Food is never in cans but freeze dried and always been tested at home to be sure you like it and know how to prepare it. US Military MREs are useful and light. I generally carried only a water filter, (small pump or filter style), as water is heavy and water sources were everywhere. If not, plastic US military canteens work. I also like the canteen cups, Stainless only), for cooking or collecting water. A small shovel with a sharp edge is useful for cutting fire wood or digging the potty hole. The rest of my pack had a small first aid kit and a good Firestarter. For hunting, the rifle, small amount of ammo, handgun and folding knife were all as light as possible. I did carry a small saw for cutting bone as the meat was all I wanted to carry out. My pack frame was aluminum custom made to haul 120 lbs of meat strapped to it. It is made so an LC-1 pack sack attaches to it. They work. Even the expensive frames will not stand up to lots of abuse like getting your game back to the truck. I like a frame with a belt that puts the weight on my hips. I’ll also admit that I also carried a Globetrotter Gaz backpacking stove in winter as heat could be had quickly. (They don’t make fuel cans for those anymore). Hope this helps with a few ideas and keep in mind I didn’t figure this all out in 2 or 3 trips. If you bring back something you didn’t use in a 5 day trip you won’t need it on the next one.
Let me put in a plug for the pack with an internal frame, which allows better balance and less fatigue.
My hunting partner did three tours in Viet Nam, (101st,3rd, 506th, Delta Co. and used any number of packs and frames from REI, Campmore and Etc. For carrying a lot of weight he used an LC-1 frame and pack. It put the weight on his shoulders and back. He liked the US military equipment. I agree that an internal frame is nice for loads mentioned in the article. They will be more stable on uneven trails or cross country with uneven ground. If you are just getting started in backpacking and willing to spend a bit more on good equipment I would recommend them. Keep in mind my experience is mostly hunting and heavy loads. Many times we made a trip down to the truck with the meat then went back to pull down the camp equipment.
There’s a whopping sized omission in the article that needs addressing. It involves the miracles of load carrying made possible by that thousands of years old invention — the wheel. Take some inspiration from the westward traveling pioneers who couldn’t afford horses or oxen to pull their worldly goods, so they used two-wheel carts to manually pull their possessions clear to the western states. The book “Handcarts to Zion” covers that story well. In modern times, hunters have devised all kinds of carts to haul out game from a hunting trip. Many of those have two wheels on an axle roughly centered from front to back so the axle takes most of the load, and not the hunter. Also, a lot of hikers and campers buy, or make, one or two-wheeled carts to carry much or all of their gear — instead of carrying it all on their back. Their cart may attach to backpack-style straps, or to a belt system, or just to a handheld tow pole. YouTube is full of examples of all kinds of such variations for both the hiker and the hunter, with both retail and DIY versions ranging from dirt cheap to very pricey. The one-wheel designs can go almost anywhere, unless you anticipate some climbing. The two-wheel designs may be a little more limited by the terrain, such as trail width considerations. Lots of very sharp rocks might rule either strategy out. The point is, there are lots more options than just the traditional backpack, even if parts of that strategy may still be relevant.
Great info. You need to teach the Civil Air Patrol about this. We do Search and Rescue and can be in the woods for up to three days. Now you got me tearing my pack apart to pack it right. Thank you very much for this sound and informative info.
I can’t imagine anyone packing canned foods on a multi-day hike. It is a ridiculous weight to carry and takes up unnecessary space. That’s the kind of stuff that stays in my truck at the trailhead or base camp. The best ready-made tinder I can think of is cotton balls saturated in Vaseline. You can stuff three or four of these into an old prescription pill bottle. I agree with G.Ogren – ditch the tent. For regular backpacking outings you will get much more utility and flexibility with a good tarp. One item that always goes in or on my pack is a machete with a 12″ blade. It is far more useful than a hatchet.
Great article, but I agree with others who mentioned the canned goods. Also, I’m not a big fan of fleece. It doesn’t wick very well and I tend to sweat. There are better wickable options to use that are even less bulky. Also, in the past two years, I bought a small solar panel for charging batteries and my cell. They work great and again eliminate extra batteries, etc. Lewis, nice mention of the wheel! I may have to see about incorporating that into my bag.
Good post. Do you mind if I use the info graphic on my site?
Hello, Kenneth.
Thank you for reading us. We don’t mind using it, but would appreciate if you put a reference to our website.
Alex, from Survivopedia 🙂