


If you’re an outdoors aficionado and you go camping often, today’s article will tick you in all the right places, as I will present you, dear readers, with 5 ways to start a self feeding campfire.
Making a campfire is arguably one of the most fun and interesting parts of camping, as it keeps you warm and safe on cool nights, not to mention that it gives you the opportunity to make the best barbecue you’ve ever had in your life.
You know, food cooked outdoors on wood-fires tastes best. However, there’s a downside to this kind of activity. I am talking about the boring job of keeping the fire alive and kicking.
We’ve all been in this situation – sitting and chilling by the fire, trying to relax and all that, when once again, we’re forced to get up and tend the fire. That’s pretty unpleasant when your belly is full of your latest barbecue, not to mention during the night when you’re sleeping like a baby, yet you awake frostbitten and what not.
However, there’s an answer to these problems with regard to camping, and I am talking about a self feeding fire. Think about our forefathers, they were the experts of this basic skill as for them, a self feeding fire lasting all nigh long meant they could take a nap after a harsh journey.
This may sound nothing short of miraculous to you, but I’ll present you with some videos and you’ll see that I am dead serious, as usual.
So, considering that you can’t really enjoy the warm glow from your campfire if you’re forced to constantly feed it with fresh logs, let’s see about some self feeding ideas which will keep your fire going forever and ever.
1. 15+ Hours Self Feeding Fire
The next idea is about a 15 hours-plus self feeding fire, which sounds pretty awesome providing that it really works; i.e. a fire that will burn for more than half a day all by itself, requiring zero maintenance. That almost beats central heating, don’t you think?
The self feeding fire was invented by the pioneers that had to travel for months. We still have a lot to learn about their skills, as they are depicted in Claude Davis’s book “The Lost Ways”, who unearths the long forgotten ways and lifestyles of the ancestors of ancient times.
Discover the ancient secrets that helped our forefathers survive in the wild!
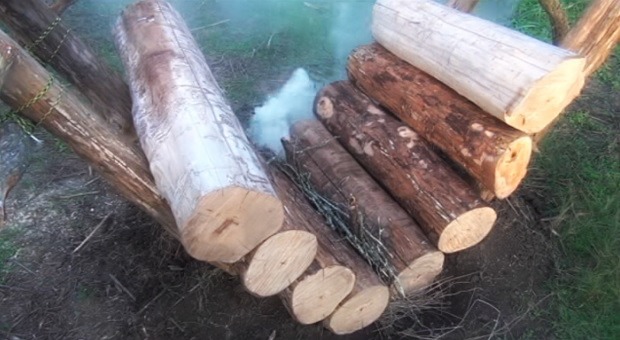
This type of fire will work if you’re doing it right and proper. The idea is that you’ll have to work a little bit in order for it to function, but it will be worth it. The concept is pretty simple: you’ll have to build two ramps opposing each other and load them with big logs.
The logs will self-load as the ones in the middle get consumed by the fire, but check out the video tutorial about this method depicted in “The Lost Ways” book, and see the concept in action for yourself.
As you have noticed, the ramps are constructed in a very easy-to-understand way; there’s nothing fancy involved here.
In order to get the fire started, you’ll have to remember to leave a gap in-between the two logs at the bottom by putting a couple of pieces of dead wood in there to keep them open. In this way, you’ll be able to start the fire, and that’s kind of important.
You’ll also have to cut pretty big (and flat-that’s crucial) logs and the trick is to start the fire from below and make sure the logs burn completely all the way down to succeed.
2. The Upside-down Fire
The second self feeding campfire idea is called the upside down fire. The general idea is that you put the biggest stuff at the bottom, like the big logs, in layers, in a crisscrossed pattern, and as you build the logs up, the woods will get smaller, ending up with the tender pile of the top.
This is a very efficient way of building a self feeding campfire and here’s a comprehensive video tutorial.
Video first seen on NorthSouthSurvival.
The idea works and it’s pretty easy to DIY, ending up with an almost maintenance-free fire which consumes itself from the top down. This method is also known as the fall-down fire.
3. Self Feeding Fire Cigarettes
The third idea is called self-feeding fire cigarettes, just another moniker for a self feeding, long-lasting campfire. The goal of this project is to build a small scale fire as opposed to the previous idea which involves big logs for creating a heavy duty campfire.
So, what we’ll be dealing with here is a minimal campfire, ideal for cooking and lighting your cigars and, you know, keeping the lights on, so to speak.
The concept is to make a hole in the ground and stick 4-5 fire cigarettes (wooden sticks basically) inside, light them up from the bottom and as they burn slowly, the burnt parts collapse under their own weight. This is elegant, very easy to put into practice, and it really works. You must remember to dig out the ventilation tunnels required for keeping the fire alive.
https://www.youtube.com/watch?v=NJg-DCuQB6Y
Video first seen on Redfuel Bushcraft.
4. 18+ Hours Self Feeding Campfire
Next on our program is how to make a long-lasting, self-feeding campfire that will stay alive by itself for approximately 18 hours, give or take (depending on the size of the logs).
First things first: you’ll have to find 2 big logs. The thicker they are, the longer your fire is going to last.
The general idea is that you’ll put these 2 thick logs on top of each other and set a fire in between them using dead/dry debris or something similar. You’ll have to use 4 stakes, 2 on each side of the logs, for keeping the logs from rolling out; something like a safety precaution. It’s best to use green wood stakes, as these don’t burn so well.
It’s important how you set up the fire; i.e. it works especially well if you set up in the direction where the wind blows, as it will fan the fire for you.
Video first seen on coydog outdoors.
5. Finnish Rakovalkea Fire
Lastly, let me present you with a clever system to build a self feeding campfire which is very popular in Northern Europe, in Finland and Sweden respectively, where it’s known as rakovalkea and/or nying.
This self feeding system uses for two notched-out short logs for its base that keep the fire lifted up off the ground for better ventilation, or more oxygen if you like.
The rest of the job is pretty similar to the previous project; i.e. you’ll have two logs on top of each other with the fire being set in the middle. Both the log on the bottom and the one on the top have a flattened edge as they’ll be facing each other, and in between you’ll have to put the combustible materials required for starting the fire.
Two poles are used to keep the logs firmly in place (via nails). But take a look at this video tutorial and you’ll see what’s up.
Video first seen on Far North Bushcraft And Survival.
Click the banner below to discover more long-forgotten secrets that helped our forefathers survive the long journeys in the wilderness!

This article has been written by Chris Black for Survivopedia.


Comments 1