


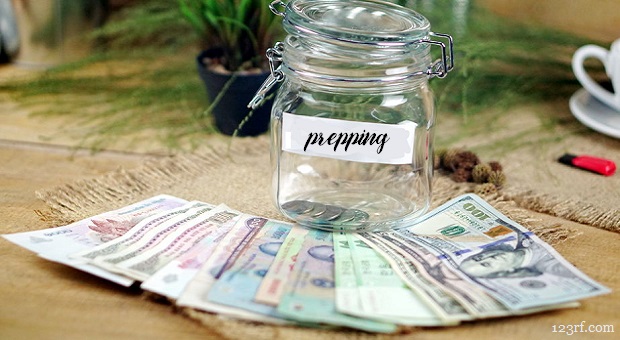
Let’s face it, prepping can get expensive. I don’t care who you are, unless you have a rather sizeable income, trying to be prepared to survive a disaster is going to take e sizeable chunk out of your budget; that is, unless you are extremely careful with your money and know how to make the most of it.
Most of us who call ourselves preppers aren’t wealthy. Oh, there are wealthy preppers; but for the most part, they’re the ones who are buying their survival retreats in New Zeeland or buying a private island.
While they may read some of the same materials you and I read, their idea of prepping is a whole lot different, simply because they can afford to do things that you and I can’t afford to do.
“I would like to see a web page or series on “the Poor Prepper”. I am on social security and have very limited funds. I would like to know what to begin with and where I should put my priorities. I would also be interested in what gives the greatest reward for the money.”
Survivopedia reader
What if you are on a limited income; what do you do then? Is it still possible to be a prepper, even if you’re living on Social Security or some other form of fixed income?
What do You Need?
To start with, we’ve got to understand what we need to have, in order to survive. Otherwise, it’s real easy to get caught up in thinking we have to have the latest survival gadget.
Granted, some of those gadgets are nice, but you don’t necessarily need to have them, in order to survive.
The basic survival needs are:
- Maintaining your body heat – You can die from hypothermia (loss of body heat) in less than 30 minutes.
- Drink enough clean water – The human body uses water for a lot of things; so you can only go about 3 days without water. It has to be clean water too, as many harmful bacteria and other microorganisms can be found in unpurified water.
- Have enough food – You can live about 30 days without food; longer if you’re overweight. But survival is going to tax your energy, meaning that you’ll burn more calories than you’re accustomed to.
To provide yourself with these three basic needs, as well as taking care of some other basics, you’ll also need:
- To be able to start and maintain a fire – We use fire to keep warm, provide light, cook our food and can even use it to purify water.
- Take care of our health – This means treating injuries, treating sickness and personal hygiene, which is necessary to prevent disease.
- Defend ourselves – There are two-legged predators out there, who would like nothing more than to steal what you have, especially in a post-disaster situation.
These six areas are your priorities, so when you make decisions on what to stockpile and how to spend your money, keep them in mind. Your first priority should be to make sure that you can keep warm in the winter. Then that you have a means of purifying water, and then that you have food to eat. The other things come after that.
The Big Challenge, Stockpiling
While you can spend a whole lot of money on survival equipment, you don’t really have to. I’ll talk more about that in a minute. Your real area of expense is going to be in stockpiling supplies; especially food. But with some judicious buying, you can even do that on a tight budget.
The first thing we have to take into consideration is that this is survival, not normal living. That means that we have to be ready to give up a lot of things that we enjoy, for the sake of surviving. Many of the things we enjoy in life are actually luxuries, not necessities. We might convince ourselves they are necessities, but they are not.
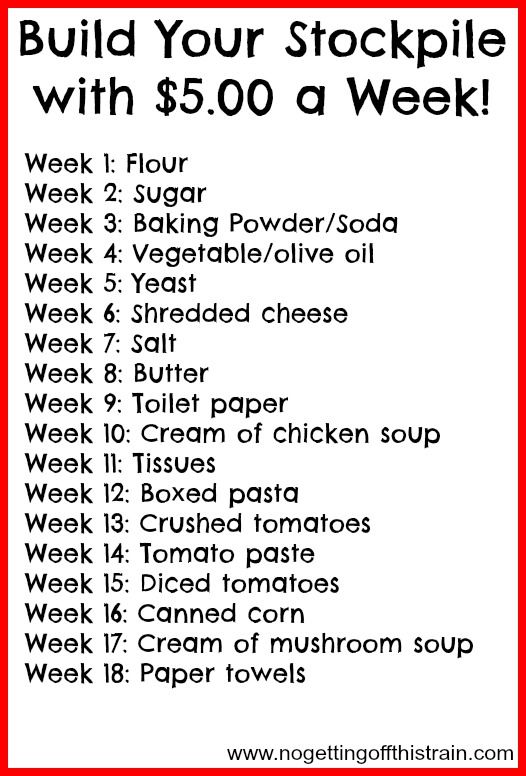
When it comes to building any stockpile, it’s difficult to do it all at once. Rather, try to build a small stockpile and then make it grow gradually. In other words, start out by building a one-month stockpile. Once you have that, work on increasing it to two months. That two months can then be expanded to three; and on and on, until you get to a year, or whatever end point you have picked.
Working on a stockpile slowly allows you to make it a part of your budget, spending whatever you feel like you can afford on prepping. Even if this is only $5 a week, that’s probably more than your neighbors are investing in their future. Five dollars can go a long way, if you use it judiciously.
Building a stockpile slowly allows you to spread the expense over a longer period of time. While you may feel an imperative to do everything right now, that’s really not possible. Rather, work on making your prepping a part of your life, where you are doing it little by little. Remember, everything you do improves your chances of survival a little bit more. So even if you don’t reach all your goals this month, you should be better off at the end of the month, than you were at the beginning.
Stockpiling water shouldn’t cost you anything. You don’t have to buy bottled water to build a stockpile of water. Rather, use the tap water from your home, storing it in whatever containers you can find. Plastic milk jugs work extremely well; but if you don’t buy milk in plastic jugs, you can use just about any sort of closable container, jars, bottles and jugs.
There are many ways you can save on food. Start by taking advantage of sales and coupons, buying whatever you can use that you can get at a discounted rate. Buying in bulk helps with this too, as part of what you are paying for is always the packaging. Just make sure that it is food which will keep for a prolonged period of time.
The most expensive part of building any food stockpile is protein, specifically animal protein. This is the big challenge for most of us. You can start by using other sources of protein, rather than animal protein. Beans are an excellent source of protein and are very inexpensive. So, beans need to become a part of your stockpile.
For the rest, your best deals are going to be buying canned meats. I’ve found some excellent deals on canned chicken, more than any other meat. You can also do extremely well with Spam, potted meat and Vienna sausage. While these may not be your favorites, they will provide you with the nutrition you need.
Make Your Own
One of the best ways of saving money is by doing things yourself, rather than paying someone else to do it for you. I’ve made a lot of my own survival gear, from solar panels to knives, even firearms. This has saved me a lot of money, freeing up that money for other needs. If you’re on Social Security, you obviously have time, so why not use some of that time to make your own survival gear.
Probably the best way of using that time to help you with prepping is to grow a huge vegetable garden and can the produce you grow. I imagine that once a major disaster hits and society breaks down, we’re all going to be doing a lot of gardening. Better to get a head-start on it and preserve some of that food for a time of need.
Make Use of Garage Sales
You can actually find a variety of different survival supplies at local garage sales, if you take the time to look. While you won’t be able to find everything, there are some key items that you are probably going to be able to get a great deal on, at one garage sale or another.
- Candles – Candles are a time-honored source of light, which people have used for centuries. But buying candles in the store today can be a bit expensive. So instead, buy them at garage sales. I find candles there all the time. They can either be used as-is or melted down and remade into more practical survival candles.
- Rugged Clothing – When you’re in survival mode, you’re going to be much harder on your clothes than you normally are. Make sure that you have a good supply of rugged “work clothes,” including some good hiking or work boots.
- Canning Supplies – Canning is one of the easiest forms of food preservation to learn; and it’s extremely secure. If you are going to try your hand at gardening for food, something we all should do, then you’re going to need canning jars. Don’t pay full price for them; you can always find canning jars at garage sales.
- Blankets – If you’re going to be heating with wood, then you may find that you have trouble getting your home as warm as you would like. The way our ancestors handled that was to pile lots of blankets on the bed. Extra blankets can also be put over windows, to act as insulation and help keep your home warmer.
- Food – Yes, you can actually find food at garage sales, believe it or not. Often, this will be bulk food, which is ideal for your prepping needs.
- Gardening Supplies – From pots to plants to tools, you can find all sorts of gardening supplies at garage sales, usually from people who have given up.
- Hunting and Fishing Gear – It’s not uncommon to find camouflage gear or fishing poles at garage sales; ones that people either outgrew or replace with newer ones. That’s fine, you can use them.
For much of my life I was way down there on the income curve. Working as a missionary doesn’t exactly bring in a huge income. Yet even though we didn’t have much, we still managed to prepare for Y2K and other disasters. How did we do it? Following the steps that I’ve just mentioned.
Take them one by one and be ready to make the most out of anything. This is what real survival is all about!
This article has been written by Bill White for Survivopedia.


I would caution about using milk jugs to store water in. There is an enzyme in milk that stays in the jug and makes the water taste bad
I’VE FOUND CASES OF CANNED FOOD I..E..; SALMON, TUNA, CHICKEN, BEANS. Tomatoes, as well as bar soap, dish soap, t.p. tissues, ect. at fleamarkets, very reasonably priced. .flea markets may also have many of the things you mentioned, with prices dirt cheap. Make sure you wash things before you store them and use air tight and rodent/insect proof containers. some grocery stores have reasonable prices during their “case lot sales.” I know a few people brave and strong enough to do the dumpster dive, thing. There are a lot of options.
If I use milk jugs for water, or any other plastic jug, how should I wash the jug and how often should the water be replaced.
definitely wash the jug well and allow to air dry. When you put water into jug, put a post it note or stickey on it with the date. As time goes by, use the oldest water to water your plants and replace with fresh water. I replace mine yearly, one jug each week or so , this way I do not run up my water bill.
NO-NO-NO ! NO Milk Jugs ! They are All “Low-Density Poly-Ethylene” – Shelf life : 3-5 Mos. Even Vinegar Jugs are “High-Density Poly-Ethylene” – Shelf Life 15 Yrs. Take the time to STERILIZE them Thoroughly.
Good stuff. I would also add dehydrating foods. You don’t need to buy a dehydrator. Just use a warm, dry place with plenty of air circulation. An old window screen with a piece of sheer synthetic fabric over it works great – such as an old sheer curtain. (Thrift shops are a good place to get the materials.) Slice the food thin and lay it out to dry. Or use the oven, but don’t turn it on; put a light bulb in and crack the door open, to keep it around 80-90 degrees inside. Cover the racks with sheer fabric and lay the food out on them. I like to put a piece of foil under the fabric on the bottom rack, to protect the food from scorching if it’s too close to the light bulb. Some stores have a mark-down area with food that is no longer beautiful, but still OK. You can get lots of produce very cheap and dehydrate it. To rehydrate, pour boiling water over it and let it sit overnight, then use it in a stew or soup. You can also dehydrate meat and fish. Watch for sales and markdowns. Dehydrated foods will normally keep for about a year.
Before you throw things away, see if you can repair or re-purpose them. For example, I save worn-out cotton rags, stuff them into an empty tuna can, pour hot paraffin over them and use them as emergency burners, for cooking outside on the barbecue or in the fireplace. Old cotton sheets can be made into dish towels and cleaning rags, or cut into strips to be used in the garden to tie plants to stakes. Use cotton flannel to make handkerchiefs instead of Kleenex. It’s way cheaper, it’s nice and soothing on a sore nose, and it uses a lot less storage space.
Also, network with others. For example, if you grow vegetables, trade with people who raise animals. Barter instead of using money.
If you can, turn the power and/or the water off and see how well you do for half a day, a full day, then a weekend, etc. Practice using your strategies when there is no emergency, and refine them if you see shortcomings.
I Use white vinegar Jugs to store water. Just rinSe Them well and put a date on thEm. I have some jugs that are over 5 years old. I’ve never had one leak like WhiMpy milk jugs will eventially do. I use reverse osmosis water and just keep adding to my collection. I plan to drink thE fresheSt and use the older water for other uses.. keep your freezer full of reused jugs of all sizEs Full of potable and or tap water. We take them out if we Need the room. Your freezer runs cheaper when full. Also if your electricity goes out put some in your FrIg to help preserve your food longer. AlwaYs Keep pure bleach on Hand if you want to make sure your water is free of bacterIa.
Make a solar dehydrator. Heat collection box to heat a room or the dehydrator. Long shallow box with a glass cover. Fill with metal or chunks of rock and paint the interior mat black. Vent heat into the dehydrator or the room to heat. A nice easy simple dual purpose item. Dehydrator is a wood cabinet with wood runners for screen shelves. Heat enters a bottom and vents moisture out at top through a few holds cut or drilled near the top of the box.
Also dry cut fruit or chopped onions on a clean sheet layed out in the sun. Natives dry thin sliced meat or fish on a simple rack in the sun. Today we tend to over complicate things.
to store water, and other food or drink survival items, in plastic containers look for the recycle code on the container. (usually on the bottom) you’ll find a triangle with a number ther.e; look for number 5. its commonly found on food containing packages, often juice, ketchup, soda pop bottles, etc., things like that. while number 5 recycles poorly it is a breakdown resistant plastic and will hold up to microwaving, holding boiling liquids, acidic foods, etc.
make sure it isn’t bha or bisphenol a type of plastic, it will say that on the package if it has that in it. don’t use these packages.
a recycle code number 5 is safe for long term storage of food or drinks, water, etc.
remember that water will be used for hygiene, washing, rinsing, sanitation and other purposes besides food preparation and drinking, and this is where milk cartons have the advantage. use screw-on caps instead of push-on lids. always store water in a cool, dark place, and rotate it out yearly; any potable water source is fine and boiling or adding 4 drops of regular bleach per quart and letting stand for 30 minutes will kill most pathogens.
Clergylady, I don’t understand your box to heat a room. Do you have some photos?
I use the 2 liter coke bottle to store some water. I clean the bottles really well, add the water and put a couple drops of clorox in there to keep any bacteria from forming. I do in fact use the water I prep. First in first out. I ALWAYS REPLACE WHAT i USE SO i HAVE PLENTY IN STOCK. tHIS ALSO KEEPS THE WATER ROTATED. i DO THE SAME WITH CANNED FOOD. iT IS WISE TO USE YOUR PREPS AND REPLACE THEM AS YOU GO. tHAT WAY YOU ALWAYS HAVE A FRESH INVENTORY.
http://knifearmory.ecrater.com/
You can also ‘can’ water- will keep it it for years, in glass jars (mason,etc) and will
alleviate the plastic/ contamination issue. Check out You Tube for directions.