When a crisis hits, battered old sneakers, high heels, bedroom slippers, or other flimsy footwear will not be of much use. Your ability to travel over long distances and over rough terrain will be greatly shortened if you do not have good quality shoes or boots that your feet are accustomed to.
Are there any secrets on how to choose your best footwear for survival?
Yes, there are a few, and you are going the right way for finding them if you’re reading this.
4 Types of Shoes to Choose When You Need to Walk a Lot
Whatever you choose, your footwear should be made out of heavy duty materials, and be comfortable to wear for a long time. Anything less could bring the wearer nothing but pain and suffering.
There are 4 basic types of footwear to choose when thinking about what to wear while hiking. They are trail sandals, trail shoes, mid weight trail hiking boots, and heavy weight hiking boots.
- Trail Sandals – You can safely hike in these sandals if you are on a well groomed trail. The average trail sandals have no support for the foot and ankle, which makes them useless for rough terrain.
- Trail Shoes – Are a great option if you are hiking in hot and dry climates on well-established and maintained path ways. The use of these shoes on rocky terrain should be discouraged.
- Mid Weight Trail Hiking Boots – For those who plan to hike for more than 1 day in rougher than normal terrain, sturdier higher cut boots will protect your feet and help stabilize your ankles.
- Heavy Weight Hiking Boots – These boots are generally used for cross country backpacking or traveling over very rough terrain. Although some people like the new lighter boots, others prefer older style heavy built boots.
The best boots to wear for all terrain in a survival situation would be the heavy weight hiking boots. These boots will give the wearer good ankle and foot support and can be used in all terrains with confidence and safety.
Just remember, though, your feet, legs, and ankles will need to adapt to these boots. No matter which brand you choose, failure to walk in them on a regular basis is the fastest way to ensure you will suffer with sore muscles, blisters, and other foot problems once you resume using them.
Typically, walking two miles per day with 20 – 50 pounds in a backpack will give you good leg strength, and also ensure you know how to take proper care of your feet, legs, and back; plus resolve problems before they cripple you.
What You Need to Know Before Buying Your Boots
There are 7 basic parts of a boot: the sole, upper, inner, insole, tongue, scree collar, and lacing.
They can be made in natural or synthetic materials.
Sole
The bottom of the boot that is responsible for gripping the ground, absorbing the shock of walking, keeping sharp objects from penetrating the bottom of the boot, and cutting the foot. The sole must be stiff enough to support the foot, but flexible to allow a natural walk.
Deep sole patterns made of hard rubber will grip better on hard slippery surfaces and will sink into soft muddy ground to increase your grip.
Upper
This is everything above the sole. The upper part of the shoe tightly holds the sole to the foot and also protects the foot from cuts, twisting, and pounding. The welt is where the sole and the upper meet and are firmly attached together.
The upper should be water proof yet allow sweat to breathe out.
Today, many people buy shoes made from synthetic fabrics without making sure the shoes breathe properly. This is one of the fastest way to wind up with fungal infections, blisters, sores, and other serious foot problems that can prevent you from walking for days on end.
Typically, you will know within the first day of wearing new shoes if your feet are sweating too much, or too much fluid is building up in the shoe.
Don’t rely on foot powders or other drying agents to take the place of a good quality shoe that breathes properly.
Inner
Padding and linings are built into the inside of boots to increase comfort and help with moisture protection and control. Padding also provides insulation and helps reduce pressure points.
Insole
Your feet stand on the insole. The feet should fit the insole exactly for proper support. A good arch support is very important because it braces the foot arch and keeps you from getting flat footed.
Once the arch of your foot flattens out, you will lose flexibility and experience foot fatigue much faster than before.
Tongue
The cover for where your insert your foot into the boot. The tongue allows the boot wearer to adjust a snug fit of your boot.
Scree Collar
Is located around your ankle area of the boot which is padded to keep loose dirt, sand, and other debris out of your boot. The scree collar should fit snugly to work properly.
If you tend to get blisters on your heels, or have sensitive skin, pay close attention to the scree collar. Even a half hour of walking in boots with an abrasive scree collar can lead to painful sores that will prevent you from wearing the boots for several days.
If you cannot tolerate a high scree collar, look for a lower cut shoe or make sure that you know how to pad areas that develop sores easily.
Lacing
Laces (boot strings) are placed on top of the tongue to tighten the fit of the boot. They can be made of natural materials such as braided leather or synthetic materials like braided nylon.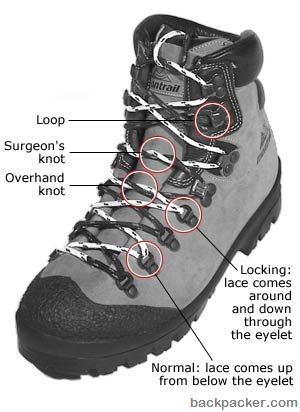
There are 4 ways to protect the necessary holes punched through the upper to assist in snugging up the tongue and getting a good fit in your boot. They are punched eyelets, webbing, D rings, and hooks.
- Punched Eyelets usually reinforced by metal grommets.
- Webbing uses loops of fabric attached to the upper.
- D Rings metal loops riveted to the upper.
- Hooks are open backed pieces of metal in a hook shape that is riveted to the upper. Often used on the top 3 or 4 eyelets for Quick lacing.
The 5 Rules for Choosing the Right Boots
Basically, the following 5 criteria will help you in choosing the right boots:
- The lighter the boots, the less your legs work. Keep the boots as light as possible, but still keep the support and protection of heavier boots.
- The boots must be waterproof and also made of materials that let the sweat escape, but will not let water in. If there is water in your boots it can cause smelly feet and blisters.
- Arch supports keep your feet supported and comfortable under a load. If your feet have no support, they will flatten and make long walks or hikes very painful.
- The boots must protect the wearer from twisting their ankle and stubbing their toes. The rougher the terrain, the more important ankle protection becomes.
- When you are carrying a heavy load, your boots should protect your feet from bending too far forward or backward while still allowing the wearer a full range of motion.
Still, there are common mistakes that people do when choosing their footwear.
Usually, they are trying to save money by buying a cheaper grade boot, with no arch support, or even not breaking the boots in. They do not do their research on the type of boots needed, or let a sales person change their mind to a different boot than originally chosen.
In trail sandals make sure all foot straps are sewn together, not glued together. Gluing is not as strong as sewing the straps together. Have no toe or foot protection. Do not use off well groomed short trails. Use only on short day trips. Do not forget to break these sandals in to reduce the chance of blisters.
In mid weight trail boots be sure the boots have good ankle and arch support. If not the feet will become tired quicker and ache sooner. These boots must be well broken in for about two weeks before going on the trail or face bad blisters and other foot problems.
In heavy weight trail boots the lighter boots have their following, but I prefer the heavy duty leather boots. These boots will generally last longer and are stronger. On the trail there’s no time to find out that your lighter style boots do not cut the grade and fall apart leaving the wearer with sore and bleeding feet! As always break these boots in for a couple of weeks before you hit the trail to avoid getting blisters.
Let’s see a few other mistakes that are usually made:
- Padding in the toe and heel of the boot is not conducive to keeping a good fit in the boot. The longer you wear the boots the more the padding will compress and change the fit of the boots.
- Do not use foam insoles because they will compress and lose their support.
- When using punched eyelets with grommets in the upper, be careful not to rip out the grommets. This can give you a poor fitting boot.
- Webbing loops of fabric tend to wear out causing a poor shoe fit.
- D rings riveted to the upper tend to make painful pressure points on the top of the foot.
- If your boots use hooks to help assist in lacing, these hooks can fray and cut the boot laces over a period of time. Replace the boot laces when they first begin to fray.
- Do not forget to waterproof all hiking or survival boots. If you do not, the boots might shrink to a smaller size, which will cause great pain when you wear them.
- Do not forget to keep a second pair of well broken in boots with you on long hiking trips. I would rather have that little extra weight than to have to travel on damaged bloody blistered feet. You must take care of your feet on outback treks or suffer the consequences.
- When crossing streams or rivers, it is advisable to change out of your boots and put on rubber water sandals to protect the boots from being submerged in water during the crossing.
The 8 Criteria to Get the Best Boot Fit
OK, you found the perfect boots, and you are about to buy a pair thinking that you’re going to wear it till the end of the world.
Do you think that it’s over? NO, because the hardest part of getting any boots is getting a good fit. Your foot and the boots will mold to each other over time during wearing.
- When you buy the boots, concentrate on how the boots fit not the size. There are many standards of sizing a boot: US sizing, European sizing, and the Asian system.
- Always try on the boots with the exact style of socks that you will be wearing on the trail.
- The boots should feel snug, but not too tight with no pressure points felt.
- Before you try on any boots at the store, walk around for 10 – 15 minutes in the late afternoon or evening. Your feet size changes many times during the day depending if you have been sitting or walking. This will prevent you from buying boots that you think fit you correctly, but wind up being too tight after even a small amount of time hiking or walking.
- A quick test to see if the boots fits right is to unlace the boots and put the correct foot in each one. Then while standing push your feet forward until your toes reach the toe of the boot. There should be just enough room to place your index finger between your heel and the back of the boot.
- Move your heel back to the rear of the boot and lace the boots up snugly. Walk around for a few minutes to try out the boots to see how they feel.
- Remember that your toes do not ever touch the front of the boots. If you kick your toes into the floor, the front of the ankle and the top of your foot should take the force. The toes should not hit the inside of the boot’s toe section. If your toes hit, then your toes will take a continual pounding while hiking downhill, which can be very painful.
- To test to see if your heel will slip, hold the heel down with the toe section of the other boot. Now try to lift your heel. If it moves more than 1/4 inch there is a good chance that when you hike you will get a blister on the heel. You may try another size or look for a different type of boots with a different heel cup and arch design.
The 7 Issues About the Quality of the Boots
When examining the new boots, take your time. At the first glance they may look like what you are looking for, but on a second glance may be nothing more than a poorly made pair of boots that will not last the test of time.
When examining boots carefully check for the 7 criteria that will help you to determine their quality:
- When looking at the stitching, look for missing stitches, loose threads, and the neatness of construction of the boots.
- The welt should be tight with no spots that look loose or weak.
- Look at the leather thickness of the boots. There should not be any thin spots, cuts, abrasions, or uneven edges.
- The tread should be thick, tough, and be solid. If the tread is spongy and soft there is a good chance that the tread will wear out quickly in about two or three weeks.
- Check eyelets for durability and strength.
- Use braided nylon rather than flat boot laces.
- Check the smell of the new boots, they should have a nice clean smell of new leather, not the odor that something had died in the new boots.
Do You Know How to Care for Your Boots?
Today boots are made of many different materials. It is wise to use the manufacturer’s proven way to clean and care for the boots.
There are 6 quite simple rules for caring for your boots.
- Always break in your new boots. Walk around in them until you feel comfortable in them.
- Always store the boots in a cool dry place. To keep the boots from absorbing moisture, put crumpled up newspaper in them. To keep them in shape and soft, take the boots out and wear them every month or so as a minimum. Just remember, though, your feet will need to adjust to the boots all over again if you do not use them on a regular basis. This can be as painful as it was the first time you broke them in.
- Make sure that the boots have new laces in them before setting out on any hike.
- Dry your boots gradually in warm dry air. Never dry them by a fire or other high heat source. The high heat can destroy the glue, ruin the leather, and cause you to buy a new pair of boots because they are no longer good for further hiking use.
- After each trip always clean and thoroughly dry the boots. Use the manufacturer’s recommended conditioners to treat them. On leather use oil or wax. On synthetic materials use silicon based products.
- Before any trip always apply another coat of conditioner on the boots. Coat and work the conditioner into the boot seams to improve the water resistance.
Most people believe that it is simple and easy to buy a pair of hiking boots. In reality it is not. If you go shopping without doing your homework you will either get taken, buy the wrong kind of boots, or pay way too much for them.
Before you buy the boots you must know what type of terrain you will be hiking, know your skill level, and know how to maintain the boots.
Knowing the parts of a boot will also help the wearer understand how all of the individual parts work together to protect the wearer from damaging their feet and make their hiking experience safe and enjoyable.
This article has been written by Fred Tyrell for Survivopedia.




eastofaustin | February 19, 2015
|
I blew the post tibial tendon in my left leg three years ago. I had my foot totally rebuilt and was essentially off my feet or on some type of support (knee scooter, walking cast, surgical brace, crutches, custom orthotics, and finally a cane). It was really a bummer. I’ve got two plates and four screws and half a heel bone in that foot. It cost me my job. I was denied disability because I’m too highly educated and my insurance companies said there were many things I could do sitting on my butt–just none within 50 miles of where I lived. I ballooned up 25 lbs. I moved and lived on savings for a year while waiting to reach retirement age. Not good.
THEN, I found my Research Tactical Khyber model boots. When laced tight, they provided support to the part of my ankle that was in constant pain when weight was put on it. I bought one pair of Desert Tan rough outs. Then bought two pair of black leather. They have essentially given me new life. My feet still hurt when I push it, but I’m walking my dog, working, cutting my own grass, hunting (dove and deer), gardening, and working in my shop. Finding the right boot is critical, and I’m thankful that I went to a store with knowledgeable people in their boot department (Top Brass in San Antonio.) My boots are better than my doctor fitted braces, because the medical device tries to put equal pressure everywhere, and the boots put pressure just where I need it.
Kerry | February 19, 2015
|
Great article. Can’t stress actively wearing boots enough – my son and I argue whether it is the boot or the foot that actually “breaks in.” In my presentations I immediately eliminate the lightweight options by showing photos of broken glass, sheared rebar sticking out of broken concrete, and nails poking out of splintered wood. Since these are common items to navigate after a disaster, there is little question in my mind that a heavy boot is the right answer. Also, I like the “lace-to-toe” option in boots as this allows a little adjustment if I wear heavier socks in cold weather.
don simmons | February 19, 2015
|
One thing NOT mentioned is the possibility of getting good USED military boots already broken in. such as – http://www.sportsmansguide.com/product/index/mens-used-german-lowa-mountaineering-boots-black?a=504873
I have used similiar for years and am VERY happy with the cost reduction for a great quality boot.
Stu. | February 19, 2015
|
Hi Preppers;
Another thing no one has mentioned is training your feet to allow travel over rough terrain barefoot. This obviously does not work in the winter snow. However American Indians walked or ran long distances with no more “support” than moccasins. There is a tribe of Indians in the Copper Canyon area of Mexico that are phenomenal long distance runners barefoot. They have won Ironman 100-type events barefoot. When the Australian Aborigines go “on walkabout”, they do so barefoot. I am now 74, and my feet are soft. As a kid (to at least 18) my feet were sufficiently conditioned that I never wore shoes in summer. I hiked in the woods, could run on new-mown hay fields (sharp stubble), and actually walked (by accident) over broken glass, without getting cut. I also did some rock climbing while barefoot, and was not disadvantaged in comparison to climbers in Vibram soled boots. I’m not trying to run down the article on boots, which is a very good one. Just saying sometime it may come down to conditioning your feet to go barefoot, or learning how to make your own boots!
Cheers! Stu.
vicki gibson | February 19, 2015
|
One product I like for boots is Mink oil. It is waterproof for winter wear and summer rain. Also, I would get water resistant but breathable leggings such as those found on the Coast of BC. Those are great in keeping the upper boot dryer and also your legs up to the knee, where most of the brush gets you! Anyway LOVE this article and will put it on hand for reference for my own supplies. I wear heavy steel toed leather boots and I have hiked in them all day without any problems, of course they are also very expensive boots with proper support for all day walking. Even in winter, however one does have to watch the steel toe part for anything long distance in winter…as that gets COLD, so don’t wear them then. Thank you for all the great advice above, about time to have this information as many I see simply do not pay attention to their feet!! They can be geared to the max, with flops for shoes…I mean, really!????LOL Oh well, maybe they will read this and get that last bit of gear in place:)
BREARBEAR | February 20, 2015
|
ALWAYS BE PREPARED
TO SHANK IT!
_________________________________
“Shank’s Mare: Scottish slang dating from the eighteenth century. There was a verb, to shank or to shank it, meaning to go on foot.
_________________________________
“Your clothing is the most important survival tool you have. Dress properly and any emergency you may have to endure becomes more manageable.”
Mors Kochanski
~i would like to humbly add to this Mors quote, by saying…
that your Footwear; (Boots and Sox, AND Boot Kit/Foot Med Kit),
is your MOST important survival Clothing Tool you have.
~All other Clothing items can be fairly easily expediently improvised, compared to Survival Boot making.
For a few ideas on Expedient Clothing, See:
http://www.oism.org/nwss/s73p926.htm
~Boots, Sox, Boot Kit including Laces and Foot Medication; (Mole Skin, Etc.)… are one of the foremost important items i Cache.
~Have Multiples and Think Redundancy.
~i have many boots (“worked in and ready”, and kits, and plan on having many more stocked and Cached away.
~Buy the best quality:
” Buy once, Cry once”.
~Remember to have All Season and Climate types.
Steel Toe Rubber Boots are great,
as are Steel Toe Work Boots.
(The Civilians Combat Boot).
Including a super warm Snow Boot is Wise.
~ Footwear can be Homemade;
Research expedient ways.
~It takes Practice and Skill, and the right Tools…to make a
Mukluk or Moccasin.
_________________________________
BE FIT.
“Walking is the best possible exercise. Habituate yourself to walk very far”.
Thomas Jefferson
“Those who do not find time for exercise will have to find time for illness”.
Author Unknown
“Everywhere is within walking distance if you have the time.” Steven Wright
“Walking makes for a long life”.
Hindu Proverb
_________________________________
LOAD CARRYING
~Practice walking and hauling weighted loads.
~REDUCE and Refine the ITEMS in your Load Carrier/Back Pack.
~Skills are more important than “Stuff”!
~ Research Light Weight Back Packing.
~ Practice Camping out IN The BUSH.
~ Companies like M.S.R. manufacture High Quality, Light Weight Gear.
“You can’t carry as much as you think you can if you haven’t been out there actually carrying it”
Author Unknown.
“The more you know, the less you have to carry. The less you know, the more you have to carry.”
Mors Kochanski
“Backpacking: An extended form of hiking in which people carry double the amount of gear they need for half the distance they planned to go in twice the time it should take”.
Author Unknown
“On a long journey even a straw weighs heavy”.
Spanish Proverb
_________________________________
“Keep your powder and socks dry”.
Author Unknown
Brear
P.S. Thanks Fred, keep the awesome
Articles coming please Sir!
gene | February 21, 2015
|
Enjoyed this read. Although I cannot walk worth a crap do to bad knees; i love hiking, hunting, and backcountry camping. Since i know i will have to hole up ever other day or so to let the swelling of the knees go down; i have to pack for a 72 hour hike even for a day hike. I want to try to eliminate as much other discomfort as possible. So finding a good quality pair of light weight boots has become sort of mission for me.
Pingback:How To Waterproof Your Clothes And Shoes | Survival skills, survival guns, survival guide | March 8, 2015
|
Pingback:How To Waterproof Your Clothes And Shoes | The Prepper Dome | March 8, 2015
|
Pingback:Winter Projects For A Man’s Hands | Prepper's Survival Homestead | January 4, 2016
|
Pingback:Survival Skills To Learn From Eskimo People | Family Survival Headlines | February 24, 2016
|
Pingback:Quick Guide For A Comfortable Shelter | Prepper's Survival Homestead | June 5, 2016
|
Pingback:Quick Guide For A Comfortable Shelter | | disasterdefense.us | June 6, 2016
|
Pingback:The Definitive Bug Out Bag Checklist That You’ll Ever Need | July 11, 2016
|
Elah Elam | February 19, 2017
|
Thank you for your much needed information.
New 2 Prepping.
matthew montes | May 1, 2017
|
hi preppers!. This is indeed a very nice post. You can learn a lot from here. I just want to know that if you like this post you might also like my article about the best hiking boots.
Pingback:Survival Skills To Learn From Eskimo People | Survivopedia | November 8, 2018
|
Pingback:Dressed to Survive: The Rules Of Survival Clothing & Accessories | Survivopedia | March 1, 2019
|
MarkBrooks | July 18, 2022
|
Thanks for a great read! Personally, I’ve had a decent amount of hiking and trail boots and I can definitely recommend 3 brands that were time-proven( at least in my experience): Danners, Kenetreks and Garmonts. As of right now I’m using Garmont Tacticals for the last 2 years and It’s been a blast! Great thick sole, good heel support and overall comfort even after walking for hours. What I’d like to add to the list is either waterproofing your prepper boots well or having a pair of rubberized boots. Most of the trail and hiking boots have decent water protection, but if you going to end up in a strong rainstorm or swampy area – your feet going to get wet really quick. For that part I’m using a pair of basic Muck Boots https://gritrsports.com/muck-boot-company/ and it does the trick. Just like with your primary boot, you can go cheaper and get a 20$ pair of rubber boots at nearby store, but paying a bit more will net you an excellent pair of boots. Don’t skimp on those or enjoy walking with blisters after 20 minutes