


One of the fun parts of being a prepper is making your own survival gear, gadgets and home projects. For those of us who consider ourselves do-it-yourselfers, there’s a real joy in making things; being able to make things that can help us survive also provides a very real satisfaction. Making knives is especially satisfying, as well as being a useful skill, providing a useful survival tool.
As we all know, a knife is the single most important survival tool. We all strive to find that one knife, which is the perfect combination and can be used for all our survival needs. In reality, no such knife exists, mostly because different blade shapes and sizes are useful for different things. Chefs don’t have just one kitchen knife. Following that example, it really makes more sense to own several knives which are created specifically for each purpose that we might need, along with a general-purpose knife or two.
Buying all those knives can be rather expensive, especially if we’re going to buy quality knives; and it really doesn’t make any sense to buy knives that aren’t quality. It is actually cheaper to make them yourself, which also gives you the opportunity to experiment with knife design, as well as the bragging rights to say that you made it yourself. So, the question is, how do you make a knife?
It Starts with an Idea
Before even looking for metal to use, you want to sit down and draw out the shape of the knife you want to create. Actually, you want to draw out a bunch of knives, experimenting with design, until you come up with something you really want to make. Your pattern can be on paper, but I like to put them on thicker cover stock. It’s easier to trace around the cover stock, than to trace around ordinary paper.
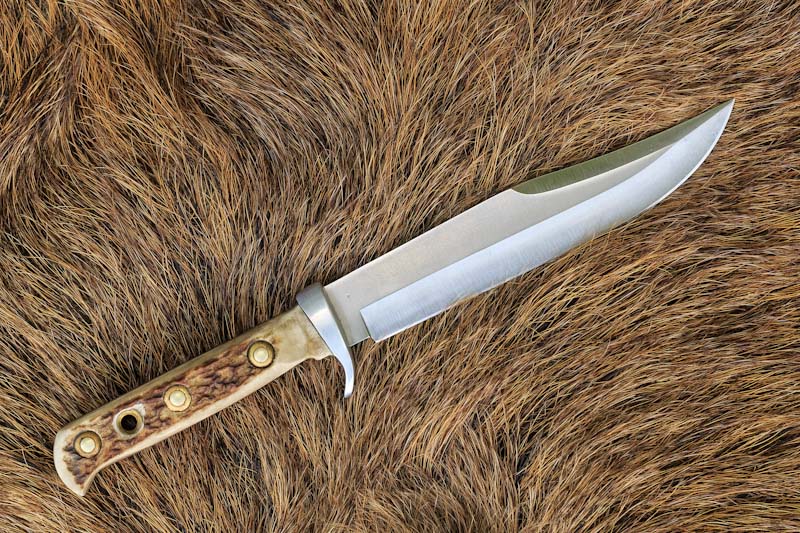
One thing you definitely want to do is to make your design a full tang knife blade. The metal from the blade needs to extend all the way though the handle to give it strength and keep it from breaking off. This does not mean that the tang has to extend all the way to the outer edges of the handle, but that’s what’s most commonly done.
You’ll Need Some Metal
Making any knife starts out with a metal blank. Blacksmiths are able to forge those blanks and factories start out with blanks they get from the foundry. You and I don’t have those options, although it is possible to buy knife blanks online. It’s even possible to buy Damascus steel knife blanks. If you’re looking for a pretty knife, that’s something you might want to try; but if you’re looking for functional, you’re better off with other steel. The Damasus steel they sell today is more decorative, than the stuff of fame and legend.
Besides buying knife blanks, there are a few really good sources to consider. You want a good tool steel or spring steel to work with. These can be found either in old blacksmith’s rasps, leaf springs from cars or old saw blades, such as circular saw blades. The saw blades are only useful for thin blades, as they aren’t very thick; but there are some places where a thin knife blade is really useful.

It will be necessary to cut a blank out of the available metal. This is usually best in two stages. The first stage is a rough-cut, to get a piece of metal that’s roughly the right size. The pattern can then be traced onto that, so that the knife’s outline can be cut.
So, how do you cut the steel to make a knife out of? If you have a band saw, don’t try it. Even the best band saw isn’t going to work. You’ll need to use abrasive cutting, specifically abrasive cutting with a blade or grinder wheel that’s made for cutting metal. Most DIY knife makers use a right-angle grinder, although a cut-off-saw is easier for a lot of the cuts. Cut-off saws are available for considerably lower cost than miter saws, because they are less complicated.
One thing that’s extremely critical about making any knife is to avoid overheating the metal. As long as the metal doesn’t overheat, it retains its temper. But once it overheats, it will need to be tempered again. If the metal turns red, it’s too hot. So, the secret is to cool the metal by quenching it in water or oil, as soon as it starts turning red, before it reaches that point. As long as you consistently quench the metal while working on the knife, you won’t need to re-temper it.
Grinding the Blade Profile
Once the knife blank is roughly cut, transfer the pattern to the blank. This can be done with a marker or scribe, but it may be hard to see while you’re working on the knife. Your best bet is to use Steel Blue Layout fluid, which can be purchased from any industrial supply, Amazon.com or Ebay.com. Brush it onto the metal and allow it to dry (it’s fast drying). Once it is dry, lay the pattern on the blank and go around it with a scribe, making as bold a line as you can.
It’s easier to grind the outline first, before working on tapering the blade. This can either be done on a bench grinder or belt sander. While people who make knives all the time use some pretty fancy belt sanders, with some pretty fancy prices, I’ve successfully ground knives on a 1” wide, $49.95 belt sander from Harbor Freight (actually, I think it was $39.95 back when I bought it).
Grinding the Blade
Tapering the blade is the touchiest part of the operation. It can either be done on a belt sander or bench grinder. In either case, you need to verify that the table or stage is exactly perpendicular to the cutting surface, before starting. Use a good square for this, making whatever adjustments are necessary and locking the table or stage in place.
The basic difference between using a belt sander and using a bench grinder is the blade profile you end up with. A belt sander will provide a flat grind, while a bench grinder will provide a hollow grind. I’ve done both, and it is harder to do the hollow grind on the bench grinder.
Start by marking the midpoint of the material thickness, providing yourself a guideline to work towards. You’ll also want to mark how high up the sides of the blade you’re going to grind, as well as how far back from the point. Once again, it’s best to do all this marking with the Steel Blue Layout Fluid for maximum visibility.
Most knifes have a 17-to-20-degree bevel, between the two sides. If a sharper bevel is desired, the knife is usually only beveled on one side. A 20-degree bevel means 10-degrees on each side. So, a support block will be needed that will hold the blade at this angle. This can be made of scrap wood, preferably a hardwood. Don’t try holding the knife by hand, as it will be all but impossible to hold it at a consistent angle.
To use the knife support, attach the blank to it with double-sided masking tape, covering as much of the knife blank with tape as possible. The heat from griding will soften the tape’s adhesive, hence the need to use a lot of tape. Lay the base of the support on the stage or table and move the blank up to make contact with the belt or wheel. Then move it back and forth, grinding the blade.
The real key here is how you move the knife blank. You want to be grinding the entire cutting area of the blade on each pass, not working on one area and then moving to the next. Working on the entire side at the same time is necessary to create an even bevel along the blade. It also helps in preventing overheating of the metal, as the various points along the blade have time to cool during each pass. Stop often and quench the blade to keep it from overheating.
You aren’t actually going to be grinding all the way to the center line, but stopping just short of it. The final grind will be done by hand on a coarse whetstone. However, the closer you can get to that center line, the less you’ll have to grind in your micro-bevel.
You can either do the hand grinding and sharpening at this point, or wait until the grips are mounted to the blade.
Making the Grips
Knife grips or scales can be made from a variety of materials, but they are most commonly made from wood on homemade knives. Use the tang of the handle itself as a pattern for the scales, as your final knife blade might not match your original pattern exactly. Cut the handles slightly oversize, so that final shaping can be done after they are mounted to the blade, ensuring a smooth contoured surface.
The mating sides of the scales must sit flush on the sides of the blade. Before mounting them, check their fit and plane or sand them as necessary. To attach the scales to the blade, two to three holes will need to be drilled through them and the knife blade’s tang. These need to be perfectly aligned and sized for drive pins (preferably brass, but other materials can be used) to hold them together.
It will likely be extremely difficult to drill these holes through the knife blade, as the metal is hardened. Use a drill press, if available. That will help prevent bit wandering and provide you with more leverage. Take your time, working up from a smaller drill bit and using oil to lubricate and cool it.
Once the holes are drilled, the drive pins can be used to attach the scales to the sides of the knife blade. In most cases, you’ll want to use some adhesive as well, such as epoxy. Allow the adhesive to fully cure, before cutting off any extra pin length and beginning to shape the knife handle.
Depending on the design of the handle, it can be shaped with a router, mounted in a table, a belt sander or a drum sander. The most important thing is to make it smooth and comfortable in your hand, while removing any burrs that might scratch or cut you. Sand everything smooth and finish the wood with either varnish or clear epoxy.


A knife doesn’t necessarily have to be made of steel. Bronze (an alloy of copper and tin) was used for thousands of years. Most hardware stores sell low carbon steel bars and rounds, usually 1018. Carbon can be added after the blade is shaped by a type of case hardening. It can then be hardened and tempered the same as any simple high carbon steel. The method used during the early Iron Age is explained in this video (https://www.youtube.com/watch?v=V_Mp1fNzIT8 ). If done correctly, it can produce a blade with a hard steel edge and soft iron core, which will improve toughness and shock resistance. Will such materials perform as well as modern steels? No, but if you need a cutting tool and ordering one from Bass Pro is no longer an option, they’ll do the job.
I get the need to look for varied subjects for publication on survival blogs but, okay, I’ll just say it and then I will duck.
Making knives belongs in an article on a hobby blog, not on a survival-oriented blog, at least for the types of survival blogs that are intended for those preparing for the need to endure desperate times. The subject might be of use to an Alaskan homesteader who is looking for a way to keep himself busy while living mostly shut-in over a long winter. For the mass of readers, however? Not so much.
Since we are wa-a-ay past times where we made our own furniture or wove our own cloth, only survivalists/preppers who have a whole lotta time on their hands would ever need to make a knife. In reality, doing so out of necessity just isn’t going to happen. The time, effort, and expense of gathering all of the tools to fabricate anything but the crudest bladed instruments just make no sense. Even then, how many people would proudly present their products for other people to admire/purchase/use/barter? In our society, “homemade” is not something that has much appeal to others unless the person making it is a master craftsman.
In the movie, “Gettysburg,” Jeff Daniels’ regiment has delivered to it several mutineers from another regiment. These soldiers had enlisted for three years. Their enlistment was completed, yet the Army refused to discharge them. As a result, they refused to fight. Daniels’ makes his pitch to them about duty, the future of the country, what they’re fighting for, etc., etc.. etc. They decide to fight. His sergeant then points out to Daniels that they have no muskets. Daniels tells him to just wait a little while. “There will be plenty of muskets later.” (The audience gets the morbid implication.)
In the same fashion, after a major societal collapse/disruption, there will be plenty of knives available, just as there will be plenty of clothing, plenty of cooking utensils, and plenty of raw material obtained from no longer functional metal and other finished goods. Their prior owners will no longer need them.
Most survivalists/preppers would be better served if they spent their time on other aspects of preparedness. We live in a society where numerous skills our ancestors possessed have been lost as a result of specialization. Except for a tiny percentage who have modest requirements, we don’t build our own houses. We don’t build our own washing machines. We don’t weave our own cloth. We don’t shoe our own horses. We don’t even make our own shoes. We let specialists do these things because: 1.) they will do the job better; and 2) our results would likely be less than adequate; and, 3) it is more productive to spend time learning how to replace finite items which we will ultimately exhaust. Knives, at least good ones, last a very long time. Better to buy a Cold Steel or Ka-Bar blade (or two, or three) now than to spend 15 hours making a crude alternative, or to spend weeks or months making something presentable to others and of competitive quality with the “store bought” knives.
The simple fact is that our great grandchildren might need to know how to make knives, but not the overwhelming mass of people living today. Worry more about how to make decent soap, growing vegetable varieties in raised bed gardens, or raising chickens.
We need an article on how to make knives when the grid goes down and there’s no electricity. You can operate bench grinders and belt sanders, etc. without electricity. A video would be nice to go along with the article.
Ignore that survivormann. Keep doing what you are doing. If he is not happy here, he can do his own thing somewhere else.
Exactly. I guess it hasn’t occurred to him that the exact same skills apply to making arrowheads, wood chisels, replacement parts for all sorts of tools, even making your own firearms. Such skills are perishable; it takes practice to maintain and improve them. The one thing that a natural disaster (or a government, at least for now) cannot take from you is knowledge.
Melt plastic or grind a piece of wire like in the prison