


Sandbags, sand, polyethylene sheeting and tools to fill and tamp sandbags are good to have on hand in case of emergency.
They enable you to adapt to change by constructing a flood barrier, erecting some ballistic cover, a windbreak or even build an expedient fallout shelter. Sometimes sandbags even get used to provide ballistic protection to vehicles or to provide traction to rear-wheel drive vehicles in foul weather. If the vehicle gets stuck, sandbags can be removed and placed on the road surface to provide traction.
Because sandbags are inexpensive and don’t take up much room empty, so they are easy to cache onsite at a bugout location or recreational property. If you end up living in a tent for a while, a windbreak constructed of sandbags can keep blown snow from building up and caving it in.
Projects constructed with sandbags are generally for short term use because modern sandbags are made of polypropylene and sunlight causes them to start falling apart within a couple of years. However, for projects where a more durable, longer-life building material is needed, mix ten parts sand or soil with one-part cement. If burlap sandbags are used, the cement/sand mixture can be mixed and placed dry and them sprinkled lighted with water. Sandbag structures can also be painted with cement slurry to protect them against UV light, rot and abrasion.
Another option is to sheathe sandbag construction to reinforce it and protect it from direct sunlight and abrasion which eventually compromise sandbags, allowing sand to spill out. Concrete-impregnated fabrics are another option that enables a rapidly constructed flood barrier, fighting position or shelter to be reinforced very quickly. The concrete-impregnated fabric is wetted and then dries solid, containing the sandbags and enabling them to withstand considerable punishment.
When the pioneers arrived out West, the first permanent shelters they built were often dugouts. Concrete sandbags can be used like masonry to construct a solid dugout shelter that makes use of passive solar design features to keep itself warm in winter and cool in summer, in much the same way that earthbag homes are constructed. Most of the building material can typically be gathered from the building site or nearby, cutting both cost and environmental impact. And the structure stops bullets, so that’s a plus!
Filling Sandbags
Most of my sandbag and flood prevention training has come from FEMA though the CERT program, so that’s where this is coming from if you’d like to follow up or receive hands-on training. Filling sandbags is an operation best carried out by two or three people. While filling sandbags is a straightforward process, large numbers of are typically needed, so the process must proceed both quickly and efficiently.
The equipment required to construct a barrier is sand, sandbags, a shovel, poly sheeting and any PPE (Personal Protective Equipment) worn, such as work gloves, work boots, eye protection and hard hats. If you have a tamping bar, it can help tamp sandbags in place. If you have access to a couple of pickups, ladder, a knife and some old traffic cones, you can construct funnels, which can speed the process considerably.
Lay the ladder horizontally, supported by the tailgates of the two trucks. Cut off the traffic cones about halfway up, turn them upside down and place them in the ladder to create a row of supported funnels. An improvised sandbag filler will make sure that the sand goes in the bags instead of on the ground. Many counties and cities have automated sandbag filling machines, bag holding racks and large funnels that mount on the backs of vehicles that speed the process greatly and save labor, but these are a luxury that they typical survivalist is unlikely to have.
Ideally, the fill for sandbags should be clean, washed sand. If good sand is unavailable, gravel or soil can be used in a pinch, but they will diminish effectiveness somewhat.
To fill sandbags, one person should hold the sandbag open on the ground, while a second individual deposit sand into the sandbag. Where most sandbagging efforts go wrong is that they overfill sandbags. For sandbags to create an effective barrier, they must be between ½ and 2/3 full. If they are filled beyond 2/3’s, they will compromise the integrity of the barrier. A third party stacks the filled sandbags.
The sandbags do not need to be tied, in fact, they’ll form a tighter seal when stacked in a barrier if they are not. Nevertheless, they can be tied if the sandbags are going to be transported or stored for some reason.
 Body Mechanics & Safety
- A sandbag weighs 30-40Lbs so lift with your knees, not your back
- Keep your elbows close to your sides when filing sandbags
- Wear gloves to prevent your hands from blistering or getting worn raw
- Move sandbags by forming a passing line
- When using a passing line to construct a barrier on and incline, place taller personnel at the end farthest from the barrier
Passing Line
Arrange the people in the passing line so that they are staggered and facing each other to reduce physical exertion. To form a passing line, have your team form a line, then count down the line, “One, two, one, two …” until your reach the end. Have the “one’s” take a step back and then have the “two’s” turn and face the “one’s.” Your staggered passing line is formed.
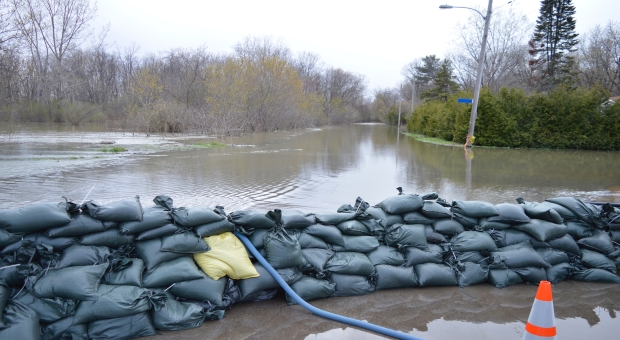
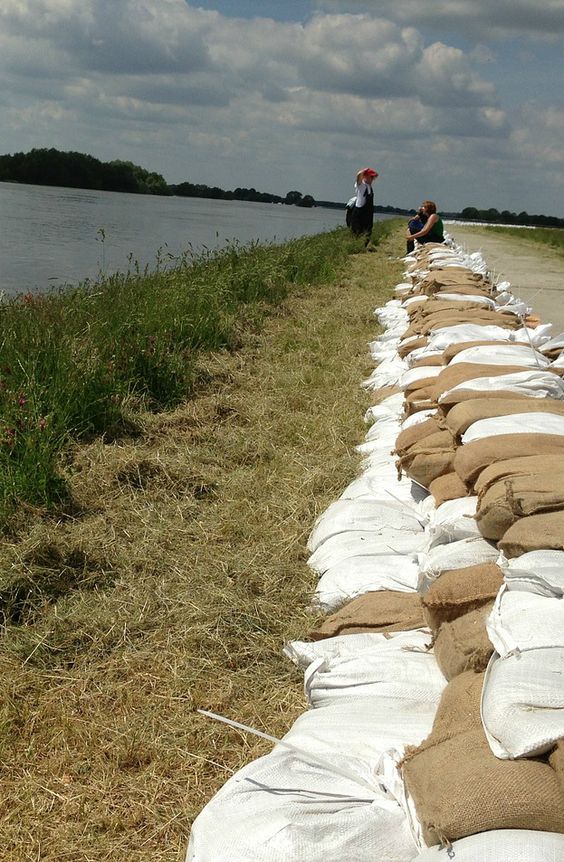
Constructing a Sandbag Flood Barrier
- Determine placement of the barrier.
- Remove any debris or objects from the area where the barrier will be built. If necessary, also trim back brush or branches to prevent injury while constructing the barrier.
- Dig a trench two sandbags wide and 4”-6” deep where the sandbags will be placed.
- Lay poly sheeting flat in the trench with the long tail of the sheeting in the direction of the water.
- Lay a row of sandbags over the poly sheeting to hold it in place.
- Sandbags must be laid both lengthwise and parallel to the direction of flow of the water.
- Sandbags must overlap each other, once again paralleling the flow of the water.
- The filled part of each sandbag should be laid atop the unfilled part of the bag that preceded it.
- Lay a second row of sandbags perpendicular to the first layer, staggered like brickwork, to eliminate gaps. Successive rows of sandbags should be laid over the seams of the sandbags beneath them.
- Fold the poly sheeting back over the row of sandbags anchoring it and anchor it again with another row.
- Fold the poly sheeting back over the second row of sandbags anchoring it and out of the way so you can build them barrier.
- Lay additional layer of sandbags with the openings in alternating directions. Offset each row of sandbags by one half bag length.
- Stack the sandbags in a pyramidal wall in a 3-to-1 ratio of width to height which provides optimal structural integrity.
- Once each sandbag is placed, tamp it in place to eliminate gaps and to form a tight seal against other sandbags. If you don’t have a tamping bar, this can be accomplished by walking back and forth on the sandbag and the ends of the sandbags it butts up against. Remember to stagger the sandbags and to tuck bag ends underneath the next bag.
- One the barrier has achieved the needed height, fold the poly sheeting back over the top of the barrier and anchor it with a row of sandbags.
The pyramidal structure of the resulting flood barrier can contain fast-moving water and water carrying debris. A sandbag/poly barrier will not keep 100% of the water out, but leakage is often manageable with some pumping.
Sandbags should not be placed on top of manhole covers. Instead, ring manhole covers with sandbags and allow the water to seek its own height.
Sand boils should be only partially ringed to reduce the flow of water and movement of soil. Do not attempt to dam the flow of water from a sand boil.


Good article. I expect that just about everyone reading this article who doesn’t live in a flood prone area where sandbag use is common will have learned something. I did.
About laying a ladder across the tailgate of two pickups, this would seem to require that a second person hold a bag while it was being filled, at least I would think so. How about if the ladder was placed lower to the ground so that the bottom of the bag was in contact with the ground for support? Four pincer-type clamps could hold the bag in place while both people shoveled sand, thereby speeding up the process. Good idea, or not?
When I was in Kodiak in the Coast Guard, I ran into makeshift bunkers constructed of sandbags filled with concrete and then laid like bricks. The bags had long-since rotted away, but the contents mortared really well with that of the other bags. they literally welded themselves together! I’m not sure if this would work with the plastic sandbags, as they don’t seep as much.
My thoughts on sand. Storing it and using it.
1) Sandbags, of course. Many of their uses will be listed.
2) Partial floor or large hole filled with sand in root cellar for moisture control and drainage.
3) Container filler for certain items kept in a root cellar
4) As a primary element in water treatment systems
5) Used in sandbags as radiation shielding
6) As a component in concrete
7) As a floor in wilderness shelters and buildings
8) As a groove and gap filler for flagstone or stepping stone floors
9) As a floor in caves
10) For sanding paved parking lots in icy conditions (not sure about using it on roads when it can no longer be replaced)
11) For finishing stone articles (used like sand paper)
12) For a very few types of casting molds. Mortar sand and regular sand is not the same as green molding sand.
13) Making glass (the more pure silica sands are best)
14) As part of a stove: Fill a metal pan with a thick layer of sand, pour in a cup or so of gasoline, and carefully ignite. Have another, larger pan or lid to set over it to put it out. And having an even larger metal pan filled with sand to put the stove pan on is also a good idea.
15) As a fire base. Preferably contained with a pan or other structure, a thick bed of sand can be put down as a safe base for a fire on top of things that will burn or melt.
16) To make sand filters for underground storage runoff water drains to prevent contaminates from entering surface water and ground water.
17) Dry mortar sand can be used as a cleaning agent for pots and pans, dishes, and utensils. Used dry the sand can be wiped out. Used with a bit of water, a little water will be needed to rinse the last bit of sand off of the items.
18) Dry mortar sand can also be used to scrub the hands and body parts that have become covered with grime. Be careful of sensitive areas, however.
19) As part of an escape tunnel hatch. Dig down at the end of the tunnel a short distance. About a foot or so below the level of the grass at the surface build a platform the size of the vertical tunnel and brace it carefully. Fill above the platform with dry mortar sand and place the sod over the sand. Keep it well watered until the sod takes hold and is growing well. If the escape hatch needs to be used, remove the platform brace to allow the sand to fall down into the cavity at the end of the escape tunnel. You can then push up through the sod carefully with a small periscope and if the area is clear you can push up through the sod and do whatever is necessary.
20) Used to make non-electric heating pads. Fill sewn up leather or cloth bags of various sizes and fill with clean dry mortar sand and finish off with stitches or a tie. Heat until warm to the touch, but not more. Too hot and they will burn the patient.
21) Use to make a Zeer pot cooler. A Zeer pot is simply another form of evaporative cooling. Two terracotta pots, one smaller than the other, are used. Put down a layer of wet sand in the larger pot after covering the hole in the bottom. Set the smaller pot inside the lager pot and fill the space between them with wet sand. Cover it with a damp cloth and re-dampen the cloth and the sand when required to maintain the inside temperature.
22) Make a sturdy table with a plywood or tight board top. Add a wooden rim around the table about one and a half to two inches high. Fill the table top with sand to create a sand table for use as a planning and mapping aid when it is necessary to illustrate various types of information.
23) Use sand, with some clay and some potting soil with a little water and add a variety of seeds to make seed bombs that can be distributed throughout an area to help create an edible and medicinal plant resource.
24) Use as pre-dug hole filler. If there is any likelihood of needing a hole, a trench, a ditch, a pit, or other in-ground cavity at some time in the future and the ground is not easy to dig, or will freeze in the winter, it would be advantageous to pre-dig at least some of those now, when time and power tools are available. Use the dirt in raised beds or to make defensive landscaping features. Fill the holes back up with good clean sand. They can then be quickly dug back out when needed much more easily than if digging them fresh and possibly under harsh or dangerous conditions. If the hole will not be refilled, the sand can be used elsewhere.
Those are just some of the uses for sand. Following is a list that is both a list of more uses, but also of ways to store as much sand as possible as the uses are a form of storage. Anything and everything that can hold mortar sand in quantity is set up and filled, and then whatever the regular use is, those parts are added.
1) Such as large planter boxes around a home. Not only can they hold a tremendous amount of sand, and the planter pots set in the top, but they are excellent anti-ramming barriers. If planted with thorny plants they can add some security. Or food plants can be grown in the pots.
2) A very large, roofed, children’s sandbox can be built. Instead of a few inches of sand inside, a much deeper hole can be created and filled with sand. The roof keeps most water out so the sand will be easy to extract.
3) Use a deep layer of sand inside containment edging for a safety area under and around swing sets and other play areas.
4) Basketball backboard pole supports can be filled with sand.
5) Large individual planter pots can store a great deal of sand, and again, a smaller pot inside will hold the plants
6) A flagstone patio, instead of a couple of inches of sand underlayment for the stones, can have a foot or two or more of sand. When needed the stones can be removed and the sand scooped into sandbags, which, along with the flagstones, can be used to add radiation protection to a shelter area or to provide ballistic protection to the lower parts of a home.
7) If you have dogs or other pets that need a run, have half of it or so be a deep sand pit area. You may need a fence down into the ground for some dogs to keep them from digging out, but the sand will make waste cleanup easier, and the pit can store a huge amount of sand for certain uses where the animals waste will not be a detriment.
8) Use sand (where applicable) instead of earth for defensive landscaping elements, and for other creative landscaping elements.
9) If you live on an estate, a farm, a ranch, or other larger property and occasionally do various projects around the place, it would justify have bins, much like those at building supply stores, only well covered, with various building products such as a couple of grades of sand, various gravel sizes and mixes, and other bulk products. Many of these would be handy to have besides just the sand, depending on what happens in the future. Many of them could be very hard to come by. If nothing else, put down sheet plastic and/or tarps an keep any leftover sand, gravel, bags of Quik-crete, and the like, that were not used in outside contractor building projects. (Side note: If you use concrete for a project, have some molds and forms ready for the concrete contractor to fill and finish with the leftover concrete in the truck. Paving stones, steps, parking blocks, etc.)
10) Do have quite a few sandbags already filled and stored in a protected area to prevent their deterioration by sun, rain, and cold. Preferably with some of them already loaded on a large wheeled cart for immediate use.
You really cannot have too much quality sand around a place. Anywhere and everywhere you can find, or make, or figure out, store as much good sand as you can.
Also keep a large number of sandbags and two or three manual scoop sandbag fillers. The purpose made sandbag fillers make it far easier and much quicker to fill sandbags by one person than even two people, with one holding a sandbag open and the other filling it with a shovel. The filled sandbags could be critical at some point.
Just my opinion
Has anyone tried the flat ready sandbags that absorb water, they are pretty pricey but are alot more storage friendly and would require less labor? I just wondered if they work!
Sure they work, (expressed in dry sarcasm!), 12 solid years as British flood warden, has taught NEVER AGAIN will I take these bags on planners say so. Well intended, householders (very politely) told me that they had floated away downstream & their homes under 3 feet of water. Please avoid at all costs, UNLESS you can put heavier conventional sandbags on top of them.