


You’ve worked hard all year to grow your crop.
You’ve preserved enough food of your harvest to get you through winter. You’ve chosen and harvested your seeds and dried them, and now have them safely stored back for winter. Or so you think.
There are a few details that you need to pay attention to if you want to have viable seeds come spring and that’s what we’re going to talk about today.
Dry Your Seeds Well
Hopefully you have a beautiful supply of heirloom or open-pollinated survival seeds just waiting to be planted next spring, so let’s make sure that they make it that long.
The first step in protecting your seeds in the winter is to make sure that they’re dried properly. If you put your seeds in storage before they’re adequately dried, they’ll mold and be worthless.
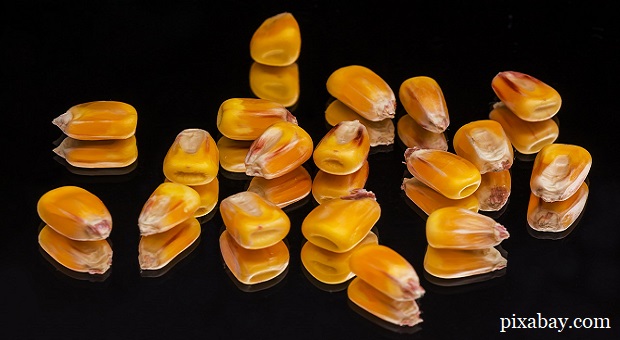
So how do you tell if your seeds are dry enough? Easy. They will have zero discernable moisture in them whatsoever. Pumpkin and cucumber seeds will snap in half rather than bend. Tomato seeds won’t have any of that gooey layer left on them and when you press your nails into it, it should be firm.
Corn and beans should be hard – you should need a hammer to break them. Pay close attention to the seeds as soon as you dry them because if you see any condensation inside of the bag, take them out immediately and dry them some more or else they’ll mold.
You Can Freeze Seeds
Freezing is actually part of the life cycle for many seeds. It drops from the plant in late summer or early fall then lies under the snow all winter. When the weather gets warm and the temperature of the soil increases, the seed begins to sprout. It’s just the nature of things.
Seed banks store all of their seeds in temperature-controlled, refrigerated or cryogenic chambers, so it’s perfectly fine to refrigerate or freeze seeds as long as you do it properly. The main issue that you have to worry about is moisture. You went to a ton of trouble to dry them. The last thing you need to do is reintroduce moisture back into them.
That’s why you need to break out your cryogenic chamber. What? You don’t have one?
Well luckily, you won’t need one because a home fridge and freezer are just fine. In fact, refrigerating them extends the viable lifespan of seeds considerably and freezing extends their viability to at least five years, and some as long as twenty.
There are a couple of tricks to storing seeds no matter whether you choose to freeze or refrigerate them or not. We’ve already discussed the first step – drying the seeds well. The second step is making sure they stay dry, so you need to store them in an air-tight, water-tight container. A freezer bag is perfectly good for this as long as there are no holes.
Storing Your Seeds
 Next, you need to store them in a cool, dry place.
You don’t want to risk moisture reaching your seeds and you don’t want the temperature to fluctuate. Storing in a warm area decreases the lifespan of your seed.
Now that you’ve got the seed in a good storage bag, you want to store them somewhere that the temperature will remain fairly constant.
A cellar is good for this, as is a cool pantry as long as it stays cool.
Freezing is better for this than refrigerating, especially if you’re using your home fridge/freezer that has other food stored in it.
Another good idea is to put it in a chest freezer or an outside fridge that has a freezer that you rarely or never use.
There’s no better way to ensure a constant temperature than to keep them stored in a freezer that’s only opened a few times a year.
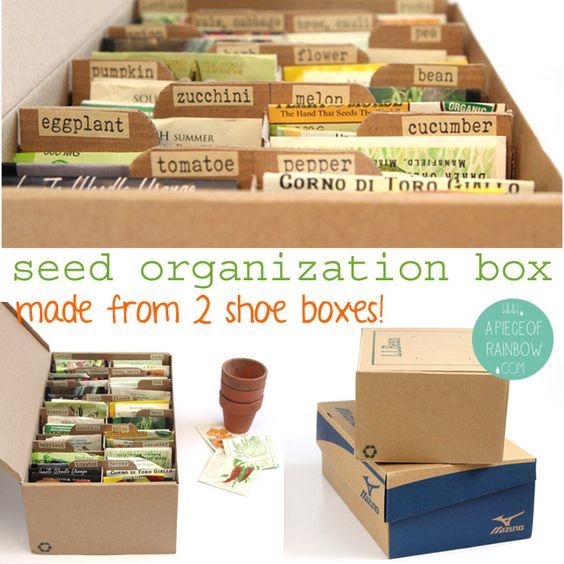
Label Your Seeds
This is important for a couple of reasons. First, many of the tiny seeds look alike, at least until you gain some experience. Even then, it’s impossible to tell the difference between varieties of plants. A lettuce seed typically looks like a lettuce seed. Same thing with carrot seeds. You can’t tell the variety just by looking at it.
Another reason that it’s good to label is so that you can practice FIFO – First In, First Out – with your seeds just like you do with your stockpile. Label the container with the seed variety and the year. Some people add a few directions in with the seeds that they’ve gained from experience. It’s even better to start a seed journal to keep track of how your garden grows.
How to Tell if Seeds are Good
This isn’t a perfect indicator, but it’s pretty darned accurate. If you want to tell if the seeds are still good, drop them in water. If they sink, they’re good. If they float, they’re not. Of course, you don’t want to go and get the seeds wet if you’re not going to use them, so just test a few of them. That sounds like common sense, but it’s always better to give too many directions than not enough.
How to Tell How Many of Your Seeds Will Grow
There’s nothing more disappointing as a gardener, or even worse, as a hungry person, than planting seeds that don’t sprout. If you’re depending on your crop to feed yourself and your family, then growing plentiful crops becomes a necessity.
Therefore, you need to know how to tell how many seeds out of a crop are going to grow. You can get a good idea of this by doing a test germination run.
A couple of weeks before you’re ready to plant, put at least 10 seeds from a single batch onto one half of a paper towel then fold the other half of the towel over the seeds. Spray it down with enough water to moisten the towel. It may be helpful to spritz it with a 1:10 bleach to water ratio to keep them from molding.
Place them in the baggie and only partially seal it so that air can still get in. Label the bag and start a record with the date and how many seeds were started. Store it in a warm, dark place and dampen the towel as necessary to keep it from going dry. Within a couple of days, you should start to see germination.
Every day, record how many seeds either germinate or mold and remove those seeds from the bag. All of the seeds will germinate within 14 days if they’re going to.
Next, divide how many seeds germinated by how many seeds you started with and you have a pretty good idea of the germination ratio of your batch. Even if only half of them germinate, but they’re quick about it, you may want to just plant twice the seeds instead of tossing the batch.
If the germination ratio was low and they germinated slowly, you may just want to toss them.

I hope this gave you a good general idea of how to store and ensure the viability of your seeds. If you have any other tips, please feel free to share them in the comments section below.
This article has been written by Theresa Crouse for Survivopedia.


What is with all the ads? I would like to save this article but the ads block out a good portion of the content.
Good Article. Many people never think about seeds being alive and how to keep them that way. The 3 main enemies of seeds are light, heat, and moisture. Eliminate those and seeds will last a long time. If your seeds were obtained commercially, place the seeds and their packaging in a glass jar with a tight fitting lid. This one step will extend the life of the seeds by about 50%. Put the glass jar in a cool, dry, dark place like a basement and you extend the life even more. If the seeds were dry enough to freeze, put the jar in a freezer and you’ll double the life of seeds. The life span of seeds varies a lot–parsnips only last a year, tomatoes last 10-20 years. A very good and inexpensive resource for seed info is “Seed to Seed” by Ashworth. You can get it used for around $10. If you want to be able to save seed in a crisis, start NOW! There is a long learning curve to be able to do it well. I’m a Master Gardener and lifelong gardener, but the first 2 years I saved seed NONE were viable!!
another thing worth mentioning is to save only heirloom seeds. I once grown the nice corn stalks of my life, but they did not produce a single ear of corn. I later learned that hybrid seeds can be come sterile over time..this was long before gmo or the “terminator seeds.
it is fact that heirloom seeds have a long shelf life than hybrids.
I personal like to store my seeds in seal-a-meal bags in the freezer. when I seal my seeds I do not pull a full vacuum, just enough to get the excess air out of the bag. my theory is if I pull a full vacuum It could cause the air in the seeds to be drawn out.as the bag hits equilibrium over time.
they type of freezer is also important. the best freezer for long term storage is one that does not have an auto-defrost. in general I found items I keep in the refrigerator freeze last about 3 months, the deep freezer with auto-defrost last about a year, and items in my manual defrost deep freezer last for years. my second choice, plan b, would be to keep them in the root cellar,