


One of the fringe benefits of being a survivalist is getting to be a shooter as well. I’ve been shooting since I was a kid, and I’ve always enjoyed it. The need to shoot well is central to survival, as far as I’m concerned; and the challenge of learning to shoot well is diverting, as well as excellent stress relief.
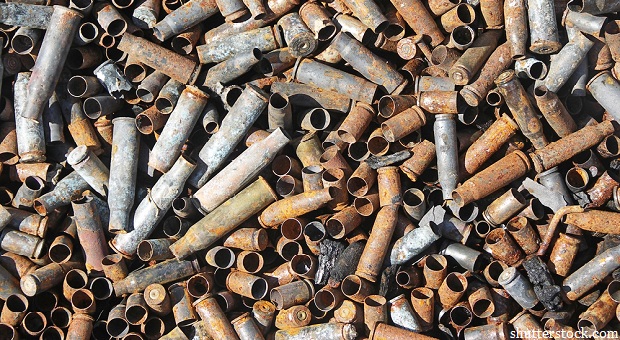
There is one small problem which I’ve always had with shooting; that’s what to do with my spent brass. You know, those coffee cans full of brass cartridge casings and shotgun shells that you have stashed away under your workbench? I hate to throw them away and I don’t have enough time to do enough reloading to use them up. So they tend to collect in my workshop, filling coffee cans.
Part of the reason that I hate to get rid of them is that reloading is part of my survival planning. While I don’t do much reloading, I do have the equipment, as well as a fairly good stock of lead, gunpowder and primers. If we ever get to a point where we can’t buy ammunition anymore, it really won’t be much of a problem for me. I’ll just have to get serious about my reloading.
But there’s another reason I hate to get rid of all that brass; because it is valuable. Granted, the cost of brass is nowhere near the cost of silver, but it’s not junk either. I suppose if I got desperate for a few bucks, I could sell off that brass as scrap metal, but in the meantime, I’ll just hang onto it.
That brass is useful for other things as well. A search of the internet will show you many projects that people have made out of spent brass and shotgun shells. Much of this is just artistic experimentation, consisting of jewelry, pictures and home adornments, some of which is actually quite attractive. But I’m more interested in practical uses for that brass and those spent shotgun shells. While all of these won’t qualify as “survival uses” for that brass, they’re at least useful for something more than decoration.
Working with Brass Casings & Shotgun Shells
Before getting into actual uses for all this brass and all these shotgun shells, I want to talk about how to work with it. That will save me from having to be repetitive later on, as well as saving you from having to read all that repetition.
Brass is a soft, malleable metal. It is easy to cut and form. This makes it useful from an industrial sense. Brass is commonly used for decorative hardware, but is also used for bearings and seals, where a soft metal is used to help harder metals form a seal (more on that in a minute). It is non-reactive and non-sparking, so it is safe to use around flammable liquids, like gasoline. However, it will corrode. It has a fairly low melting point, making it easier to cast than steel or copper. In fact, the only common metals that melt at a lower temperature are aluminum, lead, tin and zinc.
You can cut brass with just about any abrasive cutting method. Brass casings can be shortened by rubbing them on the sidewalk, allowing the concrete to grind off metal. I’ve also cut them off by scoring all the way around with a file, such as the file in my Leatherman Wave. But I prefer cutting the brass with an X-Acto razor saw. I’ve got a small miter box for use with my saw, making it possible to cut the casings off square.
Click here to get your guide to a layered survival defense!
If you need a flat piece of brass for anything, all you have to do is cut off the end of the cartridge case where the primer is. The cartridge case can then be split along its length, either with the saw or with tin snips and hammered flat. For a smaller, thicker piece, forget about splitting it along the length and just pound it flat, giving you a double thickness.
You can drill through brass easily, using just about any sort of drill bit. You can even make holes in it with a sharply pointed knife, simply by pushing the point of the knife into the brass and spinning it. If you don’t have a hammer at hand, just about any rock will work, with a flat rock underneath as an anvil.
Shotgun shells are even easier to cut than brass casings, as they are mostly plastic. You can separate the plastic from the brass by cutting it with a razor saw or utility knife. But if you want to get the most plastic, clamp a clothes iron upside-down in the vice and stand the shotgun shells on it. When the brass warms, the plastic will pull right out. Just make sure to clean out the shells before doing this, so that there’s no residue to catch fire.
Okay, so now that we’ve discussed how to work with it, let’s look at some ideas of what you can make out of all that brass.
Brass Cartridge Cases
I’m going to start out with brass cartridge cases, as there is more useful stuff that I feel you can make out of it. Besides, I’ve got a whole lot more brass sitting in my workshop, than I do shotgun shells.
Fishing weighs
If you need weights for fishing, you can make them out of empty cartridge casings. This is a definite survival use of an empty cartridge casing. Granted, the lead bullet would be heavier, but I wouldn’t want to waste one for this.
To make a fishing weight, start by making a hole through the lip, so that you can take an empty cartridge casing and fill it with sand or pea gravel. Then hammer the opening closed to keep the gravel from coming out, being sure not to block the hole.
Whistle
A whistle can be extremely useful for calling for help in a survival situation. If you don’t have one and can find an empty cartridge casing, a stick and a rock, you can make one. This works best with long casings, like .44 magnum, .357 magnum or .38 special. You can even use rifle cartridges, if you cut off the bottleneck in the casing.
Start by making the notch in the casing. This can be done by cutting it with a razor saw, but it can also be done by rubbing the same spot over and over on the edge of a rock. You want the edge closest to the opening (mouthpiece) to be perpendicular to the casing, while the other side of the notch is somewhere between 30 and 45 degrees.
With the notch cut and the burrs cleaned out, you’ll need to find a stick that will fit tightly when jammed into the open end. It might be easier to find something too big, and whittle it down. Make sure you have a clean cut end, perpendicular to the edge of the stick. Flatten the top side slightly, so that there is a small passage for air. Then, cut the stick off to fit and jam it in the casing.
Dog Tags
Military dog tags were created for identifying people killed in battle. While you probably won’t need them for that, people also use dog tags for identifying lots of other things. These are extremely easy to make out of spent cartridge casings.
This works best with larger pistol casings or even rifle casing. The bigger the casing, the bigger the tag. Start by flattening the casing, all except the primer end. Drill a hole through the flattened open end to put a chain through. Then stamp the information you want into the flattened brass, with normal metal stamps.
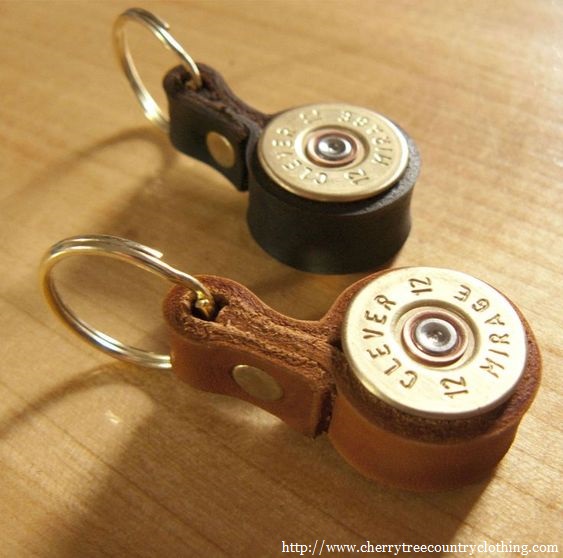
Key Fobs
The dog tags I just mentioned can be used extremely well for key tags, especially if you have a lot of oddball keys you need to identify. The only difference is that you’ll want to put a split ring through the hole in the flattened casing, rather than using a chain.
Push Pins
If you want to give your office a little personality, take some empty cartridge casings and epoxy push pins into them. Something like a .380 ACP cartridge will work ideal for this. If you use anything larger, you’re going to have to cut it down a bit, or put something inside the casing, before the push pin, so that the pin will stick out.
Chimes
You’ve probably seen wind chimes made out of metal tubing. Well, cartridge casings are metal tubing, so they work as well. You’ll want to use the larger casings, from large caliber rifle rounds for this, as smaller sizes won’t produce enough volume to hear.
Not only can these chimes be used to make a relaxing sound, but they have a survival use as well. Attach a small cluster of chimes near the end of a tripwire, to give you a warning when someone is entering your property or entering your camp. They may not even realize that they’ve set off an alarm, as the sound will be pleasant, rather than alarming.
Arrowheads
I’ve seen a number of different ways of making survival arrowheads through the years. But I’ve never seen anyone write about my favorite. That’s to flatten out brass from spent rifle cartridges and cut flat arrowheads from them. The same thing has been done with flattening pennies, but as far as I know, I’m the only one who uses cartridge cases.
The only problem with these arrowheads is that they are fairly soft, so you may not be able to reuse them over and over again, without having to flatten them between uses. But the price is right, so why not flatten them?
Gaskets and Seals
I mentioned that brass can be used as a seal when joining harder piece of metal together. This is essentially using the brass as a gasket. You’ll need to flatten the brass, just like for the arrowheads, and then cut it to the necessary shape. This could save a piece of equipment that has stopped working.
Spacers or Shims
The same brass sheeting that you get from flattening out cartridge cases can be cut to make shims and spacers for equipment. There are many types of mechanical equipment that need to be shimmed to work perfectly. The thin brass from a cartridge case makes an ideal shim when it is cut and a hole drilled through it.
Pointer
We used to do this all the time in the military, usually with a .50 caliber machine gun round. But there’s no reason why you can’t use something smaller, like a .308 Winchester rifle round. The thing is, you need a whole one, so this is a great way of using a dud, that didn’t fire.
You’ll need to cut the cartridge casing in half for this. I have to warn you, this is dangerous, especially if you try to use power tools for it. If you get the casing hot enough, the gunpowder inside will cook off. But if you cut it by hand, either scoring the casing with a file or using a razor saw, there is no risk of igniting the round.
Clean out both ends of the cut in half cartridge to eliminate any gunpowder residue. Then find a dowel rod that’s the right size to fit snugly inside it. You may have to use something that’s a touch too big and whittle it down, but that actually works out extremely well, as it eliminates the sharp exposed edge where you cut the casing.
Glue the dowel rod into the two halves of the casing with epoxy and allow to dry. Finish the dowel rod with stain and varnish, to your personal preference.
Spent Shotgun Shells
We’ve all seen shotgun shell Christmas lights. That seems to be everyone’s favorite use of spent shotgun shells. But there is more that you can do with them.
Red Lens for Flashlight
When I was in the Army, we always used a red lens for our flashlights at night. That’s because the red light doesn’t destroy your night vision, like using a regular flashlight will. You can make a red lens to fit your flashlight out of the plastic from a shotgun shell. Just cut the plastic tube and flatten it by heating it with a heat gun. Once cooled, you can cut it to fit your flashlight with tin snips or an utility knife.
The same idea can be used for using flashlights as signal lights. This allows you to prevent others from messing with your security, by allowing you to pick a series of colors used for flashlight lenses. If Paul Revere had this capability, it might have been, “Red if by land and blue if by sea.”
Lighting for Your Tent
The same idea that works for shotgun shell lights will work extremely well for lighting your tent; you just don’t need as many. I’d recommend using LED lights, run off of a battery, giving you both portability and long battery life.
Survival Candles
Empty shotgun shells can be filled with paraffin and a wick, making a small emergency candle out of them. These burn for somewhere between one-half hour and an hour, depending on the size of the wick used. Since they are enclosed in the shotgun shell, you don’t have to worry about heat melting them and making a mess.
Handles for Stuff
Shotgun shells, especially 12 gauge ones, are an ideal size for handles on a wide range of things. The bright colors also make them highly visible for ease of identification and safety. I’ve used them for homemade tools, large equipment and even where I had something sticking out in my workshop that I wanted to warn people about, like the handle for my reloading press.
To do this, stand the shotgun shell up on its closed end, with the item for it to be attached to stuck inside. You will probably need to support this item in some way, so that it stays straight and doesn’t knock the shotgun shell over. Then fill the space between the two with epoxy, potting the tool to the handle.
Drawer Pulls
The same methodology that works for using shotgun shells as handles will work for making drawer pulls. Cut the shotgun shells off to about an inch long, and stand screws up in them. Then fill the shells with mixed liquid epoxy, potting the screws in place. Be careful not to get any of the epoxy on the exposed screw threads or it will be hard to use them.
Either One
There are also a number of different things that can be made out of either shotgun shells or brass casings. In all but the last of these cases, that’s because the only part that is going to be used is the end of the casing, where the primer usually goes.
Buttons
To make buttons out of casings all you have to do is cut the casings off, then glue buttons inside them. An alternate way is to drill holes in the end of the casing.
Grommets
Brass grommets are great for tarps and a variety of other things. if you cut off the primer end of the cartridge casing or shotgun shell, then pop out the primer, you’ve got an almost perfect grommet.
Bearings
Brass is used commonly as bearings in industrial equipment, especially in cases where metal needs to rub against metal. The softer brass will be damaged by this rubbing, protecting the harder brass of the machine’s components. Either the primer end of the casing can be used for this, or the brass can be melted down and cast to make a bearing, depending on the need.


I can’t believe you have been shooting so long, and you do not know the difference between a cartridge case and a sausage casing! case, case, not casing.
you tell him Reggie