


Did you know that gun grabbing California politicians recently signed laws that say you cannot use more than 50 – 55 gallons of water per day [1]?
Even as expensive and deadly municipal water [2] is shoved down every resident’s throat, they have grossly insufficient water capture rights [3]. When people think of a major crisis, they often limit themselves to thinking about things like hurricanes, wars, or other relatively sudden events that disrupt routines and lifestyles.
As we are learning from situations like California, the collapse of our nation may be slowing up a bit, however there are still major problems and “gradual” disruptions” that drain us of money, time, freedom, and happiness. If you look at laws surrounding utilities such as electricity and gas, you will see some similar patterns to the water rationing in California. First, in many municipalities, if you do not have electricity or are not hooked up to the “grid”, your home will be condemned and you will be evicted from the property you legally own.
Find out our Firefather’s Time-Tested Natural Cures and Household Remedies
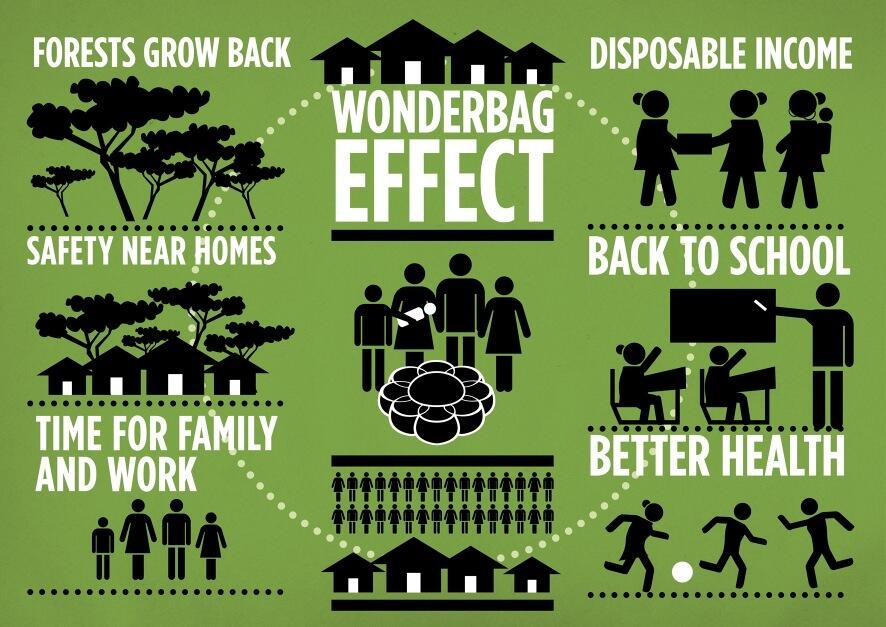
Once you are forced to pay for the energy you use to cook food or keep it cold, rest assured that rationing will follow at some point. This is just one of many reasons why preppers, off gridders, and even those with an interest in environmental protection are looking to wonderbags.
What Is A Wonderbag?
At its simplest, a wonderbag is a well insulated sack that can keep items at their original temperature for hours on end. For example, if you put a bag of frozen vegetables in the sack, they will remain frozen for several hours even without the addition of ice or some other cooler. Likewise, if you put hot stew or some other food in the wonderbag, it will maintain that temperature for several hours.
When it comes to keeping food warm, the ability to maintain a set temperature means that the food will continue to cook. In some cases, this can cut the amount of fuel used in half or more. The drawback, however, is that the food can take several hours longer to cook when compared to applying a constant rate of heat.
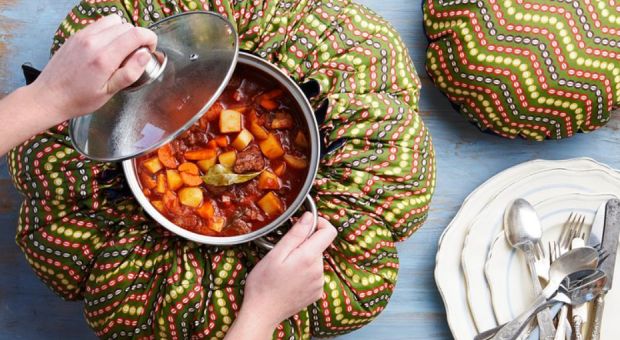
A wonderbag is similar to thermos cooking in the sense that you must heat the food up prior to placement in the vessel, however it does not need to be fully cooked. Because wonderbags can come in all shapes and sizes, however, they are much more flexible in terms of what they can accommodate. For example, you can simply tuck a whole pot of covered stew in the wonderbag and retain the heat from the vessel along with the heat in the food.
By contrast, transferring food to a thermos leads to a loss of the heat that could have been provided by keeping the food in the same vessel. Aside from that, while a thermos can also keep foods cold, they are not always as efficient as wonderbags.
How to Use a Wonderbag
If you are already familiar with thermos cooking, then you will have most of the basics for using a wonderbag. Here are some important things to remember, especially if you are new to heat retention cooking types:
- The foods must be boiled prior to putting them in the wonderbag, and must also maintain a temperature of at least 135 degrees F. The food must be consumed or refrigerated within 2 hours of dropping below this temperature.
- Unlike crock pots and other applied heat slow cook methods, the wonder bag will not lose moisture because the cooking vessel must be tightly sealed. As a result, stews, gravies, and similar food will not thicken as they cook. Be prepared to use less water, and also add corn starch, flour, or some other thickener for recipes that call for a thicker dressing.
- Make sure the cooking vessel itself is not higher than 350 degrees F in temperature. If you wish to use vessels with a higher temperature, you may have to choose different insulation and wrappings for the bag.
- The larger the vessel, the faster it will dissipate heat. It is best to choose a cooking vessel that is just large enough to contain the food.
Basic Materials
There are only three types of material that you will need for the most basic wonderbag [4]:
- Fabric for making the shell – the original designs do not call for anything special in terms of fabric. You can use anything from old shirts, bed sheets, or even old towels. As long as the fabric forms a reasonably sturdy shell, it will do the job.
- Polystyrene Bean Bag Refill – the polystyrene acts as an insulator that goes between the layers of the material used to make the shell of the wonderbag.
- Yarn or Twine – used to make a drawstring.
Constructing A Basic Wonderbag
In order to make a wonderbag, start off by deciding on how large the vessel you will be putting in it. Since basic wonderbags are very easy to make, you can make them in different sizes and shapes based on the vessel design. For example, if you are planning to put a 2 quart round stock pot in the wonder bag, then you would make a wonderbag that is essentially can shaped.
On the other hand, if you are planning to cook in a square or rectangular pyrex bowl, then you would be better off with a wonderbag that has a more square shape to it. The bag should fit snugly around the vessel so that as little heat as possible has a chance to escape the vessel and get into the surrounding air.
As simple as it may sound, there are just three parts to the shell of the wonderbag: a bottom, sides, and top. You can look online for suitable patterns, or you can work based on the shape of the vessel you plan to put inside the wonderbag. If you are using a round pot, start off by making two layers of fabric. Draw around the edge of the pot onto the fabric and remove the pot. You do not need to leave additional material for a seam allowance as the sides of the wonderbag will also be partially under the cooking vessel.
Repeat the same process for the top of the wonderbag and set them aside. To begin forming the shell for the sides, take two layers of fabric and place the bottom of the wonderbag on top of them in the center. Use a yardstick to draw lines from the center of the wonderbag bottom onto the fabric below. When you are done, the fabric should look like there are about 12 spokes drawn onto it. Make sure that the spokes are long enough so that the finished wonderbag will be tall enough to accommodate the sides and top of the vessel. It does not have to completely cover the top of the pot. Leave at least one additional 1 1/2” so that you have room to make a drawstring channel.
Next, you will need to make a circle [5] for the outer edge of the wonderbag sides. Take a thumb tack and put it through the middle of the bottom section of the wonderbag. Make sure that the fabric for the sides is still properly aligned. Use a piece of yarn, string, or thread, and measure enough so that it is long enough to reach the circumference of the new circle. Double this amount and then leave a little bit more so that you can knot the two ends of the string together. Once you have constructed a makeshift compass, make the larger circle and cut the fabric along the circumference line.
Now you can go ahead and start joining pieces together to make the wonderbag. Start off by taking the 2 pieces of fabric for the bottom of the wonderbag and place them so that the outer facing material is facing inward. Sew the two pieces of fabric together all the way around with the exception of a 1 – 2 inch hole. Turn the fabric inside out so that the seam is now located inside the bottom of the pouch. Fill the pouch with polystyrene beans and then sew the hole shut. Repeat the same process for the top of the wonderbag and set it aside.
Take the fabric for the sides of the wonderbag and make sure they are aligned so that the outer facing material is facing outward on both sides. Place the bottom of the wonderbag in the center of the larger circle for the sides. Sew it into place right on top of the two layers of fabric.
Your next task will be to create the pouches that will hold the polystyrene beads in place on the sides of the wonderbag. Simply sew along the spoke lines that you drew earlier. Do not sew along the outer circumference of the circle.
When you are done sewing along the spokes, go ahead and fill the first pocket created by the seams. Leave enough room so that you can still sew the lower seam of the drawstring channel and the upper one. Now you can go ahead and sew along the circumference between the two adjacent spokes that are filled in with beads. If you do not sew these pockets shut as you fill them, the beads will simply fall out.
After you are done filling and sewing the sides of the wonderbag, you can go ahead and sew the upper part of the drawstring channel together. Finally, take a pull through or a safety pin and use it to thread the yarn or twine through the drawstring channel.
To use a wonderbag with this design, all you have to do is put the cooking vessel filled with food into the pouch made by the bottom and sides. Draw the sides up and pull the string to tighten the sides around the cooking vessel. Place the top over the cooking vessel and let your food finish cooking. Do not open the wonderbag until you are ready to consume the food or put it under refrigeration.
Alternate Materials and Things to Try
As useful as wonderbags are, it can take up to 12 hours before the food is ready to consume. Unfortunately, during that time, the temperature may fall below 135 F and increase the risk of food borne illness or spoilage. In a similar fashion, if you are using the wonderbag to keep foods cold, the temperature may also go too high without your knowledge. This is just one reason why you may want to make some changes in the overall design of the wonderbag.
In this case, it would immensely help to have a small window and a thermometer placed below it so that you can easily gage the temperature inside the bag. Today, there are many clear materials that have excellent insulating properties that you can use to make the window. It is up to you to decide whether you would rather have the window on the top area of the bag or on the side.
Speaking of materials, there are some ways that you might be able to optimize the wonderbag so that it either retains heat or cold better. Choose white or reflective fabric for the inside of the wonderbag, and black for the outside if you want to use it for keeping foods warm. From there, all you have to do is use the white or shiny side facing inward so that heat is directed back into the vessel. The outer black shell will absorb heat and keep the temperature at least a little bit warmer around the outside of the bag. Remember, the less of a temperature difference, the easier it will be for the insulation to do its job of preventing temperature equalization between the inside of the bag and the outside.
If you are studying disaster scenarios, then you also realize that you may not have several hours to sit in one location while your food finishes to cook. On the other side of the equation, even a fairly well constructed wonderbag and tightly sealed cooking vessel can fall or spill. It will be to your advantage to choose more durable fabrics that still have good temperature modulation properties. You should also consider creating a shape that will allow you to sew handles into place.
After you gain some experience with wonderbags, it is important to go back and think some more about the insulator you are using inside the bag. Among other things, polystyrene may not be the safest, let alone the best thermal insulator [6]. There are many different materials you can choose from, including natural ones. It would be a good idea to do some research on this topic and see if you can come up with something that insulates better. Do not forget it is also possible to layer materials together to create more effective thermal barriers. While you may have to change the plans for how you sew together the wonderbag, it may be well worth your while.
How to Use a Wonderbag for Cooling
When using a wonderbag for cooling, it can keep items cold or frozen for several hours. As with other coolers, it will always help to have ice inside the wonderbag. You can still use salt in the ice to keep items frozen for longer periods of time. Needless to say, if you do not want melting ice leaking out of the wonderbag, it will be of some help to place it in a bag or container.
From there, simply place your wrapped food or beverages in with the ice.
Using Your Wonderbag With a Solar Cooker
Without learning how to harness the sun for cooking and water purification, you will find it very hard to cut back on utility bills, manage utility rationing, or get through a large scale emergency. While solar cookers and purifying water with UV from the sun are useful skills, they also require staying in one place for several hours at a time. You can cut the time required for preparing with a solar cooker back substantially by placing the food in a wonderbag after it has reached an appropriate temperature. Just remember that it will still take several hours for the food to be ready to consume after you place it in the wonderbag.
If you have ever used a solar cooker or oven, then you already know that the amount of time required for cooking depends strongly on the amount of light available and the time of day. Now let’s say that you know it is going to rain the next morning. This, in turn, means that you probably won’t be able to use the solar cooker to prepare breakfast. If the afternoon is sunny and you are in a good location, you can simply go ahead and begin preparing your breakfast food in the solar cooker. Once it has reached a suitable temperature, simply place the vessel in the wonderbag so that the food will finish cooking overnight.
Integrating Wonderbags With Other Cooking and Cooling Options
As long as you are able to heat foods to boiling in a suitable vessel, then it doesn’t matter what kind of fuel or stove you are using to heat up the foods. By the same token, it doesn’t matter if you took cold food out of a refrigerator or a zeer pot. The insulation inside the wonderbag will still do its job.
That all being said, some care needs to be taken when choosing a cooking vessel. It is very important to choose a vessel with a tight fitting lid. Some people that have used wonderbags claim that metal lids are the best, while others say glass works just as well.
Since I have found mason jars especially useful for solar cooking, I tend to recommend them for use with a wonderbag. They are lightweight, easy to modify (for example, painting them black so they absorb heat better), and have adjustable lids that can fit as tight or as loose as needed for various purposes.
Is it Possible to Bake Bread and Cake Using a Wonderbag?
Given my decided love for bread, cookies, pizza, and cake, it should come as no surprise that this was one of my first questions when encountering wonderbags. It turns out that you can use a wonderbag for baking these delicious foods. Remember, to use a wonderbag, the temperature of the food must reach boiling temperature. In this case, you simply use boiling water as the intermediary to bring the food up to a suitable temperature. While the video presented here uses glass jars and tin foil covers, you can use other vessels. This includes small bread pans or even pyrex bowls with suitable covers that will fit into a pot of boiling water. Just remember to cover them with tin foil and seal the edges so that water and excess moisture do not get into the dough.
https://www.youtube.com/watch?v=t5DHb509-Ds
As an aside, when baking anything that uses yeast as a leavening agent, it is not necessary to place the vessel in warm water as it undergoes the second raising. Remember, the faster the yeast multiples, the bigger the holes it will make in the dough. This can make a mess of both the texture and moisture level in the finished bread. I have found that it is better to let the dough raise a little bit slower the second time around by keeping the dough closer to room temperature. To my thinking, since the retained heat used in the wonderbag will come from boiling the water, there is no need to set the dough in warm water.
Cooking Meat Safely and With Good Flavor in a Wonderbag
In some ways, cooking meat in a wonderbag is similar to cooking it in a crock pot. For the sake of flavor, your best option is to start off by browning the meat. This will also kill off bacteria at the surfaces where they are most likely to be found.
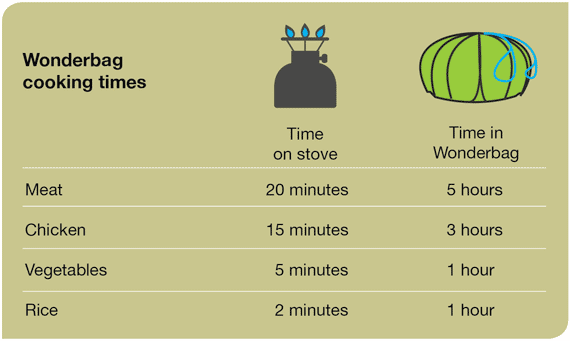
When cooking meat in a wonderbag, the most important thing is making sure that the temperature remains above 135 F. It does not matter if the food remains at this temperature for 4, 8, or even 12 hours. The longer the meat stays in the wonderbag, the more tender it will be. If you tend to like stews or other meat dishes better as leftovers, then you are sure to appreciate the results of longer cooking times in the wonderbag.
How to Adapt Recipes for Use with a Wonderbag
Today, you are bound to find cookbooks for just about every kind of cooking method and style on Earth. If you have some favored recipes, you will find that they can be adapted to use with a wonderbag and still produce good flavors, textures, and aromas.
Here are some basic rules to follow:
- If you love cooking with wine, make sure that the alcohol is gone before placing the food in the wonderbag. This is especially important if you put a lot of wine into the food and do not want to wind up consuming food that will make you, unintentionally, a bit drunk.
- Consider using higher temperatures to bring the food up to the optimal range faster. Since moisture will not be lost in the wonderbag, you do not have to be as concerned with the food drying out during the rest of the cooking process. In fact, you may find this is a better way to keep your original recipe intact rather than trying to figure out how much to cut the liquid amounts by. Unless you are baking bread, cookies, or other pastries which rely on heat for drying, the higher temperatures may work more in your favor.
- Use Rosemary and vinegar in all recipes. Both of these ingredients will inhibit a number of food borne pathogens. Vinegar will kill e.coli while Rosemary [7] will kill off listeria and other pathogens. At the very least, consider marinating all of your foods, including ones to be consumed raw in Rosemary and Vinegar. Given the increase in food borne illnesses, these ingredients may be your best bet against getting sick regardless of whether you use them with a wonderbag or not.
- Don’t use the timetables you are accustomed to. When you use a wonderbag, there is no such thing as the food overcooking or coming out too dry. In fact, the longer the food stays in the wonderbag, the softer and moister it will be.
These days, Californians are probably running around with clothespins on their noses because of laws that may increase the number of smelly people wearing dirty clothes.
Before you wind up facing energy rationing and its impact on food preparation and storage, you can make vital changes today.
A wonderbag is fairly easy to assemble and will last for years. With a little bit of practice and integration with solar ovens and other renewable power devices, you should be able to cut your utility bills by a good bit and still enjoy healthy foods. Improper food preparation and spoilage are every bit as bad, if not worse than piles of dirty laundry and body odor.
Do not wait for laws to be made that limit your electric or gas usage to the point where you have to choose between cooking your food or keeping it cool.

Resources
[1] https://www.wateronline.com/doc/permanent-water-restrictions-approved-in-california-0001
[2] http://www.fresnobee.com/opinion/opn-columns-blogs/article160193829.html
[3] https://bit.ly/2nJpc1K
[4] https://bit.ly/2NZu7pF
[5] https://sciencing.com/make-compass-home-geometry-12082521.html
[6] https://www.thermaxxjackets.com/5-most-common-thermal-insulation-materials/
[7] http://pennstatehershey.adam.com/content.aspx?productId=107&pid=33&gid=000271


In the 1900- 1920’s, these units were built into boxes for portability and sturdiness. They generally were lined with straw or sawdust and were extremely popular.
Have you actually tried this, I would think that Polystyrene Bean Bag Refill would melt at any temperature that was still cooking the foodl
Why do this? It only takes 15-17 minutes to bake bread in an oven. I can understand using this method to cook dried beans or split peas or things that take hours to cook. But bread? Not so sure there’s much savings between boiling for 10 minutes or baking for 15..
Have you ever been in a disastrous situation where there is no electricity for long periods at a time? And prices of utilities is only going up up up.
Hi, I would really not recommend cooking dried beans in this way. Wonderbags and Hayboxes are a form of slow cooking and dried beans, esp. kidney beans, need both soaking and a period of hot cooking in order to avoid illness due to chemicals in the beans. If you are using tinned/canned beans, they are already cooked and will be safe. If you have pre-soaked and heated a big batch of beans to the required temperature, again they should be safe. If the beans do not reach the required temperature, then they can make you very ill, even if they have been cooked for a long time. I know this from experience.
Grid down situation the aroma of baking bread might draw un-wanted guest
One of the ways I have been using to transport a turkey or other hot food is to take heavy aluminum foil and place paper towels between to sheets. Seal the ends and place the pan or baking dish with the hot food in the center of the aluminum sheet. Wrap tightly and you have an insulator that will last for 3 hours plus. Be sure to cover the food befor wrappin it in the foil.
Downside of foil: not recyclable. We need to use less of these type of things.
Could you actually use the ring (outer part of the jar lid) instead of the rubberband with the foil?
Have been making them for many years. You have to place a kitchen towel, card board or newspaper at the bottom before placing your hot pot. Keeps food hot for few hours.
Very interesting concept. Thanks for sharing, but can you use something other than those poly beads? They are not very earth friendly.
Wow! I am so impressed with your attention to detail and your mention of alternatives, such as lidded canning jars to avoid spillage when hauling may be important, like in a car and driving up or down steep sloped roads. Wow–your mention of the utility of this wonderbag, that can apply to outdoor cooking (camping) or indoor (home energy savings. And thank you to other commenting people for mention of other ways used early in the 20th Century. I have a vague recollection of last reading about these in the early 1960s and from a Popular Mechanics article *probably from the 1940s or 50). I used to keep those books for decades until now in my last years of life when I need to downsize. my home. I am not the cook nor seamstress of my household, but I will still have to try this out because I live in one of the top 3 coldest winter states in USA., and–by my preference–in an uninsulated 85y/o home. Why an old home, no insulation? Because even homes have to breathe, even through exterior walls, and all air carries humidity with it, so closing off an air space traps moisture that rots walls. This has been proven repeatedly in Journal of Light Construction (home building/remodeling) and Building Science.com; and by the experience of thousands of brand-new home buyers, whose insulated homes in the warm-humid South and Southeast USA states, who discovered rotted walls just a few years after construction..
I will have to review more about polystyrene and at what temperatures it may off-gas fumes, if at all. Anyway, all my devils are in the details. Carmel, you hit a home run, and with bases loaded, with this article. Thanks!