


There is a sheer volume of different scopes and rifles on the market, so it can take some research to figure out which one will best match the types of shooting you intend to use it for.
Some hints can be followed though, so you could choose the best for you.
Read the article below to find them!
Overall, there are three basic steps to take when choosing a rifle scope:
- Start off by deciding what kind of shooting you plan to do.
- Look at basic scope features and make a list of those that will best meet your needs.
- Study manufacturers, models, and testimonials to determine which scope will give you the best quality for the lowest price. Speaking of price, since some scopes can cost hundreds to thousands of dollars. Rather than cover all possible options, I will focus on features that you can get on most scopes for under $500.00.
Two Questions to Ask before Buying a Scope
Why do I need a scope?
A scoped weapon can enhance accuracy over longer distances, improve range estimation, and improve target estimation. That being said, even the best scope cannot compensate for poor shooting technique or lack of practice.
What type of shooting will the scope be used for?
There are three basic types of shooting:
- Target – Consider whether the distance is greater than 100 yards, the size of the targets, and your eyesight.
- Hunting – Think about the kind and size of the game, and the terrain you will be hunting in.
- Self defense – The amount of land you must cover is important. A high magnification scope will not be of use for a small parcel. In this case, you will need to focus on low magnification scopes.
12 Aspects to Consider when Buying Your Rifle Scope
Beside the purpose of buying the scope, you should take into account a few more things before purchasing this item.
Price
A scope can cost anywhere from fifty dollars to thousands, however most people spend between $400 – $1200.00. Here are some of the most important features to consider while you are shopping:
Power Settings (X Settings)
A 10-14x power scope will give you a reasonably clear picture of the target. If you need something clearer for target identification and spotting, move to a 20X or greater.
The better you can see the target the more accurately you can place the cross-hairs as long as you don’t outdistance the rifle’s accuracy range.
For lower caliber rifles, a 4 or 6x power scope will work well because it has a shorter maximum effective range.
When it comes to getting the most from the scope’s power settings, remember that higher power optics also have more distortion from the wind; and mirage will distort the clarity. If shooting from an unstable position, choose the lower power settings to cut down on the target “jump”.
Adjustments
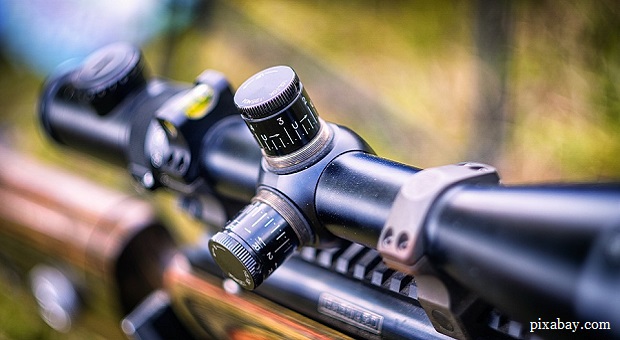
No matter which scope you choose, it should be easy to make sight adjustments. Some scopes you may need a screwdriver to make adjustments, while others may only require turning a knob.
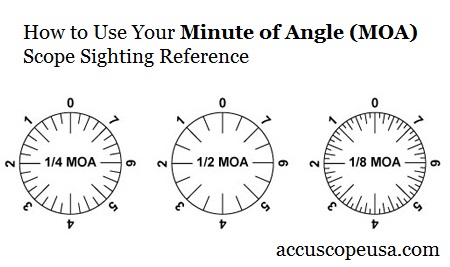
There are scopes that use ¼ MOA, ½ MOA, or 1 MOA adjustment increments. Some scopes also have bullet drop compensators. They have bold numbers on them that once zeroed will act as a guide for which yard line equals what scope setting to use.
Good bullet drop compensators have a fine tuning of ¼ MOA or ½ MOA for more accurate adjustments.
Durability
If you drop your scoped rifle, it is always important to re-check the zero before any serious shooting is done.
If the scope can’t hold a zero, or there isn’t a distinct click when turning the adjustment knob, or the scope body is bent, don’t use the scope. Even though most scopes are built to take rough (but not abusive) handling, it is still important to examine the warranty details as well as what is required to keep the scope in good condition.
Reticle
There are many reticles that are commonly used in scopes. They are Cross hairs, Dot, Mil-dot, BDC, and Duplex.
- Cross hairs – This is an older reticle that uses one horizontal and one vertical line that cross in the center to make the aiming point.
- Dot – Uses just a dot in an open circle to tell you where the target is. This reticle may also include cross hairs to extend through the full field view.
- Mil-dot – These ballistic reticles are measured in Miliradians (Mrad) At 100 yards 1 Mrad = 3.6”. At 1000 yards= 36”. This reticle was designed for the military as a ranging reticle and doesn’t use MOA. It is used to give the shooter the approximate size and distance of the target as well as the bullet drop. Some hunters use this reticle type for extreme long distance hunting shots with excellent results.
- Duplex – Uses thicker lines that thin out to draw your eye to the center of the cross hair. This is the most popular reticle for hunting, and is also considered useful for general purposes.
- Bullet drop compensation (BDC) – This reticle will give your true point of aim for a known distance to compensate for bullet drop. It is an excellent scope for long range hunters.
Low light capabilities
In low light conditions, the target may be visible, but not the cross hairs. To resolve this problem, choose a scope with an illuminated reticle (ILR). There are different types of (ILR) scopes.
Depending on manufacture, the scope may only light up a red dot, the center cross hairs, or the entire reticle.
Size of the objective lens
The larger the objective lens, the more light that you can gather into the scope, which makes longer cross hairs more visible in lower light conditions.
You will also have a larger field of view, especially in the lower power settings. If you do choose bigger objective lenses, however, remember that you will need higher scope rings, and possibly a higher cheek piece.
Accessories
The following accessories should be bought as a package to insure they are correct for the scope you intend to buy:
Bases
- One piece – The one piece base is made of a single piece of metal. It is better than a two piece base because it flexes less and also keeps the scope and rifle together better. This enhances your ability to shoot tighter groups.
- Two piece – This base is made of two pieces of metal. It won’t give good consistency, and will also flex more.
- Tapered and flat – This base will be needed for longer ranged shooting. Some scopes run out of adjustments for elevation after 500 to 600 yards. A base that is tapered to approximately 20 MOA enables the shooter to save some elevation adjustments on longer ranged shots.
Rings
- Use a good quality ring that will not strip out easily if you need to change it or readjust it.
- Always use hex head screws over Allen screws. The hex head screws are stronger and will not strip out as easily as Allen screws.
Scope covers and flip up caps
- A good scope cover or flip up cap is a necessity. It keeps the scope lens and scope body protected from dirt and dust.
- If the scope cover is padded, it can give some protection to the scope if it’s dropped or bumped.
Shooting data information cards
These cards give you a good point to experiment with rifle loads to get the optimal performance. They should have the following sections listed on them:
- Date, time, and location where the shooting took place.
- Type of rifle and scope used.
- Type of ammunition used.
- Distance shot to target.
- The altitude, humidity, and barometric pressure of the area you were shooting at.
- The temperature of the location you were shooting at.
- Number of shots fired.
- Record the elevation and windage adjustments used on the scope from the scope’s known zero.
- Your call of each shot as to where it hit the target (on target, pulled shot up, down, right, or left).
- Type of targets used.
- Light conditions when shooting.
- Record the speed and wind direction of each shot.
- Notes section used to record other important information dealing with that day’s shooting.
How to Setup a Rifle Scope
Let’s say you bought your prefered rifle scope and now you want to make use of it. You need to set it up first, and here’s what you need to do.
Mounting the scope to your rifle
Buy scope bases and rings that are compatible to your rifle. When using scope rings, remember the inside diameter of the rings must match the outside diameter of the scope. Mount the rifle base and rings to manufacturer’s instructions.
Setting up your scope
Before you can use any scoped rifle, it must be setup correctly. The first thing that must be adjusted is the reticle and the eye relief.
To adjust the reticle, loosen the mounting rings a bit and turn the scope until the reticle is upright and centered. Once the reticle is in the proper position and you can see normally in the firing position, lightly tighten down the rings to hold the reticle setting in place.
The eye relief is properly adjusted when you see the target clearly through the scope when they eye relief is 3 – 6 inches from your eye. On most scopes you will have to move the entire scope back and forth through the scope rings slowly to get the correct sight picture.
After you have set the reticle and eye relief, apply Loctite to the lock ring screws and firmly tighten the mounting rings.
Scope adjustment knobs
On most scopes, there are two and sometimes three control knobs that must be adjusted to get the scope zeroed in.
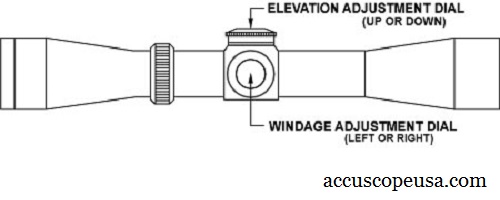
Windage
This knob is usually located on the right side of the scope. This adjustment moves the reticle from side to side to compensate for the blowing wind and any effects the wind has on bullet travel.
Elevation
This knob is located on the top of the scope and allows you to control the adjustment of the reticle up and down. On long shots, the reticle will need to be elevated slightly to make the bullet travel further.
By adjusting the the elevation, it is possible to bring the target back to zero even though the bullet must travel in an arc to get there.
Parallax
Scope manufactures usually set their scopes up to aim properly out to 100 yards. If you are not using a zoom scope or other ways to increase the magnification, your scope will not have a parallax knob.
If you are using high magnification on the scope, there should be a parallax knob located on the left side of the scope.
You will only need to make parallax adjustments at higher magnifications if the position of your eye changes to see clearly though the scope while keeping your aim on the target.
Sight picture
Before firing the rifle your sight picture should be perfect. To check the sight picture of your scope:
- The reticle should be upright and centered.
- The target should be crisp and clear. Any black on one side or the other should be symmetrical.
- If any of these properties are not exact, readjust them now.
- Check to make sure your eye relief setting is correct. If you feel the eye relief is too close, this is the time to add another inch to be on the safe side. Remember, you will not want the rifle’s recoil to push the scope backwards into your face.
Basic sighting
In this sighting phase you will be sighting in the target through a scope with live ammunition. At this stage, you might have to make several adjustments before hitting a bullseye. Just take your time and work through the steps until the scope is properly sighted.
Adjust elevation and windage adjustments
Elevation adjustments moves the point of impact up or down.
- Aim through the scope putting the reticle exactly on the target. Before making any adjustments, shoot a 3 shot group.
- If the bullet hits too high, move the reticle upwards. Alternatively, if the bullets hit too low, then move the reticle downard.
- Continue adjusting after each 3 shot group is fired until the bullet hits at the exact height where the reticle is on the target.
Windage adjustments moves the point of impact left or right
- Aim through the scope putting the reticle exactly on the target. Before making any adjustments, shoot a 3 shot group.
- If the bullet hits to the left, then move the reticle to the left. If the bullet hits to the right, adjust the reticle to the right. Keep firing and adjusting until the bullet hit is at the exact center of the target.
Zeroing in
- Place the rifle in on a rifle stand so it will not move. Use the adjustments on the stand to zero the reticle onto the target.
- Just like basic sighting, fire a 3 shot group, and check the results.
- Use the elevation and windage knobs to zero in the scope.
- Fire as many shots as needed until each shot is hitting consistently in the center of the target.
- Once the scope is properly sighted, you should hit the bull’s eye. In the field, if you keep the rifle perfectly aimed and still, all of your shots will be directly on target and zeroed in.
Preset scope adjustments for non-zoom scopes
If you are going to shoot targets at a certain distance, it will be to your advantage to zero in the scope for that distance.
- Set up a target at the required distance.
- While the rifle is on a stand, adjust the reticle to compensate for the bullet arc. Once you make this adjustment, you will not have to guess how much elevation to add in order to make the shot hit in the center of the cross hairs.
Preset scope adjustments for zoom scopes with parallax adjustment knob
- Set up a target at the required distance.
- Once again, set the rifle on a stand and adjust the reticle until you see it and the target clearly at the desired magnification and distance.
In conclusion, now that your scope is mounted and zeroed on your rifle, it is time to practice with it at many different distances.
This will help you to learn the capabilities of the rifle and scope. If you want to be a better shooter, there is still no substitute for practice and patience. These are the skills that save your life!
This article has been written by Fred Tyrell for Survivopedia.
References
http://www.accuscopeusa.com/using-your-accuscope-chart.html


I have always been partial to Leupold scopes. excellent glass, tough and a lifetime warranty. In order to keep up with the “Scope Wars” they have have to add more whistles and bells to their line of scopes. Most of these are not needed by the vast majority of shooters/hunters. The Rifleman model is what made the Leupold name. 30+ years ago They were the only model available. Vari-x meant variable power. They are an excellent value hundreds of dollars less than “tactical” scopes. same quality as they were many years ago. My favorite is the 21/2x 12. 2 1/2 is basically no power for heavy woods, 12X for long shots.
Sight in TWO shots. sturdily sandbag the rifle. fire the first shot. do not touch the scope. re-sandbag the rifle. put the cross hairs on the first bullet hole. (careful you don’t move the rifle) now just crank the cross hairs to where you actually want the bullet to print. thats it! your third shot will be real close to zero. if not, repeat the steps.
I’m a little confused about your windage and elevation adjustments. On the elevation adjustment knob, there is a ‘U’ and ‘D’ for up and down. On the windage knob, there is a ‘R’ and ‘L’ for right and left. When my shots are high, I turn the elevation knob in the direction of the down arrow and reversed if my shots are going low. Same with windage. If my shots are going right, then I turn the knob in the direction marked left. In your directions, it seems like you are doing the opposite?
Also, the first thing I do after mounting the scope is to bore sight it to get it close and save on ammo while sighting it in. I also shoot first at about 25 yards to make sure I’m ‘on paper’, again to save ammo. Once it’s dead on at 25 years, then I move out to 100 yards to finish the project. I usually sight in all my rifles at 100 yards, even my hunting rifles, as I seldom take a shot at more than 200 yards, more likely at 100-150 yards.
ironically there is one issue this article doesn’t address, that is that a scope will not make you a better shooter. what will is practicing the 4 basic fundamentals. that being said, most if not all of the info put out is factual and very informative.
Marty, Fred’s explanation is technically correct. If your ‘point of aim’ with the gun sights on the bullseye results with the bullets hitting (point of impact) too low, you want to move the sight picture/cross hairs lower, so when you put the sight picture back on the bullseye the barrel is automatically coming up to compensate for the previous low shots., and conversely. similarly with left/right manipulations on the windage knobs.
he’s just not relating it to the knob designations.. The knob designations indicate which direction you want the point of impact to move to.. up down, left or right.
After doing it a lot it becomes second nature to sight in a scope. . I can usually do it in three or four rounds if I go out and measure the exact distances to the bullseye on the paper, and have a good scope with 1/4 inch adjustments.. But I never start out at 100 meters because the error probability of other gun and barrel related factors is too sloppy. Especially with non one inch MOA barrels..
wiith a scope mounted flat top AR I benc/zero it to an inch high bullseye zero at 40 meters. which by the way, should keep ;it within 2-3 inches aiming dead on with out adjusting the cross hairs for each shot all the way out to over 200 meters.. This is known as the CQB setting for AR-15s with crosshairs or 2/3 MOA dots.. So that all you do is aim CM (solar plexus) at any distance out to 200m and its a killshot. At three hundred meters you aim where the bottom of the neck attaches to the body and you get the CM hit.
Yes Mahatma, I kind of figured what he was getting at, as that’s how I adjust metalilc sights. I just thought for those new to telescopic sights, it might prove to be a little confusing.
Nice buying guide, thanks! The experience hunting with a scope instead of plain sight is incredible