


There is no question that soaring fuel costs make it harder than ever to provide hot water and heat for household needs.
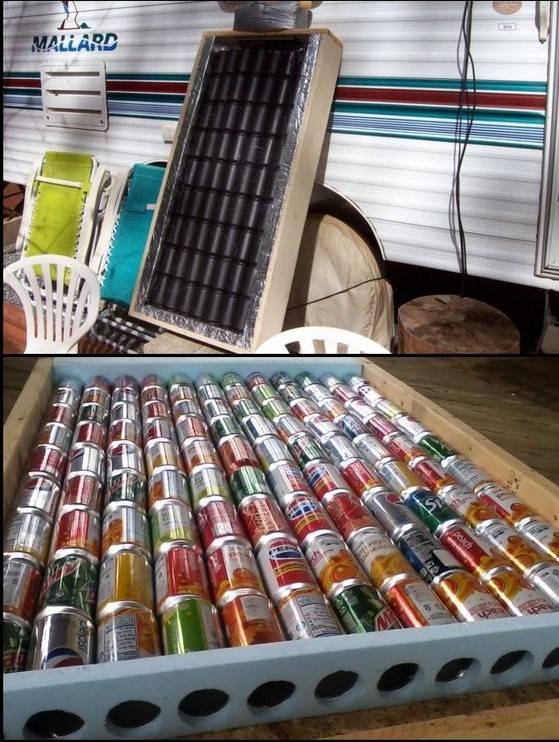
As strange as it may sound, you can build a comprehensive heating system with soda cans as the primary material in the system. Unlike expensive solar panels that may be damaged or destroyed during an EMP blast, or that cannot be easily repaired when they break down, a soda can system will run as long as you have sunlight. You can also adapt this method for use with other metallic food cans, or other metal materials that conduct heat readily and absorb it easily from the sun.

The purpose of a soda can solar heater is to use the capture and concentrate radiant, or heat energy from the sun and transport it to another location, such as a room in your home. Even though the capturing devices are referred to as “solar panels”, they bear no resemblance to the panels used to generate electricity. While you can harness soda can solar panels to generate electricity (ask Carmela about those experiments), a number of additional steps are required to generate electricity. Fortunately, simply generating heat for cooking, heating up water, and heating a room is a good bit easier.
In order to produce enough heat for these purposes, you will need to build one or more soda can collectors and then connect them together to form a solar furnace. A solar box heater can be very inexpensive to build, use, and maintain. That being said, you must still take some care when building the system and setting it up so that you get the most from each part of the system.
Pre-Building Steps
Before you begin building a solar system, you must be aware of its limitations. Aside from rainy days, you may not get as much heat from the system as the sun’s angle of light changes through the seasons. In order to ensure the system works at optimal level year round, you may need to build solar panels that can be tilted easily or adjusted to catch as much sunlight as possible, or put them in different locations. You may also need to use various insulators so that as little heat as possible is lost in the solar panels themselves, and as they are transmitted to the area you want to warm up.
Here are some other vital steps that will improve your odds of success:
- Ideally, solar panels should be installed facing the south, south east, or south west. Try to choose an area that is not obstructed by trees, buildings, or anything else that will cast a shadow during the critical day hours.
- Do a thorough study of your home’s insulation status. Be sure to find all sources of heat loss in the home, and do what you can to correct them. Even if you don’t go through with building and operating a soda can heater, these steps will still save you money no matter what method you use to heat your home.
- Pay careful attention to windows and doors. To keep from losing heat from around the windows, use silicon caulking around the outside window to seal all leaks. Next, use vinyl sheeting to cover the window and the frame.
- To keep from losing heat from around doors, use silicon caulking around the outside frame to seal all leaks. You can also use door weather stripping on the door and the area between the frame and the door proper.
Some Things to Watch For When Operating the System
This solar heating system does not have a way to store heat after making it. When it’s sunny, the system will make heat, but it must be used instantly for heating. If the sun doesn’t shine, you will need to block the solar collector’s incoming air supply. If this isn’t done the room will begin to cool off. You will also need to install a cutoff valve to reduce heat loss as much as possible.
CLICK HERE to find out about how to produce your own energy when the power grid goes off!
As a variant to this system, you may want to consider installing water pipes, a hot water storage tank, and radiators to further extend the heating range of the system. Because you will be dealing with hot water, steam, and the possibility of increasing air pressure in the system, this topic is beyond the scope of this article. You can still get started with this air heater, and then add to it later on as your skills develop.
How the Air Based Soda Can Solar Heater Works
To begin, a fan in the room you want to heat up pulls cold air from the room and pushes it into the bottom of the solar panel. Regardless of outdoor temperatures, black objects will absorb heat more readily than other colors. The black soda can heater, as a result, will heat up very quickly. The air passes through a filter and goes through a one-way-pass-valve, to distribute the air throughout the solar system. If the solar cells are constructed correctly there should be no hot air escaping which could cause fogging and the deposit of dust on the inside of the panel glass. Remember this is a closed air system and must not have any air leaks. If there are air leaks, they must be found and sealed off for best efficiency.
Within the solar panel, you will also need to build air directing compartments made from the 1”x6” wood. These boxes are strategically placed so that air from the bottom, or cold air inlet is channeling into the solar cells made of soda cans. Once the air comes into contact with the hot cans, it will warm up and raise up to the top outlet that leads back into the room.
Although the solar panel itself uses the sun for heating, you will still need electricity to run the fan that circulates the air into the system. It is up to you if you wish to power the fan using an electric generating solar cell, a windmill, or some other means.
Materials Required for Building a Soda Can Heater
 Here are the basic materials. Regardless of the size of the system or the number of panels, the parts list and tools will be pretty much the same. You may need to change some items based on availability and design interests that you may have in mind. For example, you may want to use car exhaust pipes in place of soda cans, food cans, or other materials.
- Soda Cans – The number of soda cans needed will depend on the size of the solar panel. You will need to use aluminum cans, not ones made of plastic or other materials. It is also a good idea to keep all the cans the same size.
- Front glass – If you are making a small solar unit, you can go ahead and use a double paned window. Alternatively, for this and larger sized heaters, you can use Plexiglas, polycarbonate, or tempered glass. Depending on the material, you may need additional bracing to reduce the risk of breakage.
- Wood, Insulation, and Other Building Supplies – Use 1/4” thick plywood for solar panel housing back.
- .8” thick rock wool or styrodur (fireproof insulation board) to insulate the back of the solar collector.
- Fireproof foam insulation.
- Metal duct tape for final sealing.
- Flat, black enamel high temperature spray paint to paint the exterior the soda cans and to paint inside of solar panel box.
- High heat resistant silicone adhesive to 400 degrees or higher.
- 8 (per unit) – 1×6 boards to build solar panels and upper and lower collector housings.
- 2.5” vents for bottom intake vents. Use multiple units so that you can shut one or more off as needed to control air flow.
- 3” vent for top outlet. You can also use multiple units here to help control air flow.
- Screen material for the outside intake(s) to keep bugs and other airborne matter out of the intake vents.
- Fan for pushing air into the bottom inlet. You can use anything from battery operated computer power supply fans to just about anything else that you want to try. Smaller battery fans will be easier to operate using solar panels and other off grid options, however they will move less air into the system. There is no escaping the need for larger fans to create enough air circulation to heat larger rooms. You may also need to run a ceiling fan to push the warm air coming in from the system back down to the living area.
- Screws and nails to fit construction project.
- Thermostat to fit the size of the solar system.
Needed Tools
- Heavy work gloves to protect against very sharp aluminum cuttings or glass fragments.
- Goggles, and ear protection devices if you will be using power tools.
- Screwdrivers or electric screwdriver with proper bites.
- Electric drill with a 2 5/8” bore hole bit and bit set.
- Power circular saw, hand saw, or jig saw for wood or metal cutting.
- Metal punch to cut holes in cans.
- Tin snips to cut soda cans.
- Hammer, pliers clamps, square, measuring tape, and pencils.
- Vice or other device that can be used hands free in order to restrain the can while you are cutting it.
Building the Solar Furnace Box
WARNING! Always wear heavy work gloves when cutting and bending soda cans.
Be extremely careful when prepping the soda cans! This procedure can be very dangerous if you aren’t paying attention or become careless. Depending on the size of the system, you may need to cut up several dozen to hundreds of cans. You are better off cutting just a few cans a day rather than winding up with an injury. As fragile as modern soda cans are, the walls will still produce very sharp edges when cut. These edges can cause deep cuts and other hand injuries. As you cut you may also wind up snipping off very small pieces that are just as bad as slivers of glass or wood splinters. Never remove pieces of soda can or debris with your bare hands. If you must bend any parts of the soda cans, use pliers for safety sake. In addition, the weakness in these walls also means that the can can crush inward while you are modifying it.
Cleaning And Prepping The Soda Cans
Once you have enough cans assembled for your project, you will need to wash them thoroughly to remove any liquid, and then let them dry. The cans must also be free of dents, tears, or cracks. Next, sand the cans to remove the outer labeling, and generate a rough surface that will enable the black high temperature paint to adhere more easily to the metal surface.
Cutting the Can for Placement in the System
Start off cutting an irregular shape in the bottom center of the can. You can use a star shape or anything else that will produce a disruption in the air flow. Your goal is to make sure the air moving through the cans is pushed onto the sides where it will heat up before it finishes moving through the system.
Next, remove the pop top of the can. The easiest way to do this is to take tin snips and cut into the top of the opened pop top. Make a star shape towards the outer edge, and then carefully push the metal tabs down into the can. Do not remove below the thicker metal on the can where you drink from. You will need the indented area to support the next can that will be placed on top of it. Each can should be stacked with the bottom end fitting into the top end of the can below it.
Gluing And Sealing The Cans Together
Now that the cans are ready to place in the system, it is time to seal them together with the silicone high temperature adhesive. To start building the soda can tube, take the first can and align it so that it is sitting on its bottom. Apply adhesive completely around the bottom lip of the second can. Now place the bottom of the second can so that it sits on the top portion of the can below it. There should be no air leaks or holes in the sealant between the two cans. Continue doing this until the metal tube is the correct length for your solar panel.
As you continue gluing cans together, they may start to slant and develop curves. As you work, stack the cans between two boards making a “L” shape so that they stay straight. Once the column of cans is dried, you can remove it from the form. It will take about 24 hours for the adhesive to dry.
Constructing the Air Intake And Exhaust Junction Boxes
Before you start constructing the box, make sure that all wood is painted with the same black paint you used for the cans. To make the top and bottom of the intake and exhaust junction boxes, you will need to drill holes in the top and bottom boards to enable air to pass in and out of the can columns between them. You can take single cans and arrange them along the board, leaving about an 1 1/2” between each can. This will help ensure that the board does not crack or become too weak between the cans. Draw a circle where each can is sitting, so that you know where to drill the air holes for each column of cans. To drill the holes, use a 2 5/8” drill bit. If the area between the can holes is too thin for your liking, use metal tape to strengthen up these borders. After you complete the bottom manifold, you can go ahead and use it as a template for the top manifold.
Once the manifolds are completed, you will need to build the box that houses the cans and attach the manifolds to it. To do this, take the back panel and add two sides along the length portions of the panel, and then attach just the top manifold. Make sure that the top manifold is about 6 – 8” from the top of the box. Once the top manifold is in place, go ahead and attach the top of the box. Do not forget to match the manifold pattern from left to right so that the columns of cans align properly and remain straight within the panel.
Use 0.8inch thick styrodur or rock wool on the inside of the back panel of the heater and paint it flat black and let it dry. Pay careful attention to the insulation around the solar collector air intake and outlet in order to seal up any air leaks that may exist. These leaks can ruin an otherwise useful system.
- To install the cans, start from the left side of the panel. Insert the top can of the column into the top left hole in the top manifold. Repeat this process all the way across the top manifold.
- Carefully fit the bottom manifold into place. While you are working, gently align the bottom of each column of cans so that it fits into the hole drilled for it.
- Next use silicone adhesive to glue the top and bottom cans in place.
- Continue doing this until all rows of cans are glued correctly in place.
- Now go back and carefully attach the lower manifold to the panel and sides. Once again you will need to allow 6 – 8” from the bottom for the air inlet area.
- After the lower manifold is installed, go ahead and install the bottom of the frame.
Mounting the System
- Most people mount ( 8’x4’ or larger) systems on the exterior wall of the building, with air intake and outlet ducts cut through the exterior wall and into the room that is to be heated. The outlet from the heater will direct hot air to the inside of building by way of the outlet manifold, which is located at the top of the solar heater. The intake air moves cold air through the intake manifold located at the bottom of the solar heater. To do, mount the box to the outer wall temporarily. Make careful note of where the air inlets and outlets need to go so that you don’t wind up making a mistake when you drill, as well as where you will place all the permanent mounting hardware.
- Go ahead and drill both the intake and outlet holes through the wall. Use high temperature silicon to ensure there are no air leaks around the solar collector intake and outlet.
- Next, go ahead and install mounting hooks on each corner of the solar collector so that it can be attached to the wall. For an additional variation, you may want to add a hinge system and additional braces so that you can adjust the angle of the panel for use through the seasons.
- Once the solar heater is installed, you can go ahead and cover the can core and frame with glass, or other transparent material of your choice. Do not forget to caulk the covering into place so that as much heat remains in the system as possible.
- Finish off the system by installing a fan near the bottom inlet and powering it using a method of your choosing.
- Thermostat controls – For large solar heating units, use a differential thermostat that controls the fan. These are available at most electronic component stores. This type of thermostat has two sensors. The first sensor is located inside the hot air opening. The second sensor is inside the cold air opening. When both of these sensors are working correctly, you can maximize outlets so that you get as much heat as possible throughout the heat generating and non-generating hours of the day.
- To help control the loss of heat in this system at night, be sure to install dampeners to close off the intakes and outlets when not in use. These controls should be located inside the room being heated.
- After the solar heating system is installed, test the system looking for air, heat, dust, and moisture leaks.
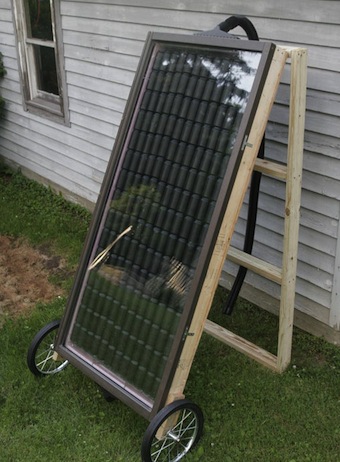
Building A Small Portable Solar Heater
The process for building a portable solar heater is very similar to the one used for a larger system. In this case, however, the frame considerations will be different. You can still use the same process for the internal solar furnace core once you know what size it will be.
Here are some things you may want to try:
- Design this system as an “A” frame. This will make it easier to build a panel that can be adjusted for different angles, or even a series of panels that form a curve around the frame.
- You can also add wheels so that the entire array can be moved from one place to another.
- Use round inlets and flexible piping so that you can easily pipe air into any room or location of interest to you.
As you can see, building and installing a solar can heater is not complicated, however, it can be a bit time consuming. Your two biggest problems will revolve around figuring out how to compensate for daily and seasonal changes in the sun’s position; and drilling holes into your home for the air inlets and outlets. That being said, if you are determined to lower your heating bill and get away from expensive heating fuels, this is a viable option that has worked for people in all areas of the United States.

![[Survival Basics] How To Survive An Impending Tsunami](https://www.survivopedia.com/wp-content/uploads/2019/08/2019_08_10_tsunami.jpg)


Why not use aluminum electrical conduit pipe, much less trouble and not that expensive
Hi Fred, I made a solar unit a few years ago similar to what you describe. Good job. I found that the foam building insulation board I used for the holes for top and bottom cans couldn’t take the heat. The warped badly. I need to retrofit it with plywood or another instead of foam. Too bad, because the foam was so easy to work with. I was not using a fan, just convection to move the air.
Can you provide any type of guidance as to what to expect for temperature gain and airflow?
Could black hose be used? I have seen water heaters that were simply coiled black hose in the sun on the rafters of a greenhouse. They were hooked up to provide hot water to the home and part of the home’s heat.
Instead of drilling holes in the wall. Go to a window and ran both intake and outlet through the window. Extend the intake to the floor and put your fan there to blow cold air out. The hot air will come into the room straight away. You will need to make a seal around the tubs and fill the window gap.
Tell us more about your instruction “be sure to install dampeners to close off the intakes and outlets when not in use. These controls should be located inside the room being heated.”.
Are these electrically operated solenoids? Or strings that pull flaps over the holes?
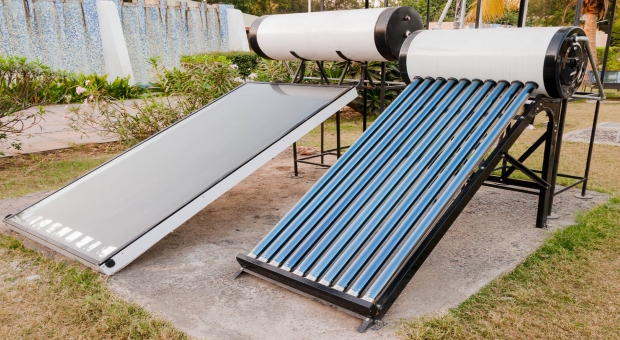
The photo at the top shows 2 types of solar hot water units.
I have one that is similar to the one on the right, which uses double-wall glass tubes with vacuum between the walls, like an open ended Thermos bottle, In the middle of each tube goes a copper pipe, sealed at each end, which contains some water, and air at a lower-than-atmospheric pressure.
The water boils at a low temperature, like those glass, hand-held toys that boil liquid from the bottom to the top.
The copper tubes go into a copper header, which collects heat from the boiled water, and a glycol-water fluid is pumped through the header, and through a coil in the domestic hot-water tank.
Operation of the coolant pump is controlled by the box which contains the pump and controls. A thermistor at one end of the array provides feedback to the controller, which turns on the pump when the array temperature is 10 degrees C above the temperature in the top of the hot water tank.
The tank also contains an electric heater, and a hydronic coil (handy because I have a forced-hot water boiler which heats the baseboard radiators in my house).
I have a switch and relay, so I can select electric or hydronic back-up heat, to top up the tank temperature, at times programmed into the controller.
That way, I have hot water when I need it, with or without solar heat.
So the sun provides some but not all the hot water. Had the system for 10 years, and it has saved me uncounted $$ in oil/electric bills, and it has proven itself as reliable.
Too bad the main thrust of solar energy is grid-tied solar electricity. You don’t get to keep the energy you produce, the panels have limited life-spans and become toxic waste, and worst of all (for me) is the inverters cause horrific radio interference.
Solar heat is a better deal!