


Most of us are used to enjoying a cold brew after a hard day’s work, and it’s a habit that boosts morale and helps close out a challenging day. However, we take beer for granted, like many other things that make our lives comfortable. What will you do when stores are closed, and this commodity will no longer be available? The answer is simple. You make your own!
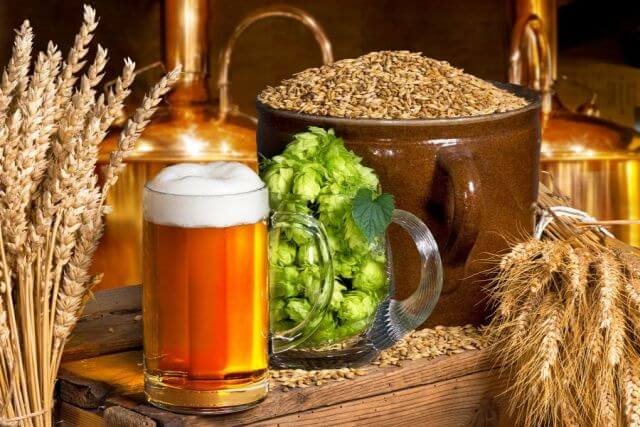
Beer is a beverage that many Americans enjoy, and in the last 30 years or so, it has come a long way from the generic bottles you were used to seeing on the shelf. Nowadays, the beer aisles are packed with all types of beer bottles, and you can pick a German lager, a British ale, the famous Belgian solid brewing, or local craft beer with a fruity flavor.
There are now many brewing enthusiasts in the United States, and everyone gives their twist to the classical beer and the various brewing traditions from around the world. This proves that brewing your beer is not rocket science since many folks are doing it. Even more, you too can make your beer at home and obtain a beverage that has all the qualities you desire.
Putting together a starter kit
Homebrewers use a 5-gallon batch size for their brewing experiment, and this pretty much helps them obtain around 48 bottles of 12-ounces. This is not a large-scale operation, and it requires a minimum amount of space and equipment. You can use your kitchen, or you can improvise a brewery in your garage.

To start making beer, you will need to get a brewing kit, and there are many shops online selling kits containing pretty much everything you need. However, keep in mind that such kits do not provide a brew pot. Some kits also offer empty beer bottles (usually plastic bottles), so you don’t have to worry about bottling options. In general, the price for a starter kit is somewhere between $40 and $200, and if you want to get a brewing kit with a kegging system, you will have to pay more.
The basic kit you buy should include:
- a plastic bucket (make sure it is food-grade) or a glass carboy in which you will ferment the beer;
- another plastic bucket is used for holding the beer before your bottle it;
- various tubing to move the liquid from one vessel to another;
- a bottle capper;
- beer bottles (depending on the kit).
For your brewing experiment, you can use a 5-gallon stainless steel pot as a brew kettle. In general, 1 gallon of space from your pot is needed for foaming, so keep this in mind if you decide to work with less boiling liquid.
Needed ingredients
To make beer, you need four essential ingredients: malt, hops, yeast, and chlorine-free water.
Malt
Malt is a cereal grain that has gone through steeping, germinating, and drying and is used for brewing or whisky making. The most common malt used by brewers is a barley malt, followed by wheat malt. However, some brewers also use corn and rice grains(unmalted) with their malt. The role of the malt is to supply sugar for the yeast to ferment and provide a distinctive flavor to beer. There are various types of malts available to influence the taste of your beer, for example, caramel and biscuit malt.
For your 5-gallons of beer batch that will provide you with an average-strength beer, typically 5% ABV (alcohol by volume), you will need to use 8 to 10 pounds of barley malt.
Hops
The hopes are the female flowers (cones) of the hop vine, and they contain a compound called “alpha acid,” which gives beer that specific bitterness. The hops have specific glands that also contain oils that give your beer a pleasant aroma. In general, you will need a few ounces of hops (1 to 5 oz.) for your 5-gallon batch, depending on what type of beer you want to make.
Brewer’s yeast
The yeast is needed to ferment the sugars in the malt you’ve picked for your beer, and it is removed from the beer once the fermenting process is complete. It’s one of the main ingredients for making beer, but it doesn’t end up in the final product. For your 5-gallon batch of beer, you will need ½ cup of yeast.
Water
Since beer is more than 90% water, you can imagine that this ingredient is pretty much crucial in the entire brewing process. I’ve mentioned that water should be chlorine-free, and you can even use tap water for brewing as long as you filter the water using a carbon filter. Some folks treat tap water using Campden tablets and if you want to do the same, use one tablet for 20 gallons of water.
Other ingredients
Besides the four essential ingredients listed above, you can experiment with others such as chocolate, coffee, fruits, and even spices. However, do so after you’ve mastered the basic process of brewing since not every experiment will have pleasant results.
Making beer
There are four steps for making your beer, and depending on the available time, needs and resources, you may skip some of these steps.
- Malting – Most homebrewers buy malt, and they don’t bother with producing their own. However, as preppers, we need to consider the possibility of making our malt. To make malt, you need to soak barley seed in water and let it sprout. Afterward, the barley needs to be heated so that the sprouts are stopped from growing. Lightly toasting the husk will turn barley grains into barley malt. Malting can be done at home relatively quickly, but it’s a delicate process with a specific learning curve.
- Mashing – Once you obtain the barley malt, you must crush and soak it in hot water. The liquid you get from the mashed malt is called wort. Mashing can be done using two methods, infusion (which most breweries use) or decoction. Some brewers do this step at home, while others skip it and buy mal extract directly from a maltster. The maltster condenses a malt extract, and you need to add water to it to reconstruct the wort.
- Boiling – After obtaining the wort, you need to boil it to thicken the proteins that would cause haze in the beer and sanitize the wort. Add hops to extract the alpha acid compounds and add that bitterness taste to the beer. If you add the hops early in the boil, you will obtain that specific bitterness, but if you add them at the end of the boiling process, you will obtain a floral aroma due to the volatile oils in the hops being quickly released.
- Fermentation – When you’re done boiling the wort, you need to cool it and add the brewer’s yeast afterward. The yeast will eat the sugars in the worth and convert them into carbon dioxide and ethanol, fermenting the wort into beer.
The brewing processes
Now that you have a basic understanding of how beer works, it’s time to get to work. As a first-timer, you’ll want to follow a well-known recipe (there are plenty available online).
Buy and store your ingredients properly until you are ready to brew. Store the barley grains in a cool and dry place, place the hops in the freezer and keep the brewer’s yeast in the refrigerator.
Before you start your brewing experiment, you need to sanitize everything. Some brewing kits contain a sanitizer, but if that’s not the case, you can buy it online or find one at your nearby homebrew shop. Make sure you sanitize all your equipment, including tubing, fermentation vessel, airlocks, and so on. Otherwise, your beer could be contaminated and will spoil or develop an off odor.
Use sanitizing solution to fill your fermenter and let it sit for about 10 minutes before emptying it. If you plan on using a bucket for fermenting, you can also soak any other equipment in the bucket and sanitize multiple items at once.
After you’re done sanitizing every piece of equipment, heat 1 ½ gallons of water in your brew pot until it reaches a temperature of 160° F. In the meantime, crush the barley grains using a grain mill or if you already bought crushed grain, place them in a nylon steeping bag.
Place the sleeping bag in the brewing pot and steep the grains for 1 hour. Clumps of grains may be forming, so use a spoon to break these up. Use a thermometer to check the water temperature, and you will notice that the temperature will drop once you add the grains.
You will need to maintain a steady temperature (as listed in your beer recipe), so you will have to add heat in short bursts until you re-establish the required temperature during the steeping process. You can do 10 to 20 seconds heat bursts to make sure you don’t overheat the water.
While the grains steep, you can heat 3 quarts of water in a separate pot until the water reaches a temperature of 170° F.
After 1 hour, lift the steeping bag and let it drip into the brewing pot. Take a colander and place it over the brew pot. The steeping bag needs to be placed in the colander, and you will rinse the grains using the water you’ve heated in a separate pot. Make sure the runoff flows into the brew pot.
Once you’re done rinsing the grains, set the colander with the grains aside. You can discard the cooled grains, or you can use them for compost. Some folks even feed them to their livestock.
Now add water to the wort in the brewing pot until you have 3 ½ gallons of liquid. Add half of the malt extract listed in your recipe, stir and heat the mixture until it starts to boil. Once the boiling starts, let it boil for 2-3 minutes, then add half of the hops. Set a timer for 1 hour and add the remaining hops at the time listed in your recipe.
Pay attention and don’t let the volume of the wort drop below 3 gallons. You will have to top it off with boiling water once the volume starts to drop. During the last 10 minutes of boiling, add the remaining malt extract. You can dissolve the malt extract in a clean pot into smaller amounts of wort since this will make it easier to stir in.
After 1 hour of boiling, you have to chill the wort to 68° F, and you can do so by placing the brew pot into a sink filled with cold water. Pay attention since you will have to change the water several times once it starts to warm up. You can add ice to the water in the sink once the wort temperature drops below 90° F.
Once the wort chills, you can transfer it to the fermenter using a racking cane to siphon the wort into the fermentation container. You will notice that a thick layer of hops debris (called trub) will be at the bottom of the pot. You should leave as much of it behind as possible, and don’t worry if some get into the fermenter. It will provide some nutrients for the yeast.
Add water into the fermentation container to have 5 gallons of liquid and aerate thoroughly. You need to provide the yeast oxygen, and that can be done only by aerating the wort. You can seal the fermenter and shake it vigorously for a few minutes to complete the aeration step, or you can use a whish to beat the wort. Alternatively, you can use a store-bought aeration device to pump filtered air into the wort.
Once the wort is chilled and you’re done aerating it, you can add the yeast and ferment the beat at the temperature specified in your beer recipe. Now seal the fermenter and attach the fermentation lock filled with water. Check the fermentation to make sure it bubbles vigorously for a couple of days.
For average-strength beer, the fermentation usually lasts 4 to 6 days, and the airlock should start to bubble more slowly in the last days of fermentation. Make sure you let the beer sit for two days before bottling it.
Bottling your beer
Before you’re ready to bottle the beer, you must sanitize the beer bottles, bottling bucket, tubing, and a large spoon.
In a pot, dissolve five oz. of corn sugar into water and heat to a boil. Add just enough water to dissolve the sugar, boil, cool briefly, and add it to the bottling bucket. Now pour the fermented beer into this bucket and gently stir with the spoon you’ve just sanitized. The corn sugar is needed to restart the yeast and add that specific fizz to the bottled beer.
Begin transferring the beer from the bottling bucket to the bottles, and make sure you leave a small amount of headspace for each bottle. Use the bottle caper to seal your beer bottles as you go. Do not fill all the bottles at once and then start capping them because the longer the beer is exposed to air, the faster it will go stale.
Before doing a taste test, store the bottles at room temperature for at least a week when you’re done bottling the beer. I recommend chilling a bottle overnight before opening it. If the beer it’s carbonated, you can chill the other bottles and consume them as desired.
Concluding
I’ve been experimenting with homebrewing for a few years now, and I can tell you that the process of making your beer at home is not complicated. However, I have to stress that cleaning and sanitation are perhaps the most critical steps when brewing.
When it comes to homebrew, practice makes perfect, and you need the patience to master this skill. However, once you get the hang of it, the beer you make will most certainly satisfy your taste and, unfortunately, will run out quickly.


Very well written article, Thanks Bob!
I’ve brewed beer a couple of times with the extract kits. I’ve always wanted to try mashing barley myself, but most of the books make it seem so complicated I’ve been too intimidated to try. But your article is so well written, I may get brave & try it after all..
Good article, and I’m not even a drinker. Beer and ale were how you survived in times when the sewer was the road, a ditch, or a river. Even today, I won’t drink out of a creek or spring because animals will use it as a sewer. I was raised around livestock and know what they do to water.
To brew is to boil. To make malt, we sprout pop corn (yep, it’s real corn) because it’s too difficult to find good maize and we’re all gluten intolerant. The grain is soaked one time for 45 minutes in a few gallons of water with a capful of bleach. This kills things like aspergillus and other problems. It gets soaked in warm, fresh water. Water is changed twice a day till the peg shows. Then, it’s drained and dried in the oven and the peg knocked off. What little we drink, we like dark beer. Corn will make a cloudy beer, but to us, it tastes much better. It can be ground before brewing, or left whole. Women, the traditional brews in most cultures, usually left it whole.
As for the rest, it’s not different from what Martin Luther’s Kathrine did, or my grandmothers. For winter and summer’s hayfever, ginger was added. Winter, the beer was dark and a little cocoa was added to make Bock. For sourmash, just do like Pappy and beware of nosy cops. It’s an old, traditional American Indian thing, beer and sourmash. niio
I recall when my dad brewed some beer at home, when I was about 15y/o. He followed the same tradition as his father during the Great Depression.. His problem wasn’t the brewing, nor the bottling. It was cleaning up the mess in the basement when the bottles exploded.. He would hear them pop at night, while sleeping. The mess was one thing; the smell in the basement that cannot easily be “aired out” was another. I wonder if the way to start is to pour the brew into a different kind of container that cannot burst (like a stainless pony barrel and then pour a glass full. I recall reading about a guy pressure cooking vegetables for canning with the smallest cooker possible. He said it was easier on him, time wise, to make small “cans” at a time, since his garden would produce just enough fresh vegee’s daily for a small canning batch (of what he didn’t eat).