
Many advances in human society and culture occurred as different groups learned how to mine metal ore and turn it into useful tools.
You need farm tools, weapons, or machines to carry out various tasks, so keep on hand what you need for metal working. If you know how build and use a forge, you’ll have a valuable skill to barter, but also a good start for a business that can help you survive nowadays.
There are several ways to build a forge that will meet most of your needs. Aim to build at least one forge and learn how to use it so that you have a better chance of being able to make and repair metal items in the future.
What is a Forge?
At it’s simplest, a forge is not much more than a place where you can heat metals up in order to soften them for further working. If you define a forge as all the things that you will need to heat, shape, and temper the metal, then there are a few more parts to consider.
For the sake of this article, I am defining a forge as the equipment you use to heat metals only.
Every Forge Must Have These Parts
You need to obtain and maintain a specific temperature to make metal items that will be durable and useful. As a result, there are some parts that every forge must have in order to achieve maximum temperature without compromising safety:
- A place to burn fuel. If the forge is going to use coal, this area might be an open pit or tub lined with fireproof material. Forges that use gas or liquid based fuels may have a cylindrical or square shaped fireproof chamber surrounded by a metal jacket. It should be noted that coal burning forges are better for situations where you need to heat large amounts of metal or produce an unusually large shape such as a sword. Since gas fired forges produce a more even heat and are easier to operate, they are usually better for knives or other small items. That being said, if you are looking to build a highly adaptable forge, coal fired ones will be more suitable for your needs.
- Fuel Inlet – for simple coal forges, you might simply layer some coal in the bottom of the pit, and when more fuel is needed, simply drop it into the burn area. If you are going to use natural gas or propane, then the fuel might be fed into a central chamber via a pipe and nozzle. In a similar fashion, if you are going to use a liquid fuel form, you will most likely want to pipe it in and be able to control the flow via a nozzle.
- Air Inlet or Tuyere – since burning fuel requires oxygen, the forge must also have a means for introducing larger amounts of air. This is usually done via a tube or pipe extending into the main burn area.
- Bellows – in order to reach and maintain higher temperatures, more air needs to get into the burn area in a shorter period of time. Bellows are used to push the air into this area as quickly as possible. Coal burning forges might have the Tuyere located under the burn area, and then a pipe would lead from the bellows so that air comes up from the bottom. Gas burning forges usually have a blower or fan that is used for the same purpose.
Materials in Nature You Can Use to Build a Coal Fired Forge
No matter how experienced you may be as a prepper, there are bound to be things that don’t seem very useful right now that will turn out to be very important later on. A metal forge is one of those items that can easily be left out of your plans, or just as bad, left behind if you have to evacuate.
If you are in a situation where you absolutely need a forge, here are some natural materials you can use to build each part of a coal forge:
- Burn Pit – a pit or even a hole in the ground can serve as a burn pit. You can line the pit with rocks and small stones so that it retains heat better.
- Air Inlet – create something like a Dakota Firepit design so that you have an easy way to introduce air into the burn area.
- Bellows – the simplest form of bellows will only force air into the fire when the handles are compressed. On the other hand, if you are going to forge metal, the supply of air must be steady, yet easy to adjust as your working needs change.
There are two forms of bellows that will be suitable for this task. First, the double-acting bellows is not so different from the simpler form.
You will need animal hide, leather, and other soft material to make the bag and attach the pipe, paddle, piston, valves, and handles. The pipe is a simple hollow tube that you can make from wood, bone, or even sturdy reeds or bamboo. Finally, you can make the paddle, piston, valves, and handles from wood harvested from trees.
The second form of bellows is known as a Fuigo Box Bellows. Unlike the Double Acting Bellows, this form does not require a bag. You can make everything but the sealing from wood.
Video first seen on Cut Marks.
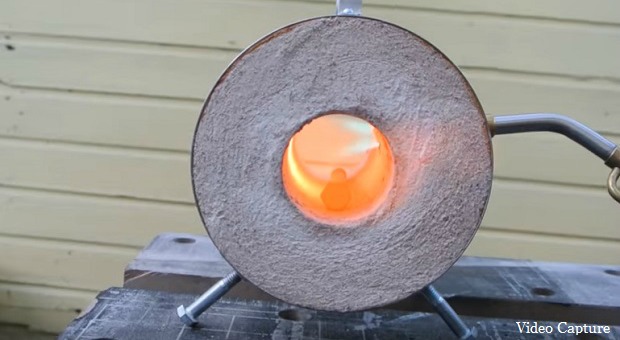
How to Make a Gas Fired Coffee Can Forge
As a prepper, I find no end to the usefulness of institution sized, or #10 food cans. From making large bins for storing devices to building stoves, there is truly no end to what these sturdy cans can be repurposed for. In this case, they serve as the beginning material for a forge that you can make knives, spear points, and many other useful items with.
Here are the basic instructions:
- Start off by making sure the can is clean and dry.
- Most people do not remove the bottom can lid, however having one end of the can closed limits the amount of room you have for heating metal. I recommend removing the bottom lid so that you can extend the metal past the back. While you may have to move the metal back and forth to keep it heating evenly, it is better than having a forge that is too small for anything larger than a 2 -3 inch item.
- Next, attach a base to where the bottom of forge will be. It should be big enough and wide enough so that the can will not roll over. Be sure to use fireproof material. The base should also be sturdy enough so that it will no collapse under the weight of the can, the lining, and any other attachments you will be adding to the can. If at all possible, try to make the base wider than the size of the can opening. When you are working with metal in such a cramped area, it is all too easy to bump the metal or the tongs holding it into the sides of the can. If the base is not sturdy enough or tips easily, it can make for a disaster as well as more than a few injuries. While many videos and “how-to” guides show coffee can forges with substantially narrower bases, it is better to be on the safe side and realize that accidents can and will happen, especially when you are in a stressful situation or working with unfamiliar equipment.
- Take a propane torch and measure the tip of it. You will need a metal pipe that is large enough so that the tip of the torch can fit through it easily.
- Once you locate a suitable metal pipe, drill a hole in the can to accommodate it. If you removed the bottom lid of the can, it might be best to put the hole near the center of the can so that heat will radiate evenly to the front and back of the can. Attach the pipe to the can. The hole should be in an area where you can easily place the torch into the pipe and not have it or the can tip over. If necessary, add a cinder blocks or something else beneath the base of the can so that the torch tip will be at the right height in relation to to the can.
- Even though a natural gas or propane flame produces quite a bit of heat, tin cans aren’t very good at retaining heat. Therefore, you will need to line the inside of the can with fireproof material. Plaster of Paris, cement, and even mud will work as insulators. When lining the can with an insulator, do not forget to leave the hole open for the torch inlet. Try not to get insulating material in the pipe used for this purpose.
Video first seen on Andrew W.
How to Make a Gas Fired Forge From Natural Materials
It is fair to say that a coal fired forge is easier to make mainly because you don’t have to be overly concerned about constructing a viable fire pit. While you will always have to be concerned about the size of the pit in order to conserve fuel, at least you will not have to spend as much time forming a more robust enclosure.
Overall, I would most recommend using fired clay or adobe to make the enclosure for a gas fired forge. When making the enclosure, do not forget that clay shrinks well over 20% from its original size as it loses water. It is better to make the enclosure a bit bigger so that you don’t wind up starting all over again.
Here are some basic rules for making a clay enclosure that can be fired successfully without the benefits of a modern kiln and all it’s heating controls:
- As with any other clay construction that must be fired, always avoid making air pockets in the clay. Pay extra attention to joining areas and overlaps where air pockets are likely to form.
- Don’t forget to poke holes in the clay so that it heats evenly. Since it will be much harder to control the speed at which temperatures change in a field kiln, these holes can reduce the risk of the entire vessel cracking.
- Always make sure the clay is as dry as possible. While moisture isn’t quite as dangerous as air to a clay object being fired, it can still lead to war page and cracking, especially if some areas are thicker than others.
- Try to make the clay thickness as even as possible throughout the vessel.
You can also make the enclosure from slabs of stone and then join them together with mud or adobe. It will take less work than making a clay vessel, however, you must choose the rocks carefully. Porous rocks can retain water and air that will cause them to explode when heated. They may also release toxic gases that can kill you or leave you with severe health problems. Learn about which rock types can be heated safely, and make sure you know how to recognize them in any terrain.
At the same time, you can also learn more about which rocks carry metal ores or point to veins of ore. This is especially important if you wind up in a situation where you don’t have much metal to work with, or the metal is of the wrong type for your needs.
How to Find Fuel for the Forge
You can use charcoal in a coal fired forge as long as you have enough air flowing through from the bellows. Even if you do not have coal, you can still turn wood or other materials into charcoal and use them in the forge.
Insofar as natural gas fired forges, try getting natural gas from large compost piles or septic waste systems, but it can be difficult to store this type of gas and also ensure that you remain safe. You’ll also need suitable piping and a valve system so that you can control the gas flow. To make these, you will need softer metal ores, or, you can start out with a coal fired forge to make these items, and then build the gas forge.
While forges aren’t especially complicated in terms of the equipment used, they are vital for building and repairing metal items.
No matter how far back society slides, the path back up to a more modern lifestyle cannot happen without metallurgy skills. At the very least, if you have metal forging skills, you and your descendants will have a better chance of surviving and thriving after a major disaster scenario.
Grab your tools and start practicing your skills!
Click the banner below for more!
This article has been written by Carmela Tyrell for Survivopedia.
References:
http://www.instructables.com/id/Coffee-Can-Forge/


 POP UP Desktop (931 x 476 px)")
Guy | May 15, 2017
|
I’m sure the videos that are a part of this article, and so many others, would be very useful to a person building today what the videos show. But I am accumulating information for my descendants so a video I can’t save to disk is totally useless to me. If you want the video to supplement the article, fine. But when the article is incomplete without the video, then the article is totally useless!
Carmela Tyrrell | May 15, 2017
|
Guy,
If you have the Firefox browser, you can install an extension (there are several to choose from) that will allow you to save videos in .mp4 or .flv. I don’t use the one on Microsoft or Chrome; but I’d expect they also have add ons or plugins that will do the same thing.
Pingback:10 Uncommon Ways To Generate Electricity For Your Homestead | Survivopedia | October 22, 2017
|